Model #20118-0001 20118-0004 USE AND CARE GUIDE EXPANDABLE TOWEL BAR TOWEL RING TISSUE HOLDER Questions, problems, missing parts? Before returning to the store, call Glacier Bay Customer Service 8 a.m. - 6 p.m., EST, Monday - Friday 1-855-HD-GLACIER HOMEDEPOT.CA THANK YOU We appreciate the trust and confidence you have placed in Glacier Bay through the purchase of these bath accessories. We strive to continually create quality products designed to enhance your home.
Table of Contents Safety Information ....................................2 Warranty ...................................................2 Pre-Installation .........................................3 Planning Installation ..............................3 Tools Required .......................................3 Hardware Included.................................3 Package Contents ..................................4 Installation ................................................5 Care and Cleaning ..................
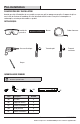
Pre-Installation PLANNING INSTALLATION Before beginning installation of these products, ensure all parts are present. Compare parts with the Package Contents and Hardware Included lists. If any part is missing or damaged, do not attempt to install the products. TOOLS REQUIRED Safety goggles Level Tape measure Electric drill Flathead screwdriver Phillips screwdriver Pencil HARDWARE INCLUDED NOTE: Hardware not shown to actual size.
Pre-Installation (continued) PACKAGE CONTENTS D C B E A F Part Quantity Description A Towel bar post (right) 1 B 3 in. Bar extension 2 C 18 in.
Installation 1 Marking the mounting location 2 Installing the mounting brackets □ □ □ □ □ Remove the set screw (DD) from the base of the product post(s). Place the product in the desired mounting location, using a level to position it accordingly, and use a pencil to lightly mark the outline of the post(s). Center the mounting bracket (BB) within the marked post location(s), and mark where the screw holes will be drilled. Repeat this step as needed for each bath accessory. □ □ □ Drill 1/4 in.
Care and Cleaning □ Preserve the finish of the bath accessory using a non-abrasive wax. □ When using non-abrasive cleaners, rinse off immediately when finished cleaning the bath accessory. □ Do not use abrasive cleaners when cleaning this bath accessory. Service Parts *Towel bar, Rings and Posts are not available service parts. 3 1 1 2 2 1 2 Part 1 Description Mounting hardware (screw, bracket, and plastic anchor) Part Number RP80061 2 Set screw RP50078 3 3 in.
Questions, problems, missing parts? Before returning to the store, call Glacier Bay Customer Service 8 a.m. - 6 p.m., EST, Monday - Friday 1-855-HD-GLACIER HOMEDEPOT.CA Retain this manual for future use.
Modèle n°20118-0001 20118-0004 GUIDE D'UTILISATION ET D'ENTRETIEN PORTE-SERVIETTES EXTENSIBLE ANNEAU PORTE-SERVIETTES PORTE-PAPIER HYGIÉNIQUE Questions, problèmes, pièces manquantes? Avant de retourner au magasin, appelez le service à la clientèle de Glacier Bay de 8h à 18h, HNE, du lundi au vendredi 1-855-HD-GLACIER HOMEDEPOT.CA MERCI Nous vous remercions d’avoir fait confiance à Glacier Bay en achetant ce robinet de salle de bains.
Table des matiéres Consignes de sécurité ..............................9 Garantie ....................................................9 Pré-installation.........................................10 Planification de I’installation .................10 Outils requis ..........................................10 Quincaillerie fournie ..............................10 Contenu de l’emballage .........................11 Installation ................................................12 Entretien et nettoyage ...........
Pré-installation PLANIFICATION DE L’INSTALLATION Avant de procéder à l'installation de ces produits, assurez-vous qu'il ne manque aucune pièce. Comparez les pièces avec la liste du Contenu de l'emballage et la liste de la Quincaillerie fournie. Si une pièce est manquante ou endommagée, ne tentez pas d'assembler ce produit.
Pré-installation (suite) CONTENU DE L'EMBALLAGE D C B E A F Pièce Description Quantité 1 D Montant du porte-serviettes (droit) Rallonge de porte-serviettes de 7,62 cm (3 po) Porte-serviettes de 45,72 cm (18 po) Montant du porte-serviettes (gauche) E Anneau porte-serviettes 1 F Porte-mouchoirs 1 A B C 11 2 1 1
Installation de l'emplacement de Pose des supports de fixation 1 Marquage 2 l'installation □ □ □ □ Retirez la vis de pression (DD) de la base du montant du produit. Placez le produit à l'emplacement d'installation souhaité en utilisant un niveau pour le positionner correctement et marquez légèrement le contour du(des) montant(s) au crayon. Centrez le support de fixation (BB) dans cet emplacement du(des) montant(s), et marquez l'emplacement où les trous de vis seront percés.
Entretien et nettoyage □ Préservez le fini des accessoires de salle de bains à l'aide d'une cire non abrasive. □ Si vous utilisez des nettoyants non abrasifs, rincez immédiatement lorsque vous avez terminé de nettoyer l'accessoire de salle de bains. □ N'utilisez pas de nettoyants abrasifs pour nettoyer cet accessoire de salle de bains. Pièces de rechange *Le porte-serviettes, l'anneau et les montants n'ont pas de pièces de rechange disponibles.
Questions, problèmes, pièces manquantes? Avant de retourner au magasin, appelez le service à la clientèle de Glacier Bay de 8h à 18h, HNE, du lundi au vendredi 1-855-HD-GLACIER HOMEDEPOT.CA Conservez ce manuel pour référence future.