
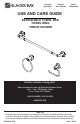
Installation Guide


MOC.TOPEDEMOH 5
.ecnatsissa rehtruf rof 5-HD-GLACIER58-1 tcatnoc esaelP
Installation
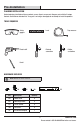
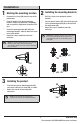
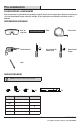
1
Marking the mounting location
2
Installing the mounting brackets
Drill 1/4 in. holes in the previously marked
locations.
□
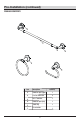
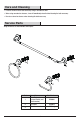
3
Installing the product
Place the post over the mounting bracket (BB)
and secure it with the set screw (DD), as shown.
□
NOTE: When mounting the products to a wood wall, fasten
the mounting brackets (BB) to the wall using the wood
screws (AA). There will be no need for drilling or plastic
anchors (CC).
Push the plastic anchors (CC) flush into the dry wall.
□
Fasten the mounting bracket (BB) to the wall with
the wood screws (AA).
□
□
Repeat this step as needed for each bath
accessory.
□
□
□
□
Remove the set screw (DD) from the base of the
product post.
Place the product in the desired mounting
location, using a level to position it accordingly,
and use a pencil to lightly mark the outline of the
post.
Center the mounting bracket (BB) within the
marked post location, and mark where the screw
holes will be drilled.
Repeat this step as needed for each bath
accessory.
□
Repeat this step for the remaining bath
accessories.
AA
CC
AA
BB
BB
BB
DD
NOTE: The included template (EE) may be used to mark the
mounting locations for the towel bar: A and B for the
18 in. towel bar / A and C for the 21 in. towel bar / A and D for
the 24 in. towel bar.
BB
DD
NOTE: Ensure the towel bar is inserted prior to
securing the second post to the mounting bracket (BB).