Model# 4211N-0001 SKU# 238178 INSTALLATION AND CARE GUIDE TWO-HANDLE LAUNDRY FAUCET Questions, problems, missing parts? Before returning to the store, call Glacier Bay Customer Service 8 a.m. - 7 p.m., EST, Monday - Friday 9 a.m. - 6 p.m., EST, Saturday 1-855-HD-GLACIER (1-855-434-5224) HOMEDEPOT.COM/GLACIERBAY THANK YOU We appreciate the trust and confidence you have placed in Glacier Bay through the purchase of this laundry faucet.
Table of Contents Important Information ..............................2 Warranty ...................................................2 Pre-Installation .........................................2 Planning Installation ..............................2 Tools and Hardware Required ...............2 Package Contents ..................................3 Installation ................................................4 Operation...................................................6 Care and Cleaning ......................
Pre-Installation (continued) PACKAGE CONTENTS F E D C B G A Part Description Quantity A Faucet body 1 B Screw 1 C Spout assembly 1 D O-ring 2 E Connector 2 F Union nut 2 G Hose adapter 1 3 HOMEDEPOT.COM/GLACIERBAY Please contact 1-855-HD-GLACIER for further assistance.
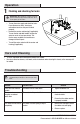
Installation 1 Installing the spout assembly 2 Installing the faucet assembly CAUTION: Always turn off the water supply before removing an existing faucet or replacing any part of a faucet. Open the faucet handle to relieve water pressure and ensure that the water is completely shut off. □ Shut off the water supply. Remove the old faucet. □ Clean the mounting surface. □ Thread the spout assembly (C) onto the faucet body (A) and wrench-tighten the spout assembly (C) to ensure a tight seal.
Installation (continued) 3 Threading the supply lines 4 Soldering the supply lines NOTE: If you want to solder the supply lines, proceed to step 4. □ Attach the supply lines (not included) to the faucet (A): cold to the right side, hot to the left. Slide the union nuts (F) over the supply lines. □ Wrap thread sealant tape (not included) around all the male threads in a counter-clockwise direction, as shown. □ Thread the connectors (E) to each supply line.
Operation 1 Flushing and checking for leaks IMPORTANT: After installation is complete, remove the aerator from the faucet (A) to flush the water lines. Do not lose the gasket (1) in the aerator. □ Turn on the water supply and check for leaks. If you discover any leaks, check your connections to ensure they are installed properly. □ Remove the aerator and housing (if applicable). Turn on the hot and cold handles to allow the water to run for at least one minute.
Service Parts 12 15 11 13 16 10 14 2 9 8 Faucet ID tags can be found by removing the hot water handle 7 6 3 5 1 4 Part Part Number Part 1 Description Screw RP50001 9 2 Handle H RP13438* 10 Connector RP70530 3 Handle C RP13439* 11 Union nut RP56107 4 Bonnet nut RP70532 12 O-ring RP60077 5 Cartridge H RP22005 13 Clip RP70531 6 Cartridge C RP22004 14 O-ring RP60113 7 Seat & Spring RP22008 15 Aerator RP30021* 8 Screw RP50182 16 Hose adapter RP30024*
Questions, problems, missing parts? Before returning to the store, call Glacier Bay Customer Service 8 a.m. - 7 p.m., EST, Monday - Friday 9 a.m. - 6 p.m., EST, Saturday 1-855-HD-GLACIER (1-855-434-5224) HOMEDEPOT.COM/GLACIERBAY Retain this manual for future use.
Modelo núm. 4211N-0001 SKU núm. 238178 GUÍA DE USO Y MANTENIMIENTO GRIFO DE LAVADERO, DE DOS LLAVES ¿Problemas, preguntas o piezas faltantes? Antes de regresar a la tienda, llama al servicio al cliente de Glacier Bay de lunes a viernes entre 8 a.m. y 7 p.m. y los sábados entre 9 a.m. y 6 p.m.(hora estándar del Este) 1-855-HD-GLACIER (1-855-434-5224) HOMEDEPOT.COM/GLACIERBAY GRACIAS Agradecemos la con anza que has depositado en Glacier Bay al comprar este grifo de lavadero.
Tabla de contenido Información importante .........................10 Garantía...................................................10 Pre-instalación .......................................10 Planificación de la instalación .............10 Herramientas y herrajes necesarios ....10 Contenido del paquete .........................11 Instalación ..............................................12 Funcionamiento ......................................14 Cuidado y limpieza ................................
Pre-instalación (continuación) CONTENIDO DEL PAQUETE F E D C B G A Pieza Descripción Cantidad A Cuerpo del grifo 1 B Tornillo 1 C Ensamblaje del caño 1 D Aro tórico 2 E Conector 2 F Tuerca de conexión 2 G Adaptador de manguera 1 11 HOMEDEPOT.COM/GLACIERBAY Para obtener asistencia, llama al 1-855-HD-GLACIER.
Instalación instalar el conjunto del instalar el ensamblaje 1 Cómo 2 Cómo caño del grifo PRECAUCIÓN: Cierra siempre el suministro de agua antes de quitar un grifo existente o reemplazar cualquier pieza de un grifo. Abre la llave del grifo para liberar la presión de agua y asegúrate de que el suministro de agua esté completamente cerrado. □ Cierra el suministro de agua. Retira el grifo anterior. □ Limpia la superficie de montaje.
Instalación (continuación) enroscar las líneas de soldar las líneas de 3 Cómo 4 Cómo suministro suministro NOTA: Si deseas soldar las líneas de suministro, procede con el paso 4. □ Conecta las líneas de suministro (no incluidas) al grifo (A): fría al lado derecho, caliente al lado izquierdo. Desliza las tuercas de conexión (F) sobre las líneas de suministro.
Funcionamiento purgar las tuberías y 1 Cómo comprobar que no haya fugas IMPORTANTE: Después de terminar la instalación, retira el aireador del grifo (A) para descargar las líneas de agua. No aflojes la junta (1) en el aireador. □ Abre el suministro del agua y comprueba que no haya filtraciones. Si descubres alguna filtración, verifica tus conexiones para asegurarte de que estén instaladas adecuadamente. □ Retira el aireador y la carcasa (si corresponde).
Piezas de repuesto 12 15 11 13 16 10 14 2 9 8 Las etiquetas de identificación de la mezcladora pueden verse al quitar el maneral del agua caliente.
¿Problemas, preguntas o piezas faltantes? Antes de regresar a la tienda, llama al servicio al cliente de Glacier Bay de lunes a viernes entre 8 a.m. y 7 p.m. y los sábados entre 9 a.m. y 6 p.m.(hora estándar del Este) 1-855-HD-GLACIER (1-855-434-5224) HOMEDEPOT.COM/GLACIERBAY Conserva este manual para uso futuro.