SKU# 703479 703476 Model# 65202W-7004 65202W-7096H INSTALLATION AND CARE GUIDE SINGLE-HANDLE LAVATORY FAUCET Questions, problems, missing parts? Before returning to the store, call Pegasus Customer Service 8 a.m. - 7 p.m., EST, Monday - Friday 9 a.m. - 6 p.m., EST, Saturday 1-877-580-5682 WWW.HOMEDEPOT.COM/PEGASUS THANK YOU We appreciate the trust and confidence you have placed in Pegasus through the purchase of this lavatory faucet.
Table of Contents Safety Information ....................................2 Warranty ...................................................2 Pre-Installation .........................................3 Planning Installation ..............................3 Tools Required .......................................3 Package Contents ..................................4 Installation ................................................5 Operation...................................................7 Care and Cleaning ........
Pre-Installation PLANNING INSTALLATION Before beginning the installation of this product, ensure all parts are present. Compare parts with the Package Contents section. If any part is missing or damaged, do not attempt to install the product. TOOLS REQUIRED SI LI CO NE Adjustable wrench Silicone Safety goggles Hex wrench (Hex key) Flashlight 3 WWW.HOMEDEPOT.COM/PEGASUS Please contact 1-877-580-5682 for further assistance.
Pre-Installation (continued) PACKAGE CONTENTS A E F G H I J B K C D Part Quantity Part A Faucet assembly Description 1 G Description Washer Quantity 1 B Rubber washer 1 H Coupling nut 1 C Metal washer 1 I Washer 1 D Nut 1 J Nut 1 E Pop-up body 1 K Tail pipe 1 F Washer 1 4
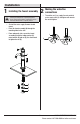
Installation 1 Installing the faucet assembly 2 □ CAUTION: Always turn off the water supply before removing an existing faucet or replacing any part of a faucet. Open the faucet handle to relieve water pressure and ensure that the water is completely shut off. □ Shut off the water supply. Remove the old faucet. □ Place the faucet assembly (A) through the mounting holes in the sink. □ From underneath sink, secure the faucet assembly (A) with the rubber washer (C), metal washer (D) and nut (E).
Installation (continued) 3 Preparing the pop-up drain 4 Installing the pop-up body □ Remove the old pop-up drain and clear up the hole in preparation for the new pop-up drain installation. □ Unscrew the nut (J) from the pop-up body (E), move over the tail pipe (K) and washer (I), then unscrew the coupling nut (H) and remove the washer (G). □ Place the washer (F) underneath the flange of the pop-up body (E). Slide the pop-up body (E) down through the drain hole on the vessel or basin.
Operation 1 Flushing and checking for leaks IMPORTANT: After installation is complete, remove the aerator to flush the water lines. □ □ Turn on the water supply and allow both hot and cold water to run for at least one minute each. This flushes away any debris that could cause damage to internal parts. While the water is running, check for leaks. □ Turn off the water and replace the aerator. Care and Cleaning □ □ □ Do not use abrasive cleaners when cleaning this faucet. 7 WWW.HOMEDEPOT.
Service Parts *Specify Finish 2 1 3 4 5 6 7 11 8 9 10 Part 1 Description Handle Part Number Part RP13069* 7 Description Washer Part Number RP64081 RP64045 2 Set screw RP50002 8 Rubber washer 3 Cap RP80028* 9 Metal washer RP64046 4 Bonnet RP70215 10 Nut RP56026 11 Press pop-up assembly RP40036* 5 Cartridge RP20005 6 Aerator RP30220* 8
Questions, problems, missing parts? Before returning to the store, call Pegasus Customer Service 8 a.m. - 7 p.m., EST, Monday - Friday 9 a.m. - 6 p.m., EST, Saturday 1-877-580-5682 WWW.HOMEDEPOT.COM/PEGASUS Retain this manual for future use.
Modelo núm. SKU núm. 65202W-7004 703479 65202W-7096H 703476 GUÍA DE USO Y MANTENIMIENTO GRIFO PARA LAVAMANOS, DE UNA SOLA LLAVE ¿Problemas, preguntas o piezas faltantes? Antes de regresar a la tienda, llama al servicio al cliente de Pegasus de lunes a viernes entre 8 a.m. y 7 p.m. y los sábados entre 9 a.m. y 6 p.m.(hora estándar del Este) 1-877-580-5682 WWW.HOMEDEPOT.COM/PEGASUS GRACIAS Agradecemos la confianza que has depositado en Pegasus al comprar este grifo para lavamanos.
Tabla de contenido Información de seguridad ......................11 Garantía...................................................11 Pre-instalación .......................................12 Planificación de la instalación .............12 Herramientas necesarias ....................12 Contenido del paquete .........................13 Instalación ..............................................14 Funcionamiento ......................................16 Cuidado y limpieza ................................
Pre-instalación PLANIFICACIÓN DE LA INSTALACIÓN Antes de comenzar la instalación de este producto, asegúrate de que no falta ninguna pieza. Compara las piezas con la sección de contenido del paquete. Si falta alguna pieza o está dañada, no intentes instalar el producto. HERRAMIENTAS NECESARIAS Gafas de seguridad Silicona Linterna Llave hexagonal SI LI CO NE Llave ajustable 12 WWW.HOMEDEPOT.COM/PEGASUS Para obtener asistencia, llama al 1-877-580-5682.
Pre-instalación (continuación) CONTENIDO DEL PAQUETE A E F G H I J B K C D Pieza Cantidad Pieza A Ensamblaje del grifo Descripción 1 G Arandela 1 B Arandela de goma 1 C Arandela metálica 1 H Tuerca de acoplamiento 1 D Tuerca 1 I Arandela 1 E Cuerpo emergente 1 J Tuerca 1 F Arandela 1 K Tubo de extensión 1 13 Descripción Cantidad
Instalación instalar el ensamblaje hacer las conexiones de 1 Cómo 2 Cómo del grifo las tuberías de agua □ PRECAUCIÓN: Cierra siempre el suministro de agua antes de quitar un grifo existente o reemplazar cualquier pieza de un grifo. Abre la llave del grifo para liberar la presión de agua y asegúrate de que el suministro de agua esté completamente cerrado. □ Cierra el suministro de agua. Retira el grifo anterior. □ Coloca el ensamblaje del grifo (A) en los orificios de montaje del lavamanos.
Instalación (continuación) preparar el drenaje 3 Cómo emergente □ Quita el drenaje emergente viejo y limpia el orificio para prepararlo para instalar el drenaje emergente nuevo. □ Desenrosca la tuerca (J) del cuerpo emergente (E), aparta el tubo de extensión (K) y la arandela (I), luego desenrosca la tuerca de acoplamiento (H) y quita la arandela (G). instalar el cuerpo 4 Cómo emergente □ Coloca la arandela (F) debajo de la brida del cuerpo emergente (E).
Funcionamiento 1 Cómo purgar las tuberías y comprobar que no haya fugas IMPORTANTE: Después de terminar la instalación, retira el aireador para purgar las tuberías de agua. □ Abre el suministro de agua y deja correr agua fría y caliente durante al menos un minuto cada una. Esto enjuagará cualquier suciedad que podría dañar las piezas internas. □ Con el chorro abierto, verifica que no haya fugas. □ Cierra el suministro de agua y vuelve a colocar el aireador.
Piezas de repuesto *Especificar acabado 2 1 3 4 5 6 7 11 8 9 10 Pieza Descripción Número de pieza Pieza RP13069* 7 Tornillo de fijación RP50002 Tapa RP80028* 4 Bonete RP70215 5 Cartucho RP20005 6 Aireador RP30220* 1 Llave 2 3 17 Descripción Número de pieza Arandela RP64081 8 Arandela de goma RP64045 9 Arandela metálica RP64046 10 Tuerca RP56026 11 Presiona el ensamblaje emergente RP40036*
¿Problemas, preguntas o piezas faltantes? Antes de regresar a la tienda, llama al servicio al cliente de Pegasus de lunes a viernes entre 8 a.m. y 7 p.m. y los sábados entre 9 a.m. y 6 p.m.(hora estándar del Este) 1-877-580-5682 WWW.HOMEDEPOT.COM/PEGASUS Conserva este manual para uso futuro.
Modèle n° 65202W-7004 65202W-7096H UGS n° 703479 703476 GUIDE D’INSTALLATION ET D’ENTRETIEN ROBINET DE LAVABO À UNE SEULE MANETTE Questions, problèmes, pièces manquantes? Avant de retourner au magasin, appelez le service à la clientèle Pegasus entre 8 h et 19 h, HNE, du lundi au vendredi au entre 9 h et 18 h, HNE, le samedi au 1-877-580-5682 WWW.HOMEDEPOT.COM/PEGASUS THANK YOU Nous vous remercions d'avoir fait confiance à Pegasus en achetant ce robinet de salle de bains.
Table des matières Consignes de sécurité ............................20 Garantie...................................................20 Pré-installation .......................................21 ................21 Outils requis .........................................21 Contenu de l’emballage .......................22 Installation ..............................................23 Utilisation ................................................25 Entretien et nettoyage ............................
Pré-installation PLANIFICATION DE L’INSTALLATION Avant de commencer l’assemblage de ce produit, assurez-vous que toutes les pièces sont présentes. Comparez les pièces avec la liste du Contenu de l’emballage. Si une pièce est manquante ou endommagée, ne tentez pas d’assembler ce produit. OUTILS REQUIS SI LI CO NE Clé à molette Silicone Lunettes de protection Clé hexagonale Lampe de poche 21 WWW.HOMEDEPOT.COM/PEGASUS Veuillez composer le 1-877-580-5682 pour une assistance supplémentaire.
Pre-Installation (continued) PACKAGE CONTENTS A E F G H I J B K C D Pièce Quantité Pièce A Description Robinet 1 F Rondelle 1 B Rondelle en caoutchouc 1 G Rondelle 1 H Écrou d’accouplement 1 I Rondelle 1 J Écrou 1 K Tuyère arrière 1 C Rondelle en métal 1 D Écrou 1 E Corps d'évacuation mécanique 1 22 Description Quantité
Installation des conduites de l'ensemble de 1 Installation 2 Branchement d'alimentation en eau robinetterie □ ATTENTION : Coupez l’alimentation en eau CAUTION: Always turntoujours off the water supply before avant d’enlever un robinet ou de any remplacer removing an existing faucetexistant or replacing part of a n’importe quelle partie du robinet. Ouvrez la poignée du faucet.
Installation (suite) de l’évacuation du corps 3 Préparation 4 Installation mécanique d’évacuation mécanique □ Retirez l’ancienne évacuation mécanique et nettoyez le trou pour le préparer à l’installation de la nouvelle évacuation mécanique. □ Dévissez l’écrou (J) du corps d’évacuation mécanique (E), déplacez la tuyère arrière (K) et la rondelle (I), puis dévissez l’écrou d’accouplement (H) et retirez la rondelle (G). □ Placez la rondelle (F) en dessous de la bride du corps d’évacuation mécanique (E).
Utilisation 1 Purge et recherche de fuites IMPORTANT : Une fois l’installation terminée, retirez l’aérateur pour purger les conduites d'alimentation en eau. □ Ouvrez l'alimentation en eau et laissez couler l'eau chaude et l'eau froide au moins une minute chacune. Ceci purge tous les débris qui pourraient endommager les pièces internes. □ Pendant que l’eau coule, vérifiez s’il y a des fuites. □ Coupez l’alimentation en eau et replacez l'aérateur.
Pièces de rechange *Spécifiez un fini 2 1 3 4 5 6 7 11 8 9 10 Pièce Description Numéro de pièce 1 Manette RP13069* 2 Vis de pression RP50002 Pièce Description Numéro de pièce 8 Rondelle en caoutchouc RP64045 3 Capuchon RP80028* 9 Rondelle en métal RP64046 4 Chapeau RP70215 10 Écrou RP56026 5 Cartouche RP20005 6 Aérateur RP30220* 11 Appuyez sur l’évacuation mécanique RP40036* 7 Rondelle RP64081 26
Questions, problèmes, pièces manquantes? Avant de retourner au magasin, appelez le service à la clientèle Pegasus entre 8 h et 19 h, HNE, du lundi au vendredi au entre 9 h et 18 h, HNE, le samedi au 1-877-580-5682 WWW.HOMEDEPOT.COM/PEGASUS Conservez ce manuel pour référence future.