Model #67070-0801 67070-0808D2 USE AND CARE GUIDE PULL-DOWN KITCHEN FAUCET Questions, problems, missing parts? Before returning to the store, call Glacier Bay Customer Service 8 a.m. - 6 p.m., EST, Monday - Friday 1-855-HD-GLACIER HOMEDEPOT.COM/GLACIERBAY THANK YOU We appreciate the trust and confidence you have placed in Glacier Bay through the purchase of this kitchen faucet. We strive to continually create quality products designed to enhance your home.
Table of Contents Safety Information ....................................2 Warranty ...................................................2 Pre-Installation .........................................2 Planning Installation ..............................2 Tools Required .......................................2 Package Contents ..................................3 Installation ................................................4 Operation...................................................8 Care and Cleaning ........
Pre-Installation (continued) PACKAGE CONTENTS L A M B C D E P N F Q G K O H J I Part Quantity Part A Faucet assembly Description 1 J Description B Plastic washer 1 K Weights 1 Pump 1 1 Quick connector Quantity 1 C Metal washer 1 L D Nut 1 M Body assembly E Flange 1 N Nut 1 F Escutcheon 1 O Bottle 1 G Base plate 1 P Screw 2 H Bolt 2 Q Cap 1 I Mounting nut 2 3 HOMEDEPOT.COM/GLACIERBAY Please contact 1-855-HD-GLACIER for further assistance.
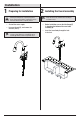
Installation 1 Preparing for installation 2 Installing the faucet assembly CAUTION: Always turn off the water supply before removing an existing faucet or replacing any part of a faucet. Open the faucet handle to relieve water pressure and ensure that the water is completely shut off. □ Shut off the water supply. □ Unscrew the nut (D), and remove the washers (B & C). NOTE: This step is for flange installation (optional).
Installation (continued) 3 Installing the escutcheon 4 Installing the faucet assembly NOTE: This step is for escutcheon installation (optional). If the escutcheon will not be used, install the faucet assembly as described in step 2. NOTE: This step is for escutcheon installation (optional). If the escutcheon will not be used, install the faucet assembly as described in step 2. □ Before installation, remove the flange (E).
Installation (continued) the quick connector 5 Securing the faucet assembly 6 Attaching to the receiving block □ Install the plastic washer (B), and metal washer (C) onto the threaded mounting shank. □ Remove the cap (Q) from the quick connect tube (1). □ Thread the nut (D) onto the mounting shank. Lock the nut (D) into position by tightening the screws (P). Do not overtighten. □ Push the quick connector (J) firmly upward and attach it to the receiving block (1).
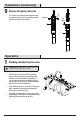
Installation (continued) 7 the waterline 8 Making connections Installing the soap dispenser □ Insert the body assembly (M) through the selected hole in the sink. Secure the body assembly to the sink with the nut (N). □ From under the sink, screw the bottle (O) onto the body assembly (M) shank. Insert the pump (L) down into the body assembly (M). NOTE: The hot side inlet tube is indicated by a label. If the label is not present, the hot supply tube is the longer of the two inlet tubes.
Installation (continued) 9 Remove the quick connector □ 2 If it is necessary to remove the quick connector (1), squeeze the tabs (2) on the quick connector and then pull down to disconnect. Squeeze Pull down 1 1 Operation 1 Flushing and checking for leaks IMPORTANT: After installation is completed, turn on the hot and cold water supplies. Check for leaks. □ Pull the hose assembly out of the spout and remove the spray head by unscrewing it from the hose in a counterclockwise direction.
Care and Cleaning □ □ □ Do not use abrasive cleaners when cleaning this faucet.
Questions, problems, missing parts? Before returning to the store, call Glacier Bay Customer Service 8 a.m. - 6 p.m., EST, Monday - Friday 1-855-HD-GLACIER HOMEDEPOT.COM/GLACIERBAY Retain this manual for future use.
Modelo Núm.: 67070-0801 67070-0808D2 GUÍA DE USO Y MANTENIMIENTO GRIFO RETRÁCTIL PARA COCINA ¿Problemas, preguntas o piezas faltantes? Antes de regresar a la tienda, llama al servicio al cliente de Glacier Bay de lunes a viernes de 8 a.m. a 6 p.m., hora estándar del este 1-855-HD-GLACIER HOMEDEPOT.COM/GLACIERBAY GRACIAS Agradecemos la confianza que has depositado en Glacier Bay al comprar este grifo para cocina. Nos esforzamos por crear continuamente productos de calidad diseñados para mejorar su hogar.
Tabla de contenido Información de seguridad ......................12 Garantía...................................................12 Pre-instalación .......................................12 Planificación de la instalación .............12 Herramientas necesarias ....................12 Contenido del paquete.........................13 Instalación ..............................................14 Funcionamiento ......................................18 Cuidado y limpieza ................................
Pre-instalación (continuación) CONTENIDO DEL PAQUETE L A M B C D E P N F Q G K O H J I Pieza Cantidad Pieza A Ensamblaje del grifo Descripción 1 J Descripción B Arandela plástica 1 K Pesos 1 L Bomba 1 M Ensamblaje del cuerpo 1 Conector rápido Cantidad 1 C Arandela metálica 1 D Tuerca 1 E Brida 1 F Placa protectora 1 N Tuerca 1 G Placa base 1 O Botella 1 H Perno 2 P Tornillo 2 I Tuerca de montaje 2 Q Tapa 1 13 HOMEDEPOT.
Instalación prepararse para la 1 Cómo instalación instalar el ensamblaje 2 Cómo del grifo PRECAUCIÓN: Cierra siempre el suministro de agua antes de quitar un grifo existente o reemplazar cualquier pieza de un grifo. Abre la llave del grifo para liberar la presión de agua y asegúrate de que el suministro de agua esté completamente cerrado. □ Cierra el suministro de agua. □ Desenrosca la tuerca (D) y quita las arandelas (B y C). NOTA: Este paso es para la instalación de la brida (opcional).
Instalación (continuación) instalar la placa 3 Cómo protectora instalar el ensamblaje 4 Cómo del grifo NOTA: Este paso es para la instalación de la placa protectora (opcional). Si no usarás la placa protectora, instala el ensamblaje del grifo como se describe en el paso 2. NOTA: Este paso es para la instalación de la placa protectora (opcional). Si no usarás la placa protectora, instala el ensamblaje del grifo como se describe en el paso 2. □ □ Antes de la instalación, quite la brida (E).
Instalación (continuación) fijar el ensamblaje del montar el conector 5 Cómo 6 Cómo grifo rápido al bloque receptor □ □ Instala la arandela de plástico (B) y la arandela de metal (C) en el vástago de montaje roscado. □ Quite la tapa (Q) del tubo de conexión rápida (1). □ Presiona firmemente el conector rápido (J) hacia arriba y fíjalo en el bloque receptor (1). Hala hacia abajo ligeramente para asegurar que la conexión es segura.
Instalación (continuación) 7 Cómo instalar el dispensador de jabón □ Coloca la pieza ensamblada (M) a través del orificio seleccionado en el fregadero. Asegura el ensamblaje del cuerpo al fregadero con la tuerca (N). □ 8 Cómo hacer las conexiones de las tuberías de agua NOTA: El tubo de entrada del agua caliente se identifica con una etiqueta. Si no encuentras la etiqueta, el tubo de suministro del agua caliente es el más largo de los dos tubos de entrada.
Instalación (continuación) 9 Quita el conector rápido □ Si es necesario, retira el conector rápido (1), aprieta las pestañas (2) de la manguera y hala hacia abajo para desconectar. 2 Aprieta 1 Hala hacia abajo 1 Funcionamiento 1 Cómo purgar las tuberías y comprobar que no haya fugas IMPORTANTE: Luego de terminar la instalación, abre los suministros de agua caliente y fría.
Cuidado y limpieza □ Conserva el acabado del grifo aplicando cera no abrasiva. □ Cuando uses limpiadores no abrasivos, enjuaga de inmediato cuando termines de limpiar el grifo. □ No uses limpiadores abrasivos para limpiar este grifo.
¿Problemas, preguntas o piezas faltantes? Antes de regresar a la tienda, llama a servicio al cliente de Glacier Bay de lunes a viernes de 8 a.m. a 6 p.m., hora estándar del este 1-855-HD-GLACIER HOMEDEPOT.COM/GLACIERBAY Conserva este manual para uso futuro.