Model# FP4A0032BNV SKU# 302357334 INSTALLATION AND CARE GUIDE PULL-DOWN KITCHEN FAUCET Questions, problems, missing parts? Before returning to the store, call Glacier Bay Customer Service 8 a.m. - 7 p.m., EST, Monday - Friday 9 a.m. - 6 p.m., EST, Saturday 1-855-HD-GLACIER (1-855-434-5224) HOMEDEPOT.COM/GLACIERBAY THANK YOU We appreciate the trust and confidence you have placed in Glacier Bay through the purchase of this kitchen faucet.
Table of Contents Important Information...............................2 Warranty....................................................2 Pre-installation..........................................2 Planning Installation.................................2 Tools and Hardware Required...................2 Package Contents.....................................3 Installation.................................................4 Operation...................................................7 Care and Cleaning................
Pre-Installation (continued) PACKAGE CONTENTS Faucet Assembly Soap Dispenser Assembly A K* B* L* M* N* C* O* D* E* F* G* Tools H P I* J* Part Description NOTE: *Items come pre-assembled.
Installation 1 Installing the faucet assembly 2 Securing the faucet □□ Slide the rubber washer (D), rubber washer (E), metal washer (F) and lock nut (G) over outlet hose (C). Use the lock nut (G) to secure the rubber washer (D), rubber washer (E) and metal washer (F). □□ Attach the extension rod (P) to lock nut (G), and then tighten the lock nut (G). CAUTION: Always turn off the water supply before removing an existing faucet or replacing any part of a faucet.
Installation 3 Attaching the quick connector 4 Attaching the weight □□ Remove the cap from the outlet hose (C). □□ Attach the quick connector (J) to the outlet hose (C). Pull down the quick connector (J) to ensure it is secure. □□ The pull-down spray (B) should be nested in the faucet body (A). □□ Use a Phillips screwdriver to secure the weight (H) at the lowest point on the pull-down spray hose (I). The weight (H) should cover the weight location decal on the pull-down spray hose (I).
Installation (continued) the water supply 5 Making connections 6 Installing the soap dispenser assembly □□ Remove bottle (O), bottle lock nut (N) and metal washer (M) from shank of dispenser holder (L). Remove pump nozzle (K) from dispenser holder (L). □□ Insert shank of dispenser holder (L) and pump nozzle (K) through top of sink. □□ Attach metal washer (M) , bottle lock nut (N) and bottle (O) to dispenser holder (L) and screw tightly. □□ Use 1/2 in. I.P.S. faucet connections (1), or a 3/8 in. O.D.
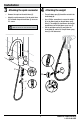
Operation 1 Flushing and checking for leaks □□ Detach the pull-down spray (B) from the pull-down spray hose (I). Hold the pull-down spray hose (I) firm to prevent it from retracting into the faucet body (A). □□ Ensure the handle is in the off position. Turn the hot and cold water supplies on and check all connections for leaks. If leaks are discovered, check the connections to ensure they are tight and properly secured. □□ Lift the handle to allow the water to run for approximately one minute.
Care and Cleaning □□ To clean, wipe down with a damp cloth and towel dry. □□ Do not use abrasive cleaners, steel wool, or harsh chemicals when cleaning this faucet, or the warranty will be voided. Troubleshooting NOTE: Refer to the service parts section in this manual for a detailed drawing showing the location of the parts listed below. Problem Possible Cause Solution There are leaks from the handle. □□ The bonnet nut is loose. □□ Tighten the bonnet nut.
Service Parts 5. 4. 3. 2. 1. Faucet ID Tags can be found on the hot supply line. DO NOT REMOVE DATE CODE: HOT 1-888-328-2383 6. 10. 7. 9. 8. 14. 12. 13. 11. Part Part No. Part 1 Metal Handle Assembly A662598* 9 Soap Dispenser Assembly A502227* 2 Trim Cap A103290* 10 Soap Pump A66D350 3 Bonnet Nut A104207 11 Soap Bottle A116000 4 Ceramic Disc Cartridge A507348N 12 Weight A504713 5 Spray Head 6 Mounting Hardware A66D507 13 Hex Wrench (H2.
Questions, problems, missing parts? Before returning to the store, call Glacier Bay Customer Service 8 a.m. - 7 p.m., EST, Monday - Friday 9 a.m. - 6 p.m., EST, Saturday 1-855-HD-GLACIER (1-855-434-5224) HOMEDEPOT.COM/GLACIERBAY Retain this manual for future use.
Núm. de modelo FP4A0032BNV Núm. de sku 302357334 GUÍA DE INSTALACIÓN Y CUIDADO GRIFO EXTRAÍBLE PARA COCINA ¿Tiene preguntas, problemas, o faltan piezas? Antes de regresar a la tienda, llame a Servicio al Cliente de Glacier Bay de lunes a viernes de 8 a.m. a 7 p.m., hora local del Este de lunes a viernes de 9 a.m. a 6 p.m., sábado 1-855-HD-GLACIER (1-855-434-5224) HOMEDEPOT.COM/GLACIERBAY GRACIAS Apreciamos la confianza que ha depositado en Glacier Bay por la compra de este grifo para cocina.
Tabla de contenido Información Importante............................2 Garantía ....................................................2 Pre-instalación..........................................2 Planificación de la Instalación..................2 Herramientas y Piezas Necesaria.............2 Contenido del Paquete..............................3 Instalación.................................................4 Operación...................................................7 Cuidado y Limpieza..........................
Pre-instalación (continuación) CONTENIDO DEL PAQUETE Ensamblaje del Grifo Ensamblaje de dispensador de jabón A K* B* L* M* N* C* O* D* E* F* G* Herramientas H P I* J* Pieza Descripción NOTA: *Las piezas vienen preensambladas.
Instalación del conjunto del 1 Instalación 2 Sujeción del grifo grifo □□ Introduzca la arandela de goma (D) , la arandela de goma (E), la arandela de metálica (F) y la contratuerca (G) por las manguera de salida (C). Use las contratuerca (G) para sujetar la arandela de goma (D) , la arandela de goma (E) y la arandela de metálica (F). □□ Sujete la varilla extensión (P) a contratuerca (G) y apriete la contratuerca (G).
Instalación (continuación) 3 Sujeción del conector rápido 4 Sujeción del peso □□ Retira la tapa del manguera de salida (C). □□ Coloca el conector rápido (J) al manguera de salida (C). Tira del conector rápido (J) para verificar que esté asegurado. □□ El grifo extraíble (B) debe estar anidado en el cuerpo del grifo (A). □□ Use un destornillador Phillips para apretar el peso (H) en el punto más bajo en la manguera de grifo extraíble (I).
Instalación (continuación) de las líneas de 5 Conexión suministro de agua de las líneas de 6 Conexión suministro de agua □□ Use conexiones para grifos I.P.S. de ½ pulgada (1) o un tubo ascendente de punta esférica con diámetro exterior de 3/8 de pulgada (2) con las tuercas de unión del conducto de alimentación (3) (no incluidas). □□ Retire la botella (O), los contratuerca de la botella (N) y la arandela de metal (M) del vástago del soporte del dispensador (L).
Operation 1 Comprobación de fugas □□ Retire el grifo extraíble (B) de la manguera del grifo extraíble (I). Sostén firmemente la manguera del grifo extraíble (I) para evitar que se retraiga (A). □□ Compruebe que la manija esté en posición cerrada. Abra la alimentación de agua fría y caliente y ompruebe todas las conexiones si hay fugas. Si encuentra alguna pérdida de agua, verifique las conexiones y compruebe que estén bien aprietes y debidamente instaladas.
Cuidado y Limpieza □□ Limpie con un trapo húmedo y seque con un paño. □□ No use limpiadores abrasivos, lana metálica ni productos químicos fuertes para limpiar el grifo o la garantía podría anularse. Solución de Problemas NOTA: Consulte la sección de piezas de repuesto de este manual para ver dibujos detallados sobre la ubicación de las piezas enumeradas abajo. Problema Posible causa Hay fugas por la manija. □□ La tuerca tapa está floja. □□ Apriete la tuerca tapa.
Piezas de Repuesto 5. 4. 3. Las etiquetas de identicación del grifo se encontrarán en la tubería de alimentación de agua caliente. DO NOT REMOVE DATE CODE: HOT 2. 1. 1-888-328-2383 6. 10. 7. 9. 8. 14. 12. 13. 11. Pieza Descripción 15. Pieza No. Descripción Pieza No. 9 Ensamblaje de dispensador de jabón A502227* A103290* 10 Bomba de la jabonera A66D350 A104207 11 Botella de jabón A116000 12 Pesas A504713 13 Llave hexagonal (H2.
¿Tiene preguntas, problemas, o faltan piezas? Antes de regresar a la tienda, llame a Servicio al Cliente de Glacier Bay de lunes a viernes de 8 a.m. a 7 p.m., hora local del Este de lunes a viernes de 9 a.m. a 6 p.m., sábado 1-855-HD-GLACIER (1-855-434-5224) HOMEDEPOT.COM/GLACIERBAY Conserve este manual para uso futuro.