Model# FS1A0026CP FS1A0026BNV SKU# 302357330 302357337 INSTALLATION AND CARE GUIDE ONE-HANDLE BAR FAUCET Questions, problems, missing parts? Before returning to the store, call Glacier Bay Customer Service 8 a.m. - 7 p.m., EST, Monday - Friday 9 a.m. - 6 p.m., EST, Saturday 1-855-HD-GLACIER (1-855-434-5224) HOMEDEPOT.COM/GLACIERBAY THANK YOU We appreciate the trust and confidence you have placed in Glacier Bay through the purchase of this bar faucet.
Table of Contents Important Information...............................2 Warranty....................................................2 Pre-installation..........................................2 Planning Installation.................................2 Tools and Hardware Required...................2 Package Contents.....................................3 Installation.................................................4 Operation...................................................6 Care and Cleaning................
Pre-Installation (continued) PACKAGE CONTENTS Faucet Assembly Soap Dispenser Assembly J* A B* K* L* M* C* H D* I N* E* F* G* NOTE: *Items come pre-assembled. Part A Description Faucet Quantity Part Description Quantity 1 H Deck plate 1 B Aerator 1 I Gasket 1 C Threaded rod 1 J Pump nozzle 1 D Rubber washer 1 K Dispenser holder 1 E Rubber washer 1 L Metal washer 1 F Metal washer 1 M Lock nut 1 G Lock nut 1 N Bottle 1 3 HOMEDEPOT.
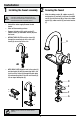
Installation 1 Installing the faucet assembly 2 Securing the faucet □□ Slide the rubber washer (D), rubber washer (E), metal washer (F) and lock nut (G) over threaded rod (C). Use the lock nut (G) to secure the rubber washer (D), rubber washer (E) and metal washer (F). CAUTION: Always turn off the water supply before removing an existing faucet or replacing any part of a faucet. Open the faucet handle to relieve water pressure and ensure that the water is completely shut off.
Installation (continued) the water supply 3 Making connections the soap dispenser 4 Installing assembly □□ Use 1/2 in. I.P.S. faucet connections (1), or a 3/8 in. O.D. ball-nose riser (2) with supply line coupling nuts (3) (not included). □□ Remove bottle (N), bottle lock nut (M) and metal washer (L) from shank of dispenser holder (K). Remove pump nozzle (J) from dispenser holder (K). □□ Insert shank of dispenser holder (K) and pump nozzle (J) through top of sink.
Operation 1 Flushing and checking for leaks IMPORTANT: After installation is complete, remove the aerator to flush the water lines. Do not lose the gasket in the aerator. □□ Ensuring the handles are in the off position, turn on the water supply and check for leaks. If you discover any leaks, check your connections to ensure they are installed properly. □□ Remove the aerator (B) and housing (if applicable). Turn on the hot and cold handles to allow the water to run for at least one minute.
Service Parts 8. Faucet ID Tags can be found on the hot supply line. 6. 7. DO NOT REMOVE DATE CODE: HOT 1. 9. 2. 3. 4. 5. 13. 1-888-328-2383 12. 10. 14. Part Description 11. Part No. Part Description Part No.
Questions, problems, missing parts? Before returning to the store, call Glacier Bay Customer Service 8 a.m. - 7 p.m., EST, Monday - Friday 9 a.m. - 6 p.m., EST, Saturday 1-855-HD-GLACIER (1-855-434-5224) HOMEDEPOT.COM/GLACIERBAY Retain this manual for future use.
Núm. de modelo FS1A0026CP FS1A0026BNV Núm. de sku 302357330 302357337 GUÍA DE INSTALACIÓN Y CUIDADO GRIFO DE UNA MANIJA PARA BAR ¿Tiene preguntas, problemas, o faltan piezas? Antes de regresar a la tienda, llame a Servicio al Cliente de Glacier Bay de lunes a viernes de 8 a.m. a 7 p.m., hora local del Este de lunes a viernes de 9 a.m. a 6 p.m., sábado 1-855-HD-GLACIER (1-855-434-5224) HOMEDEPOT.
Tabla de contenido Información Importante............................2 Garantía ....................................................2 Pre-instalación..........................................2 Planificación de la Instalación..................2 Herramientas y Piezas Necesaria.............2 Contenido del Paquete..............................3 Instalación.................................................4 Operación...................................................6 Cuidado y Limpieza..........................
Pre-instalación (continuación) CONTENIDO DEL PAQUETE Ensamblaje del Grifo Ensamblaje de dispensador de jabón J* A B* K* L* M* C* H D* I N* E* F* G* NOTA: *Las piezas vienen preensambladas.
Instalación del conjunto del 1 Instalación 2 Sujeción del grifo grifo □□ Introduzca la arandela de goma (D) , la arandela de goma (E), la arandela de metálica (F) y la contratuerca (G) por las varillas rosca (C). Use las contratuerca (G) para sujetar la arandela de goma (D) , la arandela de goma (E) y la arandela de metálica (F). CUIDADO: Cierre siempre el suministro de agua antes de retirar el grifo viejo o sustituir cualquier pieza de un grifo.
Instalación (continuación) de las líneas de 3 Conexión suministro de agua del ensamblaje de 4 Instalación dispensador de jabón □□ Use conexiones para grifos I.P.S. de ½ pulgada (1) o un tubo ascendente de punta esférica con diámetro exterior de 3/8 de pulgada (2) con las tuercas de unión del conducto de alimentación (3) (no incluidas). □□ Retire la botella (N), los contratuerca de la botella (M) y la arandela de metal (L) del vástago del soporte del dispensador (K).
Operation 1 Enjuague y verificación de fugas IMPORTANTE: Una vez terminada la instalación, retire el aireador para enjuagar los conductos de agua. No pierda el empaque del aireador. □□ Compruebe que la manija esté en posición cerrada. Abra la alimentación de agua y compruebe si hay fugas. De haberlas, verifique que las conexiones estén bien hechas. □□ Retire el aireador (B) y el receptáculo (si procede). Levante la manija para que el agua corra al menos durante un minuto.
Piezas de Repuesto 8. Las etiquetas de identicación del grifo se encontrarán en la tubería de alimentación de agua caliente. 6. 7. DO NOT REMOVE DATE CODE: HOT 1. 9. 2. 3. 4. 5. 13. 1-888-328-2383 12. 10. 14. Pieza 11. Descripción Pieza No.
¿Tiene preguntas, problemas, o faltan piezas? Antes de regresar a la tienda, llame a Servicio al Cliente de Glacier Bay de lunes a viernes de 8 a.m. a 7 p.m., hora local del Este de lunes a viernes de 9 a.m. a 6 p.m., sábado 1-855-HD-GLACIER (1-855-434-5224) HOMEDEPOT.COM/GLACIERBAY Conserve este manual para uso futuro.