
Installation Guide


6
Operation
1
Flushing and checking for leaks
Problem Possible Cause Solution
There are leaks from the
handle.
□ The bonnet nut is loose.
□ The O-ring on the cartridge is
dirty or damaged.
□ Tighten the bonnet nut.
□ Clean or replace the O-ring.
The aerator leaks or has a
reduced water ow.
□ The aerator is dirty or mis-tted.
□ The cartridge may be clogged.
□ Remove the aerator and check for
debris.
□ Remove the cartridge and check for
debris.
□ Ensure the aerator is properly
installed.
The water will not shut off
completely.
□ The locking nut is loose or
cartridge is not positioned
correctly.
□ Remove the handle and cartridge to
check the rubber seat and spring.
□ Tighten the lock nut.
□ Clean or replace.
The sink drain at the base of
the sink is leaking.
□ The sink surface is rough or
irregular.
□ Apply additional silicone sealant to
the beveled side of the drain ange.
□ Retighten and test for leaks.
Care and Cleaning
Troubleshooting
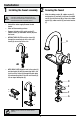
IMPORTANT: After installation is complete, remove the
aerator to flush the water lines. Do not lose the gasket in
the aerator.
□ Ensuring the handles are in the off position, turn
on the water supply and check for leaks. If you
discover any leaks, check your connections to
ensure they are installed properly.
□ Remove the aerator (B) and housing (if applicable).
Turn on the hot and cold handles to allow the
water to run for at least one minute. This ushes
away any debris that could cause damage to
internal parts.
□ Turn off the water and reinstall the aerator and
housing (if applicable).
NOTE: Refer to the service parts section in this manual for a
detailed drawing showing the location of the parts listed below.
□ To clean, wipe down with a damp cloth and towel dry.
□ Do not use abrasive cleaners, steel wool, or harsh chemicals when cleaning this faucet, or the warranty will be
voided.