
Installation Guide


Installation (continued)
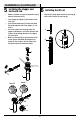
1
3
2
3
4
4
5
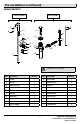
Q
R
Q
R
Q
R
J
R
P
J
P
J
P
Hole
J
S
1
1
RED LINE
HOT
COLD
BLUE LINE
2
7
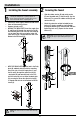
Attaching the horizontal rod and strap
8
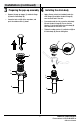
Checking the operation of the
pop up
9
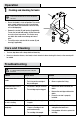
Making the water supply
connections
□ Press the rod (P) down to ensure the stopper (J) is in the maximum open position.
□ Slide the clip (R) upward, adjust the location of the lift rod strap (Q) to the appropriate height and insert the
horizontal rod (P) with the correct hole of the lift rod strap (Q).
□ Move the lift rod strap (Q) in or out to choose an appropriate location.
□ Slide the clip (R) downward until it secures with the horizontal rod (P).
□ Use two adjustable wrenches to connect and
tighten the supply lines to the supply valves.
□ Connect the red supply line to the hot water
supply valve.
□ Connect the blue supply line to the cold water
supply valve.
□ Operate the lift rod (S) up and down to verify that
the stopper (J) opens and closes correctly.
NOTE: If the pop up lift rod strap (Q) is interfering with your installation, the lift rod strap (Q) can be cut shorter. Once you have identified
the proper hole in the lift rod strap (Q) that is necessary for your installation, you may cut off the bottom portion of the lift rod strap (Q).
CAUTION: Ensure the supply lines do not kink, twist or
bend into a “V” or “L” shape during installation. Do not use
if there are visible signs of damage.
7
HOMEDEPOT.COM/GLACIERBAY
Please contact 1-855-HD-GLACIER for
further assistance.