SKU# 1005402051 / 1005403610 / 1005401788 Model# VDR2522A1 / VDR3322A1 / VDR3322A0 / FSDR3022E1 , Monday - Friday V1-TD-1
Hardware Included Package Contents Topmount Installation Undermount Installation Care and Cleaning Service Parts 3 4 9 11 14 15
1-855-HD-GLACIER or visit www.HomeDepot.com/GLACIERBAY. /under Hardware not shown to actual size. These screws can be installed with power tools.
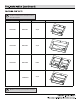
NOTE: The manual only displays the assembly for double bowl sink, but the assembly instruction is including but not limited to below SKU & configuration SKU# Model# Bowls 1005402051 VDR2522A1 Single 1005403610 VDR3322A1 Single 1005401788 VDR3322A0 Double FSDR3022E1 Single Picture NOTE: Please matching your purchased product for below pages 4
Part Description Quantity Topmount/Undermount template 5
Part Description Quantity Topmount/Undermount template 1 1 1 6
Part Description Quantity Topmount/Undermount template 2 2 2 2 2 2 2 2 2 7
Part Description Quantity Topmount/Undermount template 1 1 1 8
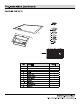
Installation Types Topmount Installation . .
Topmount 4 These screws can be installed with power tools.
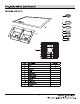
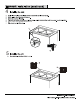
Undermount Installation WARNING When you choose undermount style installation, please do not pull out the installation rail shown in this illustration. This will cause the sink to be damaged beyond repair.It is strongly recommended that you use a professional installer is you choose the undermount installation. 11 HOMEDEPOT.
Undermount Installation (continued) Place the mounting clips (not included) as shown in the attched template and mark the centers of the clip on the countertop. Installing the accessories to the sink Place refer to steps 3 on pages 8. It is easier to install the sink accessories to the sink before installing the sink to the cabinet. Attaching the mounting clips (not included) step 3. 1 1 12 HOMEDEPOT.
Undermount Installation (continued) 13 HOMEDEPOT.
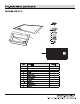
Service Parts 1 2 3 4 5 6 7 8 Part Description Part Number 1 Screener ST-001 2 bowls ST-002 3 Strainer Ring ST-003 4 Rubber washer ST-004 5 Paper washer ST-005 6 Locknut ST-006 7 Plastic joint ST-007 8 Connecting nut ST-008 15
, Monday-Friday
SKU# 1005402051 / 1005403610 / 1005401788 Model# VDR2522A1 / VDR3322A1 / VDR3322A0 / FSDR3022E1 GUÍA DE USO Y CUIDADO Fregadero de cocina de acero inoxidable ¿Tiene preguntas o problemas, o le faltan piezas? Antes de devolver a la tienda, llame al servicio de atención al cliente de Glacier Bay Lunes a viernes de 8:00 a.m. – 7:00 p.m., EST y los sábados de 9:00 a.m. – 6:00 p.m., EST. 1-855-HDGLACIER HOMEDEPOT.
Índice Índice ......................................................................................... 2 Información de seguridad ........................................................... 2 Garantía...................................................................................... 2 Preinstalación ............................................................................. 3 ..................................................... 3 Herramientas requeridas................................................
Preinstalación PLANIFICACIÓN DE LA INSTALACIÓN Antes de la instalación, compruebe el espacio libre del armario: presenta cualquier defecto o daño, incluyendo abolladuras, combaduras, irregularidades o marcas de rozaduras. Si nota algún daño o piezas 1-855-HD-GLACIER or visit www.HomeDepot.com/GLACIERBAY. faltantes, no proceda con la instalación. 1-855-HD-GLACIER or visit www.HomeDepot.com/GLACIERBAY. 1-855-HD-GLACIER orvisit visit www.HomeDepot.com/GLACIERBAY. 1-855-HD-GLACIER www.HomeDepot.com/GLACIERBAY.
Preinstalación (continuación) CONTENIDO DEL PAQUETE NOTA: El manual solo muestra el ensamblaje para el fregadero de doble cubeta, pero las instrucciones de ensamblaje incluyen, entre otras, las siguientes SKU y configuración. SKU# Modelo# Bochas 1005402051 VDR2522A1 Soltero 1005403610 VDR3322A1 Soltero 1005401788 VDR3322A0 Doble FSDR3022E1 Soltero Imagen NOTA: haga coincidir su producto comprado para las páginas siguientes. 4 HOMEDEPOT.
Preinstalación (continuación) CONTENIDO DEL PAQUETE Pieza A B C D E F G H I J K Descripción Fregadero Plantilla para la instalación por arriba/por abajo Rejilla Cuba Anillo de drenaje Arandela de goma Arandela de papel Contratuerca Junta plástica Tuerca de conexión Rejilla del fregadero Cantidad 1 1 1 1 1 1 1 1 1 1 1 HOMEDEPOT.COM/GLACIERBAY 5 Póngase en contacto con 1-855-HDGLACIER para obtener más asistencia.
Preinstalación (continuación) CONTENIDO DEL PAQUETE Pieza A B C D E F G H I J K Descripción Fregadero Plantilla para la instalación por arriba/por abajo Rejilla Cuba Anillo de drenaje Arandela de goma Arandela de papel Contratuerca Junta plástica Tuerca de conexión Rejilla del fregadero Cantidad 1 1 1 1 1 1 1 1 1 1 1 HOMEDEPOT.COM/GLACIERBAY 6 Póngase en contacto con 1-855-HDGLACIER para obtener más asistencia.
Preinstalación (continuación) CONTENIDO DEL PAQUETE Pieza A B C D E F G H I J K Descripción Fregadero Plantilla para la instalación por arriba/por abajo Rejilla Cuba Anillo de drenaje Arandela de goma Arandela de papel Contratuerca Junta plástica Tuerca de conexión Rejilla del fregadero 7 Cantidad 1 1 2 2 2 2 2 2 2 2 2 HOMEDEPOT.COM/GLACIERBAY Póngase en contacto con 1-855-HDGLACIER para obtener más asistencia.
Preinstalación (continuación) CONTENIDO DEL PAQUETE Pieza A B C D E F G H I J K Descripción Fregadero Plantilla para la instalación por arriba/por abajo Rejilla Cuba Anillo de drenaje Arandela de goma Arandela de papel Contratuerca Junta plástica Tuerca de conexión Rejilla del fregadero Cantidad 1 1 1 1 1 1 1 1 1 1 1 HOMEDEPOT.COM/GLACIERBAY 8 Póngase en contacto con 1-855-HDGLACIER para obtener más asistencia.
Installation Types Types Installation Tipos de instalación Installation Types Installation Types Usted puede optar por instalar este fregadero sobre su encimera (tipo 1: instalación por arriba) o por debajo de su encimera (tipo 2: instalación por abajo) Tipo 1: instalación por arriba Tipo 2: instalación por abajo Topmount Installation Topmount Installation Topmount Installation Topmount Installation Instalación por arriba 1 2 Preparación de la encimera .
Topmount Instalación por arriba (continuación) 4 Instalación del fregadero Aplicar la silicona para sellar (no incluida) alrededor de la parte de abajo y el borde del fregadero (A). Bajar con cuidado el fregadero (A) en la encimera. Fijar las presillas de montaje (AA). Apretar los tornillos de las presillas de montaje por arriba (AA) uniformemente hasta que el fregadero (A) esté nivelado con la encimera. Con la instalacion de herramienta tornillo. Limpiar el exceso de silicona con un trapo.
Undermount Installation Instalación por abajo Undermount Installation Undermount Installation WARNING When you choose undermount style installation, please do not pull out the installation rail shown in this illustration. This will cause the sink to be damaged beyond repair.It is strongly recommended that you use a professional installer is you choose ADVERTENCIA: Cuando escoja la instalación por abajo, no desprenda los rieles de instalación que se the undermount installation.
Undermount Installation (continued) Undermount (continued) Instalación por Installation abajo (continuación) 3 4 . 5 Preparación del fregadero Colocar elPlace fregadero del hueco de la encimera; y comprobar el huecotemplate es apropiado el fregadero; ajustar el corte es necesario. thedebajo mounting clipscortado (not included) as shown in theque attched andpara mark the centers of the clipsion the countertop. Coloque un soporte debajo del fregadero para facilitar la instalación y evitar que se caiga.
Undermount Installation (continued) Undermount Installation (continued) Instalación por abajo (continuación) Diagrama de montaje: Encimera Silicona para sellar Fregadero Inserto Presilla Tornillo Checking for leaks and removing the quick connector Please Checking refer to stepsfor 10 and 11 onand pageremoving 8. leaks the quick connector Please refer to steps 10 and 11 on page 8. 7 Instalación de la rejilla Cuando termine, coloque las rejillas del fregadero (K) en el fregadero. HOMEDEPOT.
Cuidado y limpieza Se recomienda una limpieza diaria y regular para eliminar la suciedad y evitar manchas. Utilice detergente líquido para vajilla, agua y una esponja suave de uso doméstico. de acero inoxidable del fregadero, enjuague con agua y limpie el fregadero con un paño suave y seco. Secar el fregadero evitará las manchas de agua causadas por el contacto con el agua.
ServiceParts Parts Service Repuestos 10 9 1 1 2 2 3 3 4 4 5 21 5 6 6 77 88 Pieza Description Descripción Part Description 1 2 3 1 2 3 4 4 5 5 66 77 88 Número de pieza Part Number Part Number Rejilla Screener Screener ST-001 ST-001 ST-001 Part Part bowls bowls Anillo de ST-002 ST-002 ST-003 9 10 Spray head Spray headand andHose Hose Inverter 10 11 Inventer Cartridge & Screw 11 12 Cartridge Bonnet nut & Screw 13 14 Cap Handle assembly Cuba ST-002 drenaje Strainer Ring Stra
¿Tiene preguntas o problemas, o le faltan piezas? Antes de devolver a la tienda, llame al servicio de atención al cliente de Glacier Bay Lunes a viernes de 8:00 a.m. – 7:00 p.m., EST y los sábados de 9:00 a.m. – 6:00 p.m., EST. , Monday-Friday 1-855-HDGLACIER HOMEDEPOT.COM/GLACIERBAY Guarde este manual para su uso futuro.