Model# HD67084W-6010H HD67084W-6001 HD67084W-6004 HD67084W-604405 SKU# 1005129779 312673426 312673429 312673418 INSTALLATION AND CARE GUIDE OSWELL 8 IN. WIDESPREAD 2-HANDLE HIGH-ARC BATHROOM FAUCET Questions, problems, missing parts? Before returning to the store, call Glacier Bay Customer Service 8 a.m. - 7 p.m., EST, Monday - Friday 9 a.m. - 6 p.m., EST, Saturday 1-855-HD-GLACIER (1-855-434-5224) HOMEDEPOT.COM/GLACIERBAY THANK YOU faucet.
Table of Contents Important Information ..............................2 Warranty ...................................................2 Pre-Installation .........................................2 Planning Installation ..............................2 Tools and Hardware Required ...............2 Package Contents ..................................3 Installation ................................................4 Operation...................................................7 Care and Cleaning ......................
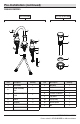
Pre-Installation (continued) PACKAGE CONTENTS Faucet Assembly Press Pop-Up Assembly A B L C G H I M D E F J N K O Part Description Quantity Part A Faucet body 1 H Nut (M28) 1 I Screw 2 J Quick connect hose 1 K 2.38mm hex wrench 1 B Handle assembly - Hot 1 Description Quantity C Handle assembly - Cold 1 L Top gasket 1 D Washer 2 M Pop-up body 1 E Nut (M30) 2 N Bottom gasket 1 F Screw 4 O Nut 1 G Washer 1 3 HOMEDEPOT.
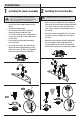
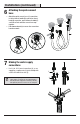
Installation 1 Installing the faucet assembly 2 Installing the faucet handles CAUTION: Always shut off the water supply before removing an existing faucet or replacing any part of a faucet. Open the faucet handle to relieve water pressure and ensure that the water is completely shut off. □ □ □ □ Remove the preassembled nuts (E) and washers (D) from the hot and cold faucet handles (B and C).
Installation (continued) 3 Preparing the pop-up assembly 4 Installing the pop-up body □ Remove the bottom gasket (N) and nut (O) from the top gasket (L) and pop-up body (M). □ Attach these pieces together by pushing the bottom gasket (N) down into the top of the nut (O) and twisting together. □ Insert the pop-up body (M) into the sink. Ensure that the top gasket (L) rests securely between the top of the sink and the top of the pop-up body (M).
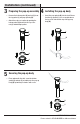
Installation (continued) the quick connect 6 Attaching hose □ □ Attach the quick connect hose (J) connections to the hot faucet handle (B) connection, faucet body (A) connection, and cold faucet handle (C) connection. Push until the connections snap together. C A Pull down moderately to ensure the connections have been made. B 1 J 2 3 the water supply 7 Making connections □ Use 1/2 in. I.P.S. faucet connections (2), or use supply line coupling nuts (3) (not included) with a 3/8 in. O.D.
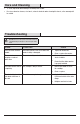
Operation 1 Flushing and checking for leaks A IMPORTANT: After installation is complete, remove the aerator from the faucet (A) to flush the water lines. Do not lose the gasket (1) in the aerator. □ Ensure the faucet (A) handles are in the off position and turn on the water supply to check for leaks. If you discover any leaks, check your connections to ensure they are installed properly. □ Remove the aerator and housing (if applicable).
Care and Cleaning □ To clean, wipe down with a damp cloth and dry with a towel. □ Do not use abrasive cleaners, steel wool, or harsh chemicals when cleaning this faucet, or the warranty will be voided. Troubleshooting NOTE: Refer to the service parts section in this manual for a detailed drawing showing the location of the parts listed below. Problem Possible Cause There are leaks from the handle. The bonnet nut has come loose and/or the washer is dirty or damaged. □ Tighten the bonnet nut.
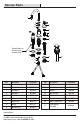
Service Parts 8 9 10 11 1 2 3 4 5 Faucet ID tags can be found on the hot water inlet 6 12 13 7 6 14 15 17 7 16 Part Description Part Number Part Description Part Number 1 Handle assembly RP13713* 10 Clip RP70023 2 Bonnet nut RP70723 11 O-ring RP60008 3 Cartridge H RP20079 12 Washer RP64188 4 Cartridge C RP20080 13 Nut & Screw RP56140 5 Connector RP70724 14 Block RP70421 6 Washer RP64147 15 O-ring RP60002 7 Nut & Screw RP56137 16 Quick connect hose RP
Questions, problems, missing parts? Before returning to the store, call Glacier Bay Customer Service 8 a.m. - 7 p.m., EST, Monday - Friday 9 a.m. - 6 p.m., EST, Saturday 1-855-HD-GLACIER (1-855-434-5224) HOMEDEPOT.COM/GLACIERBAY Retain this manual for future use.
Modelo núm. HD67084W-6010H HD67084W-6001 HD67084W-6004 HD67084W-604405 SKU núm. 1005129779 312673426 312673429 312673418 GUÍA DE USO Y MANTENIMIENTO OSWELL MEZCLADORA PARA BAÑO, DE ARCO ALTO, CON 2 MANERALES Y PIEZA EXTENDIDA DE 8" ¿Problemas, preguntas o piezas faltantes? Antes de regresar a la tienda, llama al servicio al cliente de Glacier Bay de lunes a viernes entre 8 a.m. y 7 p.m. y los sábados entre 9 a.m. y 6 p.m.(hora estándar del Este) 1-855-HD-GLACIER (1-855-434-5224) HOMEDEPOT.
Tabla de contenido Información importante .........................12 Garantía...................................................12 Pre-instalación .......................................12 Planificación de la instalación .............12 Herramientas y herrajes necesarios ....12 Contenido del paquete .........................13 Instalación ..............................................14 Funcionamiento ......................................17 Cuidado y limpieza ................................
Pre-instalación (continuación) CONTENIDO DEL PAQUETE Ensamblaje de la mezcladora Presiona el ensamblaje emergente A B L C G H I M D E F J N K O Pieza A Descripción Cuerpo del grifo Cantidad Pieza Descripción Cantidad 1 I Tornillo 2 1 1 B Ensamblaje de la llave - Caliente 1 J Manguera de conector rápido C Ensamblaje de la llave - Fría 1 K Llave hexagonal de 2.
Instalación instalar el ensamblaje instalar las llaves del 1 Cómo 2 Cómo del grifo grifo PRECAUCIÓN: Cierra siempre el suministro de agua antes de retirar un grifo existente o reemplazar alguna parte del mismo. Abre la llave del grifo para liberar la presión de agua y asegúrate de que el suministro de agua esté completamente cerrado. □ □ □ □ Retira las tuercas preensambladas (E) y las arandelas (D) de las llaves de agua caliente y fría (B y C) del grifo.
Instalación (continuación) preparar el ensamblaje instalar el cuerpo 3 Cómo 4 Cómo emergente emergente □ Retira la junta inferior (N) y la tuerca (O) de la junta superior (L) y del cuerpo emergente (M). □ Sujeta las dos piezas empujando la junta inferior (N) hacia abajo en la parte superior de la tuerca (O) y enroscándolas juntas. □ Inserta el cuerpo emergente (M) en el lavamanos.
Instalación (continuación) instalar la manguera 6 Cómo de conector rápido □ □ Conecta las conexiones de la manguera de conector rápido (J) a la conexión de la llave de agua caliente (B), la conexión del cuerpo del grifo (A) y a la conexión de la llave de agua fría (C). Presiona hasta que las conexiones se aseguren entre sí. Hala hacia abajo levemente para asegurarte de que las conexiones se han realizado.
Funcionamiento 1 Cómo purgar las tuberías y comprobar que no haya fugas A IMPORTANTE: Después de terminar la instalación, retira el aireador del grifo (A) para descargar las líneas de agua. No aflojes la junta (1) en el aireador. □ Asegúrate de que las llaves del grifo (A) estén cerradas y abre el suministro del agua para comprobar que no haya filtraciones. Si descubres alguna filtración, verifica tus conexiones para asegurarte de que estén instaladas adecuadamente.
Cuidado y limpieza □ Para limpiar, usa un paño húmedo y seca con una toalla. □ No uses limpiadores abrasivos, esponjas de alambre o productos químicos fuertes para limpiar esta mezcladora, pues ello anulará la garantía. Solución de problemas NOTA: Consulta la sección de piezas de repuesto de este manual para ver un dibujo detallado que muestra la ubicación de las piezas enumeradas a continuación. Problema Posible causa Solución Hay filtración por el maneral.
Piezas de repuesto 8 9 10 11 1 2 3 4 5 Las etiquetas de identificación de la mezcladora pueden encontrarse en la entrada de agua caliente.
¿Problemas, preguntas o piezas faltantes? Antes de regresar a la tienda, llama al servicio al cliente de Glacier Bay de lunes a viernes entre 8 a.m. y 7 p.m. y los sábados entre 9 a.m. y 6 p.m.(hora estándar del Este) 1-855-HD-GLACIER (1-855-434-5224) HOMEDEPOT.COM/GLACIERBAY Conserva este manual para uso futuro.