Model# SKU# HD67095W-6410H 1007747515 HD67095W-644405 320828875 HD67095W-6404 320828870 HD67095W-6401 320828877 INSTALLATION AND CARE GUIDE ARNETTE SINGLE HOLE SINGLE-HANDLE BATHROOM FAUCET With Deck Plate Without Deck Plate Questions, problems, missing parts? Before returning to the store, call Glacier Bay Customer Service 8 a.m. - 7 p.m., EST, Monday - Friday 9 a.m. - 6 p.m., EST, Saturday 1-855-HD-GLACIER (1-855-434-5224) HOMEDEPOT.
Table of Contents Important Information ..............................2 Warranty ...................................................2 Pre-Installation .........................................2 Planning Installation ..............................2 Tools and Hardware Required ...............2 Package Contents ..................................3 Installation ................................................4 Operation...................................................6 Care and Cleaning ......................
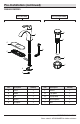
Pre-Installation (continued) PACKAGE CONTENTS Faucet Assembly Press Pop-Up Assembly G A H E D F I J B C Part Description Quantity Part Description Quantity A Faucet 1 F Gasket 1 B Washer 1 G Top gasket 1 C Nut 1 H Pop-up body 1 D Wrench 1 I Bottom gasket 1 E Deck plate 1 J Nut 1 3 HOMEDEPOT.COM/GLACIERBAY Please contact 1-855-HD-GLACIER for further assistance.
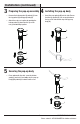
Installation 1 Installing the faucet assembly 2 Securing the faucet assembly CAUTION: Always shut off the water supply before removing an existing faucet or replacing any part of a faucet. Open the faucet handle to relieve water pressure and ensure that the water is completely shut off. □ □ □ Install the washer (B) onto the threaded bolt. □ Thread the lock nut (C) onto the bolt using the wrench (D) provided to tighten firmly. Shut off the water supply. Remove the old faucet.
Installation (continued) 3 Preparing the pop-up assembly 4 Installing the pop-up body □ Remove the bottom gasket (I) and nut (J) from the top gasket (G) and pop-up body (H). □ Attach these pieces together by pushing the bottom gasket (I) down into the top of the nut (J) and twisting together. □ Insert the pop-up body (H) into the sink. Ensure that the top gasket (G) rests securely between the top of the sink and the top of the pop-up body (H).
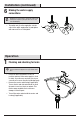
Installation (continued) the water supply 6 Making connections NOTE: The hot side inlet tube is indicated by a label. Avoid twisting wires together or placing the wires close to each other and damaging. □ 1 Thread the nut (1) on the supply line onto the outlet of the water supply valve (2) and tighten with a wrench. Do not overtighten.
Care and Cleaning □ To clean, wipe down with a damp cloth and dry with a towel. □ Do not use abrasive cleaners, steel wool, or harsh chemicals when cleaning this faucet, or the warranty will be voided. Troubleshooting NOTE: Refer to the service parts section in this manual for a detailed drawing showing the location of the parts listed below. Problem Possible Cause Solution There are leaks from the handle. The bonnet nut has come loose and/or the washer is dirty or damaged.
Service Parts 1 2 3 4 5 6 10 7 Faucet ID tags can be found on the hot water inlet 8 9 Part Part Number Part 1 Description Handle assembly RP13856* 7 Description Part Number Gasket RP80829 2 Cap RP80761* 8 Washer RP64258 3 Bonnet nut RP70612 9 Nut RP56033 4 Cartridge & Screw RP20133 5 10 Aerator RP30187 Press pop-up assembly RP40269* 6 Deck plate RP80612* *Specify Finish Many replacement cartridges, aerators, and drain assemblies can be purchased at your local The Home
Questions, problems, missing parts? Before returning to the store, call Glacier Bay Customer Service 8 a.m. - 7 p.m., EST, Monday - Friday 9 a.m. - 6 p.m., EST, Saturday 1-855-HD-GLACIER (1-855-434-5224) HOMEDEPOT.COM/GLACIERBAY Retain this manual for future use.
Modelo núm. HD67095W-6410H HD67095W-644405 HD67095W-6404 HD67095W-6401 SKU NÚM. 1007747515 320828875 320828870 320828877 GUÍA DE INSTALACIÓN Y CUIDADO ARNETTE GRIFO DE BAÑO CON UN SOLO ORIFICIO Y UNA MANIJA Con Placa De Cubierta Sin Placa De Cubierta ¿Preguntas, problemas o piezas faltantes? Antes de regresar a la tienda, llama a servicio al cliente de Glacier Bay de lunes a viernes entre 8 a.m. y 7 p.m., (hora estándar del Este) sábados entre 9:00 a.m. y 6:00 p.m.
Tabla de contenido Información importante .........................11 Garantía...................................................11 Pre-instalación .......................................11 Planificación de la instalación .............11 Herramientas y herrajes necesarios ....11 Contenido del paquete .........................12 Instalación ..............................................13 Funcionamiento ......................................15 Mantenimiento y limpieza ......................
Pre-instalación (continuación) CONTENIDO DEL PAQUETE Ensamblaje del grifo Ensamblaje emergente de presión G A H E D F I J B C Pieza Descripción Cantidad Pieza Descripción Cantidad A Grifo 1 F Junta 1 B Arandela 1 G Junta superior 1 C Tuerca 1 H Cuerpo emergente 1 D Llave 1 I Junta inferior 1 E Placa de la cubierta 1 J Tuerca 1 12 HOMEDEPOT.COM/GLACIERBAY Para obtener asistencia, llama al 1-855-HD-GLACIER.
Instalación instalar el ensamblaje fijar el ensamblaje del 1 Cómo 2 Cómo del grifo grifo PRECAUCIÓN: Cierra siempre el suministro de agua antes de retirar un grifo existente o reemplazar alguna parte del mismo. Abre la llave del grifo para liberar la presión de agua y asegúrate de que el suministro de agua esté completamente cerrado. □ □ □ □ Cierra el suministro de agua. Retira el grifo anterior. Limpia la superficie de montaje.
Instalación (continuación) preparar el ensamblaje Cómo preparar el ensamblaje 3 Cómo 4 emergente emergente □ Retira la junta inferior (I) y la tuerca (J) de la junta superior (G) y el cuerpo emergente (H). □ Conecta estas piezas entre sí presionando la junta inferior (I) hacia abajo sobre la parte superior de la tuerca (J) y girándolas juntas. □ Inserta el cuerpo emergente (H) en el fregadero.
Instalación (continuación) realizar las conexiones 6 Cómo de suministro de agua NOTE: El tubo lateral de entrada de agua caliente está marcado con una etiqueta. No tuerzas los cables entre sí ni los coloques cerca unos de otros para que no se dañen. □ 1 Enrosca la tuerca (1) de la línea de suministro en la salida de la válvula de suministro de agua (2) y aprieta con una llave. No aprietes demasiado.
Mantenimiento y limpieza □ Para limpiar, usa un paño húmedo y seca con una toalla. □ No uses limpiadores o químicos abrasivos ni esponja de alambre al limpiar este grifo. De lo contrario, se anulará la garantía. Solución de problemas NOTA: Consulta la sección de piezas de repuesto de este manual para ver una ilustración detallada sobre la ubicación de las piezas enumeradas a continuación.
Piezas de repuesto 1 2 3 4 5 6 10 7 Les étiquettes d’identité du robinet se trouvent sur l’arrivée d’eau chaude 8 9 Pieza 1 Descripción Ensamblaje de la llave Núm. de pieza Pieza RP13856* Descripción Núm.
¿Problemas, preguntas o piezas faltantes? Antes de regresar a la tienda, llama al servicio al cliente de Glacier Bay de lunes a viernes entre 8 a.m. y 7 p.m. y los sábados entre 9 a.m. y 6 p.m.(hora estándar del Este) 1-855-HD-GLACIER (1-855-434-5224) HOMEDEPOT.COM/GLACIERBAY Conserva este manual para uso futuro.