
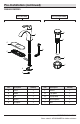
Installation Guide


6
Installation (continued)
1
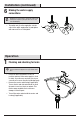
Flushing and checking for leaks
IMPORTANT: After installation is complete, remove the
aerator from the faucet (A) with a coin (1) to ush the water
lines.
□ Ensure the faucet (A) handle is in the off
position, and turn on the water supply to check
for leaks. If you discover any leaks, check your
connections to ensure they are installed properly.
□ Remove the aerator and housing (if applicable).
Turn on the hot and cold water handle to allow
the water to run for at least one minute. This
ushes away any debris that could cause
damage to internal parts.
□ Turn off the water and reinstall the aerator and
housing (if applicable).
Operation
6
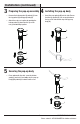
Making the water supply
connections
□ Thread the nut (1) on the supply line onto the
outlet of the water supply valve (2) and tighten
with a wrench. Do not overtighten.
NOTE: The hot side inlet tube is indicated by a label. Avoid
twisting wires together or placing the wires close to each
other and damaging.
2
1
A
1