
Installation Guide


4
Installation
1
Installing the faucet assembly
CAUTION: Always shut off the water supply before removing an existing faucet or replacing any part of a faucet. Open the faucet handle
to relieve water pressure and ensure that the water is completely shut off.
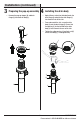
1b
NOTE: This step is for escutcheon installation (optional).
If the sink is uneven, use silicone under the gasket (R).
□ Before installation, remove the ange (E) and
bolts (F).
□ Place the faucet (A) through the mounting holes
in the sink. Secure the faucet (A) to the sink using
the mounting nuts (S) provided. Hand-tighten only.
□ Secure the deck plate (G) and gasket (R) to
the faucet (A) with the screws (T).
□ Shut off the water supply. Remove the old faucet. Clean the mounting surface.
□ Remove the preassembled lock nuts (D) and washers (B & C) from the new faucet (A).
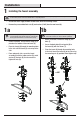
1a
NOTE: This step is for ange installation (optional). When
you insert the lift rod (Q), the lift rod (Q) can go through the
faucet (A) and down into the slot of the washers (B & C).
□ Before installation, ensure that the ange (E) is
placed on the bottom of the new faucet (A).
□ Place the faucet (A) through the mounting holes
in the sink until the faucet (A) sets on top of the
sink.
□ From underneath sink, secure the faucet
assembly (A) with the rubber washer (B), metal
washer (C) and nuts (D). Use the wrench to
tighten the nuts (D).
A
E
B
C
D
A
E
F
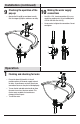
1
2
G
R
T
A
3
4
S
A
5
6
6