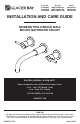
Internet# 312018093 312018089 312018090 Model# HD67140W-6101 HD67140W-6104 HD67140W-6110H SKU# 1005024391 1005024393 1005024392 INSTALLATION AND CARE GUIDE MODERN TWO-HANDLE WALL MOUNT BATHROOM FAUCET Questions, problems, missing parts? Before returning to the store, call Glacier Bay Customer Service 8 a.m. - 7 p.m., EST, Monday - Friday 9 a.m. - 6 p.m., EST, Saturday 1-855-HD-GLACIER (1-855-434-5224) HOMEDEPOT.
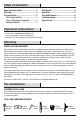
Table of Contents Important Information ..............................2 Warranty ...................................................2 Pre-Installation .........................................2 Planning Installation ..............................2 Tools and Hardware Required ...............2 Package Contents ..................................3 Installation ................................................4 Operation...................................................8 Care and Cleaning ......................
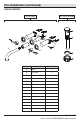
Pre-Installation (continued) PACKAGE CONTENTS Faucet Assembly Press Pop-Up Assembly J H K G F I N E D C L B A M Part Description Quantity A Index 2 B Set screw 2 C Handle assembly 2 D Flange 2 E Spout 1 F Spout seat 1 G Flange 1 H Valve body 1 I Screw 4 J Top gasket 1 K Pop-up body 1 L Bottom gasket 1 M Nut 1 N 2.5mm hex wrench 1 3 HOMEDEPOT.COM Please contact 1-855-HD-GLACIER for further assistance.
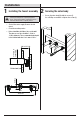
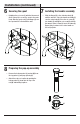
Installation 1 Installing the faucet assembly 2 Securing the valve body □ CAUTION: Always shut off the water supply before removing an existing faucet or replacing any part of a faucet. Open the faucet handle to relieve water pressure and ensure that the water is completely shut off. □ Shut off the water supply. Remove the old faucet. □ Clean the mounting surface. □ Before installation, drill three holes on the wall. The valve access hole should be 1-1/2 in. to 1-3/4 in. diameter.
Installation (continued) the water supply 3 Making connections □ 4 Removing the protective caps Wrap thread sealant tape around the valve body (H) threads in a counterclockwise direction, as shown. Thread the supply line (1) to valve body (H), and tighten with a wrench. □ Remove the protective caps (1 & 2) from the valve body (H). H 1 H 2 1 1 5 Placing the spout □ Unscrew the set screw (1) with the Hex wrench (Hex: 2.5mm, N) from the valve body (H).
Installation (continued) 6 Securing the spout □ 7 Installing the handle assembly Retighten the set screw (1) with the Hex wrench (Hex: 2.5mm, N) to secure the spout to the valve body. Slide the spout seat (F) and flange (G) over the spout until it is flush with the wall. □ Slide the flange (D) to the cold value body (H) until the wall face. Place the handle assembly (C) onto the value body (H). Place the set screw (B) into handle (C) and tighten set screw (B) with the Hex wrench (Hex: 2.5mm, N).
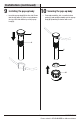
Installation (continued) 9 Installing the pop-up body □ 10 Securing the pop-up body Insert the pop-up body (K) into the sink. Ensure that the top gasket (J) rests securely between the top of the sink and the top of the pop-up body (K). □ From underneath the sink, screw the bottom gasket (L) and nut (M) assembly onto the pop-up body (K) by twisting clockwise until secure. J K K L M 7 HOMEDEPOT.COM Please contact 1-855-HD-GLACIER for further assistance.
Operation 1 Flushing and checking for leaks IMPORTANT: After installation is complete, remove the aerator from the spout (E) with a coin (1) to flush the water lines. □ □ □ Ensure the faucet handles are in the off position and turn on the water supply to check for leaks. If you discover any leaks, check your connections to ensure they are installed properly. Remove the aerator and housing (if applicable). Turn on the hot and cold handles to allow the water to run for at least one minute.
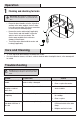
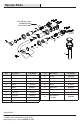
Service Parts Faucet ID tags can be found by removing the hot water handle 9 13 14 15 17 11 12 10 16 7 8 6 3 1 Part Description 5 4 18 2 Part Number Part Description Part Number 1 Aerator RP30187 11 O-ring RP60104 2 Handle assembly RP13707* 12 Screw & Anchor RP50175 3 Screw RP50049 13 Set screw RP50002 4 Inverter RP70396 14 Flange RP80422* 5 Flange RP80421* 15 Spout seat RP80424* 6 Bonnet nut RP80423* 16 O-ring RP60085 7 Connector RP70534 17 O-rin
Questions, problems, missing parts? Before returning to the store, call Glacier Bay Customer Service 8 a.m. - 7 p.m., EST, Monday - Friday 9 a.m. - 6 p.m., EST, Saturday 1-855-HD-GLACIER (1-855-434-5224) HOMEDEPOT.COM Retain this manual for future use.
Internet núm. 312018093 312018089 312018090 Modelo núm. HD67140W-6101 HD67140W-6104 HD67140W-6110H SKU núm. 1005024391 1005024393 1005024392 GUÍA DE USO Y MANTENIMIENTO MODERN MEZCLADORA PARA BAÑO CON MONTAJE EN PARED, DE DOS LLAVES ¿Problemas, preguntas o piezas faltantes? Antes de regresar a la tienda, llama al servicio al cliente de Glacier Bay de lunes a viernes entre 8 a.m. y 7 p.m. y los sábados entre 9 a.m. y 6 p.m.(hora estándar del Este) 1-855-HD-GLACIER (1-855-434-5224) HOMEDEPOT.
Tabla de contenido Información importante .........................12 Garantía...................................................12 Pre-instalación .......................................12 Planificación de la instalación .............12 Herramientas y herrajes necesarios ....12 Contenido del paquete .........................13 Instalación ..............................................14 Funcionamiento ......................................18 Cuidado y limpieza ................................
Pre-instalación (continuación) CONTENIDO DEL PAQUETE Ensamblaje de la mezcladora Press Pop-Up Assembly J H K G F I N E D C L B A M Pieza Descripción Cantidad A Índice 2 B Tornillo de fijación 2 C Ensamblaje de la llave 2 D Brida 2 E Caño 1 F Base del caño 1 G Brida 1 H Cuerpo de la válvula 1 I Tornillo 4 J Junta superior 1 K Cuerpo emergente 1 L Junta inferior 1 M Tuerca 1 N Llave hexagonal de 2.5 mm 1 13 HOMEDEPOT.
Instalación instalar el ensamblaje asegurar el cuerpo de 2 Cómo 1 Cómo del grifo la válvula □ PRECAUCIÓN: Cierra siempre el suministro de agua antes de retirar un grifo existente o reemplazar alguna parte del mismo. Abre la llave del grifo para liberar la presión de agua y asegúrate de que el suministro de agua esté completamente cerrado. □ Asegura el cuerpo de la válvula (H) con tornillos (I). Usa un desarmador Phillips para apretarlos (I). Cierra el suministro de agua. Retira el grifo anterior.
Instalación (continuación) realizar las conexiones Cómo quitar las tapas 4 3 Cómo de suministro de agua protectoras □ □ Coloca cinta selladora para roscas alrededor de las del cuerpo de la válvula (H) y en sentido contrario de las manecillas del reloj, tal como se muestra. Enrosca la tubería de agua (1) al cuerpo de la válvula (H) y ajusta con una llave. Quita las tapas protectoras (1 y 2) del cuerpo de la válvula (H). H 1 2 H 1 1 5 Cómo colocar el caño □ Desenrosca con la llave hexagonal (Hex.: 2.
Instalación (continuación) 6 Cómo asegurar el caño □ instalar el conjunto 7 Cómo del maneral Vuelve a ajustar el tornillo de fijación (1) con la llave hexagonal (Hex.: 2.5 mm, N) para asegurar el caño al cuerpo de la válvula. Desliza la base del caño (F) y la brida (G) sobre el caño hasta quedar al ras con la pared. □ Desliza la brida (D) hacia el cuerpo de la válvula de agua fría (H) hasta el frente de la pared. Coloca la ensamblaje de la llave (C) en el cuerpo de la válvula (H).
Instalación (continuación) 9 □ asegurar el cuerpo 10 Cómo emergente Cómo instalar el cuerpo emergente Inserta el cuerpo emergente (K) en el lavamanos. Asegúrate de que la junta superior (J) descansa de manera segura entre la parte superior del lavamanos y la parte superior del cuerpo emergente (K). □ Desde la parte inferior del lavamanos, enrosca la junta inferior (L) y el ensamblaje de la tuerca (M) en el cuerpo emergente (K) en el sentido de las manecillas del reloj hasta que quede seguro.
Funcionamiento purgar las tuberías y 1 Cómo comprobar que no haya fugas IMPORTANTE: Después de terminar la instalación, retira el aireador para del caño (E) con una moneda (1) al efecto de purgar las tuberías de agua. □ □ □ Asegúrate de que las llaves del grifo estén cerradas y abre el suministro del agua para comprobar que no haya filtraciones. Si descubres alguna filtración, verifica tus conexiones para asegurarte de que estén instaladas adecuadamente. Retira el aireador y la carcasa (si corresponde).
Piezas de repuesto Las etiquetas de identificación de la mezcladora pueden verse al quitar el maneral del agua caliente.
¿Problemas, preguntas o piezas faltantes? Antes de regresar a la tienda, llama al servicio al cliente de Glacier Bay de lunes a viernes entre 8 a.m. y 7 p.m. y los sábados entre 9 a.m. y 6 p.m.(hora estándar del Este) 1-855-HD-GLACIER (1-855-434-5224) HOMEDEPOT.COM Conserva este manual para uso futuro.