
Installation Guide
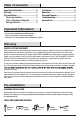


4
Installation
1
Preparing for installation
CAUTION: Always turn off the water supply before
removing an existing faucet or replacing any part of a
faucet. Open the faucet handle to relieve water pressure
and ensure that the water is completely shut off.
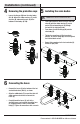
2
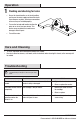
Removing the protective cap
□ Remove the protective cap (D). Loosen the
connector (E) from the middle body (F). Adjust
the rubber washer (G), metal washer (H) and
mounting nut (I) to the bottom of middle body (F).
□ Shut off the water supply. Remove the old
faucet.
□ Clean the mounting surface.
□ Drill 1-3/8 in. holes in the nished deck as
shown in the diagram below.
5 in. min.
8~16 in.
3 in. min.
1-1/4 in. MAX. DECK THICKNESS
1-3/8 in.
Diamter
1-1/8 in.
Diamter
1-3/8 in.
Diamter
NOTE: This kit allows up to 1-1/4 in. deck thickness.
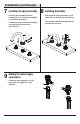
3
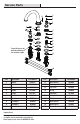
Installing the middle body
□ From underneath the deck, insert the middle
body (F) with the rubber washer (G), metal
washer (H) and mounting nut (I) through the
mounting hole.
□ From above, thread the connector (E) onto
the middle body (F).
□ Tighten the mounting nut (I) using a basin
wrench, so that the connector (E) sits ush
against the nished deck surface.
D
E
F
G
H
I
E
F
G
H
I