
Installation Guide


5
Installation (continued)
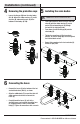
4
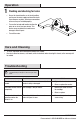
Removing the protective caps
□ Loosen the anges (M) from the valve bodys
(N & O). Adjust the rubber washers (P), metal
washers (Q) and mounting nuts (R) to the
bottom of valve bodys (N & O).
5
Installing the valve bodies
□ From underneath the deck, insert the cold end
valve (O) with the rubber washer (P), metal
washer (Q) and mounting nut (R) through
the hole on the right (cold) side.
□ From above, thread the ange (M) onto the
valve body (O).
□ Tighten the mounting nut (R) using a basin
wrench, so that the ange (M) sits ush against
the nished deck surface.
□ Repeat this procedure for the hot end valve (N)
on the left (hot) side.
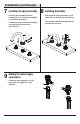
6
Connecting the hoses
□ Connect the hoses (S) to the bottom of the hot
and cold end valves (N & O), as shown.
□ Align the middle body (F) in a position that will
allow maximum clearance to connect the
hoses (S).
□ Carefully bend the hoses (S) to t in the
available space, and carefully thread the hose
(S) couplings onto the sides of the middle
body (F). Tighten all connections with a wrench.
HOMEDEPOT.COM
Please contact 1-855-HD-GLACIER for further assistance.
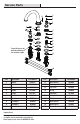
O
P
Q
R
M
N
P
Q
R
M
N
O
P
Q
R
M
S
O
N
F
S
NOTE: The hot end valve is identied with a label.