
Installation Guide


10
2
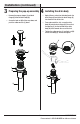
Removing the quick connector
□ If it is necessary to remove the quick connector
(1), squeeze the tabs (2) on the quick connector
and then pull down to disconnect.
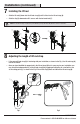
Care and Cleaning
□ To clean, wipe down with a damp cloth and dry with a towel.
□ Do not use abrasive cleaners, steel wool, or harsh chemicals when cleaning this faucet, or the warranty will
be voided.
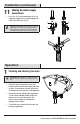
Operation (continued)
Squeeze
Pull
down
2
1
1
Troubleshooting
Problem Possible Cause Solution
There are leaks from the
handle.
The bonnet nut has come loose and/or the
washer is dirty or damaged.
□ Tighten the bonnet nut.
□ Clean or replace the washer.
The aerator has an
irregular or reduced
water ow.
□ Remove the aerator and
check for debris.
The water will not shut off
completely.
The cartridge is dirty or broken. □ Remove the handle to check
the cartridge.
□ Clean or replace.
The aerator is dirty or mis-tted.
NOTE: Refer to the service parts section in this manual for
a detailed drawing showing the location of the parts listed
below.
There is leaking from the
sink drain at the base of
the sink.
The sink has a rough or irregular surface. □ Apply additional silicone sealant
to the beveled side of the drain
ange.
□ Retighten and test for leaks.