Internet# 304353690 304353680 Model# HD67799-1001 HD67799-1008D2 SKU# 1003015466 1003015471 INSTALLATION AND CARE GUIDE SINGLE-HANDLE LAUNDRY FAUCET Questions, problems, missing parts? Before returning to the store, call Glacier Bay Customer Service 8 a.m. - 7 p.m., EST, Monday - Friday 9 a.m. - 6 p.m., EST, Saturday 1-855-HD-GLACIER (1-855-434-5224) HOMEDEPOT.COM THANK YOU We appreciate the trust and confidence you have placed in Glacier Bay through the purchase of this laundry faucet.
Table of Contents Important Information ..............................2 Warranty ...................................................2 Pre-Installation .........................................2 Planning Installation ..............................2 Tools and Hardware Required ...............2 Package Contents ..................................3 Installation ................................................4 Operation...................................................7 Care and Cleaning ......................
Pre-Installation (continued) PACKAGE CONTENTS A I B C D E F G H Part A Description Quantity Faucet assembly 1 B Plastic washer 1 C Metal washer 1 D Nut 1 E Screw 2 F Flange 1 G Connector 1 H Quick connector 1 I Connector 1 3 HOMEDEPOT.COM Please contact 1-855-HD-GLACIER for further assistance.
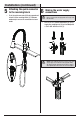
Installation 1 Preparing for installation 2 Installing the faucet assembly CAUTION: Always shut off the water supply before removing an existing faucet or replacing any part of a faucet. Open the faucet handle to relieve water pressure and ensure that the water is completely shut off. □ Shut off the water supply. □ Unscrew the nut (D), and remove the washers (B & C). □ Before installation, ensure that the flange (F) is placed on the bottom of the new faucet assembly (A).
Installation (continued) 3 Securing the faucet assembly 4 Installing the connector □ Install the plastic washer (B), and metal washer (C) onto the threaded mounting shank. □ Thread the nut (D) onto the mounting shank. Lock the nut (D) into position by tightening the screws (E). Do not overtighten. □ Attach the connector (G) by screwing it onto the threaded end of the tube (1). 1 G B C D E 5 HOMEDEPOT.COM Please contact 1-855-HD-GLACIER for further assistance.
Installation (continued) the quick connector the water supply 5 Attaching to the receiving block 6 Making connections □ Push the quick connector (H) firmly upward and attach it to the receiving block (1). Pull down moderately to ensure the connection has been made. NOTE: The hot side inlet tube is indicated by a label. If the label is not present, the hot supply tube is the longer of the two inlet tubes. □ Use 1/2 in. I.P.S.
Operation 1 Flushing and checking for leaks IMPORTANT: After installation is completed, turn on the hot and cold water supplies. Check for leaks. □ Remove the spray head by unscrewing it from the hose in a counterclockwise direction. Turn the faucet to the warm position where it mixes hot and cold water. □ Flush the water lines for one minute. This flushes away any debris that could cause damage to internal parts. Check for leaks. □ Re-tighten any connections if necessary, but do not overtighten.
Care and Cleaning □ To clean, wipe down with a damp cloth and dry with a towel. □ Do not use abrasive cleaners, steel wool, or harsh chemicals when cleaning this faucet, or the warranty will be voided. Troubleshooting NOTE: Refer to the service parts section in this manual for a detailed drawing showing the location of the parts listed below. Problem Possible Cause Solution There are leaks underneath the handle. The bonnet nut has come loose and the o-ring on the cartridge is dirty or damaged.
Service Parts 3 2 4 5 1 6 7 12 16 Faucet ID tags can be found on the hot water inlet 8 13 9 14 10 15 Part Description 11 Part Number 1 Connector RP80599* 2 Spray head RP38339* 3 Cartridge & Screw 4 Bonnet nut Part Description Part Number 10 Quick connect assembly RP20081 11 O-ring RP60089 RP70588 12 Flange RP80280* RP70584 5 Cap RP80279* 13 Plastic washer RP64131 6 Handle RP13213* 14 Metal washer RP64024 7 Set screw RP50002 15 Nut & Screw RP56113 16 Scr
Questions, problems, missing parts? Before returning to the store, call Glacier Bay Customer Service 8 a.m. - 7 p.m., EST, Monday - Friday 9 a.m. - 6 p.m., EST, Saturday 1-855-HD-GLACIER (1-855-434-5224) HOMEDEPOT.COM Retain this manual for future use.
Internet núm. Modelo núm. 304353690 HD67799-1001 304353680 HD67799-1008D2 SKU núm. 1003015466 1003015471 GUÍA DE USO Y MANTENIMIENTO GRIFO DE UNA LLAVE PARA LAVADERO ¿Problemas, preguntas o piezas faltantes? Antes de regresar a la tienda, llama al servicio al cliente de Glacier Bay de lunes a viernes entre 8 a.m. y 7 p.m. y los sábados entre 9 a.m. y 6 p.m.(hora estándar del Este) 1-855-HD-GLACIER (1-855-434-5224) HOMEDEPOT.
Tabla de contenido Información importante .........................12 Garantía...................................................12 Pre-instalación .......................................12 Planificación de la instalación .............12 Herramientas y herrajes necesarios ....12 Contenido del paquete .........................13 Instalación ..............................................14 Funcionamiento ......................................17 Cuidado y limpieza ................................
Pre-instalación (continuación) CONTENIDO DEL PAQUETE A I B C D E F G H Pieza A Descripción Cantidad Ensamblaje del grifo 1 B Arandela plástica 1 C Arandela metálica 1 D Tuerca 1 E Tornillo 2 F Brida 1 G Conector 1 H Conector rápido 1 I Conector 1 13 HOMEDEPOT.COM Para obtener asistencia, llama al 1-855-HD-GLACIER.
Instalación prepararse para la 1 Cómo instalación instalar el ensamblaje 2 Cómo del grifo PRECAUCIÓN: Cierra siempre el suministro de agua antes de retirar un grifo existente o reemplazar alguna parte del mismo. Abre la llave del grifo para liberar la presión de agua y asegúrate de que el suministro de agua esté completamente cerrado. □ Cierra el suministro de agua. □ Desenrosca la tuerca (D) y quita las arandelas (B y C).
Instalación (continuación) fijar el ensamblaje del 3 Cómo 4 Cómo instalar el conector grifo □ Instala la arandela plástica (B) y la arandela de metal (C) en el vástago de montaje roscado. □ Enrosca la tuerca (D) en el vástago de montaje. Fija la tuerca (D) en posición, apretando los tornillos (E). No aprietes demasiado. □ Fija el conector (G) enroscándolo en el extremo roscado del tubo (1). 1 G B C D E 15 HOMEDEPOT.COM Para obtener asistencia, llama al 1-855-HD-GLACIER.
Instalación (continuación) montar el conector 5 Cómo rápido al bloque receptor □ 6 Presiona firmemente el conector rápido (H) hacia arriba y fíjalo en el bloque receptor (1). Hala hacia abajo ligeramente para asegurar que la conexión es segura. Cómo hacer las conexiones del suministro de agua NOTA: El tubo de entrada del agua caliente se identifica con una etiqueta. Si no encuentras la etiqueta, el tubo de suministro del agua caliente es el más largo de los dos tubos de entrada.
Funcionamiento 1 Cómo purgar las tuberías y comprobar que no haya fugas IMPORTANTE: Luego de terminar la instalación, abre los suministros de agua caliente y fría. Revisa si hay filtraciones. □ Quita de la manguera el cabezal del rociador desenroscándolo hacia la izquierda. Gira el grifo a la posición de agua tibia donde se mezclan agua caliente y fría. □ Deja que corra el agua por un minuto. Esto enjuagará cualquier suciedad que podría dañar las piezas internas. Verifica que no haya filtraciones.
Cuidado y limpieza □ Para limpiar, usa un paño húmedo y seca con una toalla. □ No uses limpiadores abrasivos, esponjas de alambre o productos químicos fuertes para limpiar esta mezcladora, pues ello anulará la garantía. Solución de problemas NOTA: Consulta la sección de piezas de repuesto de este manual para ver un dibujo detallado que muestra la ubicación de las piezas enumeradas a continuación. Problema Posible causa Hay filtraciones debajo de la manija.
Piezas de repuesto 3 2 4 5 1 6 Las etiquetas de identificación de la mezcladora pueden encontrarse en la entrada de agua caliente.
¿Problemas, preguntas o piezas faltantes? Antes de regresar a la tienda, llama al servicio al cliente de Glacier Bay de lunes a viernes entre 8 a.m. y 7 p.m. y los sábados entre 9 a.m. y 6 p.m.(hora estándar del Este) 1-855-HD-GLACIER (1-855-434-5224) HOMEDEPOT.COM Conserva este manual para uso futuro.
Internet nº 304353690 304353680 Modèle n° HD67799-1001 HD67799-1008D2 UGS n° 1003015466 1003015471 GUIDE D’INSTALLATION ET D’ENTRETIEN ROBINET DE BUANDERIE À UNE SEULE MANETTE Questions, problèmes, pièces manquantes? Avant de retourner au magasin, appelez le service à la clientèle Glacier Bay entre 8 h et 19 h, HNE, du lundi au vendredi au entre 9 h et 18 h, HNE, le samedi au 1-855-HD-GLACIER (1-855-434-5224) HOMEDEPOT.
Table des matières Information importante ..........................22 Garantie...................................................22 Pré-installation .......................................22 ................22 Outils et quincaillerie requis ................22 Contenu de l’emballage .......................23 Installation ..............................................24 Utilisation ................................................27 Entretien et nettoyage ............................28 Dépannage ............
Pré-installation (suite) CONTENU DE L'EMBALLAGE A I B C D E F G H Pièce A Description Quantité Robinet 1 B Rondelle en plastique 1 C Rondelle en métal 1 D Écrou 1 E Vis 2 F Bride 1 G Raccord 1 H Raccord à branchement rapide 1 I Raccord 1 23 HOMEDEPOT.COM Veuillez composer le 1-855-HD-GLACIER pour une assistance supplémentaire.
Installation 1 2 Préparation en vue de l'installation ATTENTION : Fermez l’alimentation en eau CAUTION: Always turn toujours off the water supply before avant de retirer un robinet ou d’en removing an existing faucetexistant or replacing anyremplacer part of a une pièce Ouvrez la poignée du robinet pour libérer faucet.quelconque. Open the faucet handle to relieve water pressure la pression vousisassurer que shut l’alimentation en and ensure de thatl’eau the et water completely off.
Installation (suite) 3 4 Installation du raccord Fixer solidement l'ensemble de robinetterie □ Installez la rondelle en plastique (B) et la rondelle en métal (C) sur la tige de montage filetée. □ Vissez l’écrou (D) sur la tige de montage. Verrouillez l’écrou (D) en position en serrant les vis (E). Ne serrez pas trop. □ Fixez le raccord (G) en le vissant sur l’extrémité filetée du tube (1). 1 G B C D E 25 HOMEDEPOT.COM Veuillez composer le 1-855-HD-GLACIER pour une assistance supplémentaire.
Installation (suite) Attacher le raccord à branchement rapide au bloc récepteur 5 □ des conduites 6 Raccordement d’alimentation en eau Poussez fermement le raccord à branchement rapide (H) vers le haut et attachez-le au bloc récepteur (1). Tirez modérément vers le bas pour vous assurer que le branchement est bien fait. REMARQUE : Le tuyau d'arrivée de l'eau chaude est indiqué par une étiquette. S'il n'y a pas d'étiquette, le tuyau d'arrivée de l'eau chaude est le plus long des deux tuyaux d'arrivée.
Utilisation 1 Purge et recherche de fuites IMPORTANT : Une fois l'installation terminée, ouvrez l’alimentation en eau chaude et en eau froide. Vérifiez s’il y a des fuites. □ Retirez la pomme de douchette en la dévissant du tuyau flexible dans le sens inverse des aiguilles d’une montre. Tourner le robinet à la position chaude où il mélange l’eau chaude et froide. □ Faites couler l'eau pendant une minute. Ceci purge tous les débris qui pourraient endommager les pièces internes.
Entretien et nettoyage □ Pour nettoyer, essuyez avec un linge humide et séchez avec une serviette. □ N'utilisez pas de nettoyants abrasifs, de la laine d’acier ou de produits chimiques abrasifs pour nettoyer ce robinet, sinon la garantie sera annulée. Dépannage REMARQUE : Consultez la section pièces de rechange de ce guide pour une illustration détaillée de l’emplacement des pièces énumérées ci-dessous. Problème Cause possible Il y a des fuites sous la manette.
Pièces de rechange 3 2 4 5 1 6 7 12 Les étiquettes d’identité du robinet se trouvent sur l’arrivée d’eau chaude 16 8 13 9 14 10 15 Pièce Description 11 Numéro de pièce 1 Raccord RP80599* 2 Pomme de douchette RP38339* 3 Cartouche et Vis 4 Écrou de chapeau Pièce Description Numéro de pièce 10 Raccord à branchement rapide RP20081 11 Joint torique RP60089 RP70588 12 Bride RP80280* RP70584 5 Capuchon RP80279* 13 Rondelle en plastique RP64131 6 Manette RP13213* 14 Ro
Questions, problèmes, pièces manquantes? Avant de retourner au magasin, appelez le service à la clientèle Glacier Bay entre 8 h et 19 h, HNE, du lundi au vendredi au entre 9 h et 18 h, HNE, le samedi au 1-855-HD-GLACIER (1-855-434-5224) HOMEDEPOT.COM Conservez ce manuel pour référence future.