
Installation Guide


5 HOMEDEPOT.COM
Please contact 1-855-HD-GLACIER for further assistance.
Installation
1
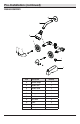
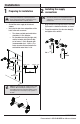
Preparing for installation
CAUTION: Always turn off the water supply before
removing an existing faucet or replacing any part of a
faucet. Open the faucet handle to relieve water pressure
and ensure that the water is completely shut off.
□ Shut off the water supply to the tub and
shower.
□ Verify that the hole sizes and positions of the
holes in the wall are correct:
□ The shower and tub spout outlet holes
should be 1-1/4 in. diameter.
□ For the cold water inlet (the right side)
and the hot water inlet (the left side),
cut or leave a 1-3/8 in. diameter hole
(recommended size is 1-3/4 in.). The
center to center distance between the
cold and hot water inlets is 8 in.
2
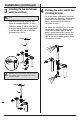
Installing the supply
connections
□
Wrap thread sealant tape around the valve body
(D) threads in a clockwise direction, as shown.
□
Thread the waterline (1) to the valve body (D),
and tighten with a wrench.
NOTE: Be sure to position the body (D) correctly in the
wall, with the markings "UP" facing upward. Hot water
supply lines go into the H inlet; cold water supply lines go
into the C inlet.
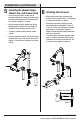
NOTE: Do not disassemble the cartridges during normal
installation. When reinstalling the cartridge, be sure to
insert with the limit stop (a & b) pointed inward as shown
in the diagram. This is necessary for proper operation of
the valve.
1-3/8 in. ~ 2 in.1-3/8 in. ~ 2 in.
8 in.
8 in. Min.
30 in.
Shower Only
48 in.
Tub & Shower
30 in.
Tub & Shower
48 in.
Shower Only
a
b
Cold
Hot
1
D