
Installation Guide


11
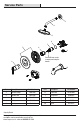
Installation (continued)
9
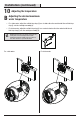
Removing the plastic cap
□ Before installing the escutcheon (F), remove
the plastic cap (1) from the valve body (D) by
twisting the cap in a clockwise direction.
8
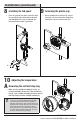
Installing the tub spout
Place the spout (K) onto quick connection until
the spout (K) becomes flush with the finished
wall and tighten the screw (1) with with the
Hex wrench (Hex: 2.5mm, L) provided.
□
HOMEDEPOT.COM/GLACIERBAY
Please contact 1-855-HD-GLACIER for further assistance.
1
2
D
1
10
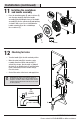
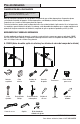
Adjusting the temperature
A
Removing the red limit stop ring
□
Make sure the cartridge assembly (2) is in the off
position. Remember the position of the red limit stop
ring (1) on the cartridge assembly (2). Remove the red
limit stop ring (1) from the cartridge assembly (2).
NOTE: The limiter on the valve can be set to allow partial
or full access to hot water by limiting how far the handle
can be turned to the hot side of the valve. The limiter is
typically set at the factory to allow only warm water to pass
through the valve. Follow the directions in this section if you
wish to adjust the amount of hot water that is allowed
through the valve. If you do not wish to adjust the amount
of hot water that is allowed through the valve, proceed to
the step 11, and skip over the step 10 (A, B).
K
L
1