
Installation Guide

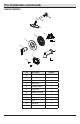

8
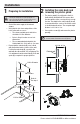
Installation (continued)
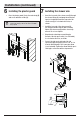
3a
Installing the supply
connections
□
□ Tighten the pipes to the valve body (D) with a
pipe wrench (not included).
Wrap thread sealant tape (not included) around
the pipe threads in a clockwise direction, as
shown.
□
Connect the hot and cold water supply lines (1,
not included), the shower outlet pipe (2, not
included), and tub outlet pipe (3, not included)
by threading them into the valve body (D) in a
clockwise direction.
Connect the pipe elbows (4, not included) to
the end of the shower outlet and tub outlet
pipes.
□
NOTE: The hot water supply lines go into the "H" inlet, and
the cold water supply lines go into the "C" inlet. Do not use
PEX or CPVC between the valve body (D) and tub spout (K).
NOTE: If you do not wish to install the tub outlet, insert
the plug (J) into the bottom of the valve body (D).
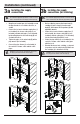
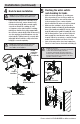
3b
Installing the supply
connections (for soldering)
□
Before soldering, remove the bonnet nut (1),
cartridge (2) and o-ring (3) from the valve
body (D), and remove the stop valves (4) with
adjustable wrench.
□
Solder the hot and cold water supply lines (5,
not included), the shower outlet pipe (6, not
included), and tub outlet pipe (7, not included)
into the valve body (D) with the torch.
Solder the pipe elbows (8, not included) to the
end of the shower outlet and tub outlet pipes
with the torch.
□
Reinstall the bonnet nut, cartridge, o-ring and
stop valves onto the valve body (D). Make sure
the cartridge (2) is installed correctly.
□
NOTE: The hot water supply lines go into the "H" inlet, and
the cold water supply lines go into the "C" inlet. Do not use
PEX or CPVC between the valve body (D) and tub spout (K).
NOTE: If you do not wish to install the tub outlet, insert
the plug (J) into the bottom of the valve body (D).
3
D
1
1
2
4
5
3
1
2
4
7
D
5
6
8
2
J
D
1
1
2
4
5
3
1
2
4
D
5
6
8
J