
Use and Care Guide


4
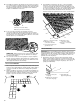
4. From the first column, continue installing the first row of tiles
working toward the left-side wall of the garage. Adjust the
installed tiles to balance the pattern.
IMPORTANT:
■ When installing tiles on the left-hand side of the column, it
may be necessary to adjust the position of the edge trim and
tiles.
■ To minimize cuts and/or balance the pattern, adjust the
installed edge trim and tiles to the left or right as needed.
When adjusting the tiles, be sure not to extend the edge trim
beyond the center line marked on the garage floor.
■ For a balanced pattern, tiles along both walls may need to be
cut. Before cutting the tiles or edge trim, measure the allotted
space. Mark and cut the tile to length for proper placement.
■ Using a saw, notch out the edge trim or tile around any
obstructions such as the garage door track.
■ In a wall-to-wall application, if no edge trim will be applied, it
may be necessary to cut the tile floor covering along one or
more of the perimeter walls.
5. Continue installing the tiles on the left-hand side of the column
working toward the back of the garage until complete.
6. Connect the remaining tiles on the right of the column and work
toward the back of the garage as shown.
NOTE: If the orientation or placement of the tiles is incorrect due
to misassembly, separate the tiles at the leading edge of the
misassembly. Be sure that the female loops are at the bottom
and right side of each tile. Reconnect the tiles.
7. If necessary, cut the last row of tiles to fit between the existing
row of tiles and the back wall of the garage.
NOTE: Leave a minimum of ¹⁄₂" (1.25 cm) space between the
edge of the tiles and the perimeter of the garage walls and
around all obstructions, such as drains, stairs and posts. The
spacing is necessary to allow for expansion and contraction of
tiles caused by seasonal temperature fluctuations. The tiles may
buckle if the necessary spacing is not provided.
A. Adjust to the left or right
AA