
Installation Guide


6
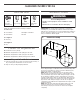
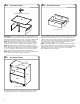
4a. Assemble Drawer 4b. Assemble Drawer
IMPORTANT: Position the drawer sides so that the glides are at
the top and facing the outside. Do not fully tighten the six screws
attaching the drawer back to the sides. Using three Phillips-head
screws (F3c), attach the side (D1) to the back (D2) as shown.
NOTE: Working from the back, insert the screws through the
drawer back and then into the drawer side. Using three Phillips-
head screws (F3c), attach side (D3) to the back (D2) as shown.
NOTE: Working from the back, insert the screws through the
drawer back and then into the drawer side. Working from the top,
set the drawer bottom (D4) down onto the back and side anges
as shown. Working from the bottom, insert screws through the
drawer back and sides and then into the drawer bottom.
NOTE: Wait until the drawer front is in place before inserting the
screws that attach the drawer bottom to the front.
Using nine Phillips-head screws (F3c), attach the drawer front (D5)
to the bottom and sides. Before you insert the drawer into the
cabinet, make sure the bearing carriages on the cabinet slides are
at the front of the cabinet. Align the drawer glides with the slides
on the inside of the cabinet. Insert the drawer glides into the
slides and push the drawer into the cabinet.
NOTE: If the drawer glide is not correctly aligned with the cabinet
slide, the drawer may become lodged in the cabinet. Facing the
cabinet, press down on the lever located on the right-hand drawer
glide while pressing up on the lever located on the lefthand
drawer glide to release the drawer.
F3c
F3c Phillips-head screw (22)
D4
D2
D3
D1
D4
D2
D3
D1
D5
A
4c. Assemble Drawer
Once the drawer is in place, work from the rear of the cabinet to
completely tighten the six screws attaching the drawer back.
P6
P3
P1
D2
A
P2
A. Drawer glide lever
A. Tighten drawer screws