
Installation Instructions


10
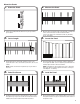
■ If splitting occurs, you may nd it necessary to predrill and
countersink the screw holes near channel ends.
■ Repeat steps 1-4 with additional panels until you reach the
opposite edge of the desired coverage area.
NOTE: If installing an optional trim kit, be sure to apply the
trim around any windows, doors, and outlets you encounter
along the way, as well as to the nal piece of the row if
mounting against an interior corner (see “Trim Options” for
details).
■ Drive a screw in every slot at every stud location.
■ Repeat step 5, installing each following row of wall panels
until the wall is nished. If the wall is wider than the
4 ft (1.22 m) panel, you will need to stagger the vertical panel
joints in each row with the seams at the wooden studs, as
shown.
NOTE: The nal row of panels can be rip cut lengthwise to t
the required height.
7. Predrill Holes
9. Repeat Until Row Complete
8. Drive Remaining Screws
10. Repeat Until Desired Coverage