
Installation Instructions


7
Install the GearWall
®
Panels
■ Snap a level chalk line at a convenient height on the wall(s).
Measure from the chalk line to the ceiling and determine the
lowest point of the ceiling along the wall.
■ Starting from the lowest point of the ceiling, measure down
to the oor. Round the measurement down to the nearest
foot and mark. Snap a level chalk line ¹⁄4” (6.3 mm) below the
mark. Repeat step for remaining walls.
NOTE: For partial wall installation, simply snap a level chalk
line at the desired height of the bottom of the wall.
1. Measure Ceiling Sag
2. Mark Bottom of Wall
Plan your Installation
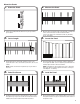
■ Install the rst stud at the starting edge of the desired
coverage area to act as a guide. Drill a hole through the
stud and into the wall surface. Follow masonry screw
manufacturer’s instructions for proper installation. For best
results use a hammer drill and masonry bit.
NOTE: For extra hold, you may choose to put
construction adhesive on the stud before attaching it to
the wall.
■ Secure the stud to the wall by placing ¹⁄4” (6.3 mm) x 2³⁄4”
(6.9 cm) masonry screws every 18” (45.72 cm).
1. Mount First Stud
2. Secure First Stud
Prepare the Wall
Masonry Block / Poured Concrete Wall
■ Before you can install the panels on poured concrete or masonry block walls, you must install 2" (5.08 cm) x 4" (10.16 cm) wooden
studs to the wall with the 4" (10.16 cm) side against the wall. The wooden studs must be installed over the entire area to be covered
by the GearWall
®
panels. This provides a level surface on which to mount the panels.
B
A
A. Masonry screws
B. Wooden stud