
Use and Care Guide


7
ASSEMBLY INSTRUCTIONS
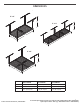
Unpack the Overhead GearLoft™
Storage Rack
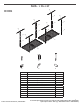
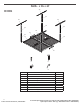
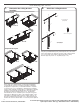
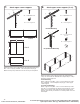
1. Unpack the rack sections, support sections, ceiling brackets
and all hardware. Verify contents. See “Parts.”
2. Dispose of all packaging materials properly.
Tools and Parts
■ Install Overhead GearLoft
TM
Storage Rack according to
manufacturer's instructions and any local codes.
■ Only use provided fasteners. Do not use an alternate form of
mounting. Do not alter or modify any components included
with this product.
■ Gather the required tools and parts before starting assembly.
■ Read entire manual before starting assembly.
Tools Needed
■ Electric drill
■ Drill bit (3/16") - included
■ 1/2" socket wrench and/or 1/2" open end wrench
■ 6 mm hex wrench - included
■ Stud nder (If ceiling has drywall covering joists/rafters)
■ Tape measure
■ Step stool or step ladder
■ Pencil / Marker
■ Masking tape
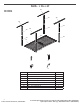
Overhead GearLoft™ Storage
Rack Use Requirements
1. Intended for garage use, installed into a wood framed/
traditional wood structure type dwelling.
2. To be used for storing lightweight items
overhead and out of the way.
3. Recommended to be positioned 80" minimum
above oor (standard door opening height).
4. Check for clearance of all doors, vehicles, or any
items to be positioned under the storage rack.
5. The maximum weight of all items combined on the rack not to
exceed:
2 ft x 4 ft - 350 lbs.
2 ft x 8 ft - 350 lbs.
4 ft x 4 ft - 350 lbs.
WARNING
Excessive Weight Hazard
Use two or more people to move storage rack.
Failure to do so can result in back or other injury.
11-Nov-2019 09:35:29 EST | RELEASED
In some European factories the letter "W" of the part code mentioned herein will be automatically
replaced by the number "4000" (e.g. "W12345678" becomes "400012345678")