
Use and Care Guide


8
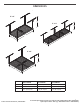
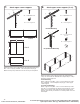
Assembling the Rack
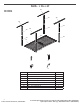
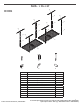
The storage rack ceiling brackets can be positioned parallel
or perpendicular to the wood ceiling joists/rafters. Determine
the application required for your desired installation. If drywall
covers the joists, use a stud nder to determine the joist/rafter
locations and mark with masking tape. For applications requiring
installation of the brackets perpendicular to the joists/rafters,
the maximum distance between them is 24". The brackets
included allow for a 24" maximum span. See gure for typical
ceiling layouts. Mark the location of the ceiling brackets on the
joists/rafters or drywall, making sure the vertical supports can
be positioned between the lag bolts use to attach the brackets.
Position the center of the brackets on a 24"/48" grid as required.
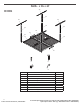
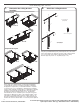
Using the provided drill bit (3/16"), drill all pilot holes in the center
of the joists/rafters. Two lag bolts must be used on each bracket,
one on each side of the vertical support. Mount the ceiling
brackets (P2) using 5/16" x 3" lag bolts (F2) (8 or 12).
2. Attach the ceiling brackets
F2
P2
F2
P3
P4
F2
5/16" x 3" Lag bolt
Center Support
(If Required)
Corner Support
(4 Required)
1. Determine the ceiling bracket
locations
F2
P2
F2
P5
P6
P2
P2
P2
P2
48"
48"
P2
P2
P2
P2
P2
P2
P2
P2
P2
P2
Parallel layout
P2
P2
P2
P2
P2
P2
2' x 8'
2' x 8'
2' x 4'
2' x 4'
P2
P2
P2
P2
48"
26"
48"
4' x 4'
4' x 4'
P2
P2
P2
P2
Perpendicular layout
24"
24"
48"
48"
48"
48"
24"
26"
48"
24"
48"
48"
26"
24"
11-Nov-2019 09:35:29 EST | RELEASED
In some European factories the letter "W" of the part code mentioned herein will be automatically
replaced by the number "4000" (e.g. "W12345678" becomes "400012345678")