
Use and Care Guide


9
Lay two rack sections upside down on the oor. Assemble the
rack sections (P1) together using M8 - 1.25 x 12 socket-head cap
screws (F1) (2 or 4).
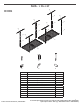
4. Attach the rack brackets (4' x 4')
P1
P7
F1
P1
F1
M8 - 1.25 x 12 Socket-head
cap screw
Attach the rack connection brackets (P7) to both sides of the two
bolted-together rack sections using M8 - 1.25 x 12 socket-head
cap screws (F1) (8).
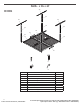
5. Attach lower corner supports
P1
F1
P4
F1
M8 - 1.25 x 12 Socket-head
cap screw
Attach the four lower corner supports (P4) to the rack corners
using M8 - 1.25 x 12 socket-head cap screws (F1) (8).
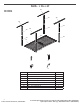
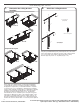
6.
Attach lower center supports (2' x 8')
P6
P1
F1
P1
F1
M8 - 1.25 x 12 Socket-head
cap screw
Attach the two lower center supports (P6) to the rack assembly
using M8 - 1.25 x 12 socket-head cap screws (F1) (4).
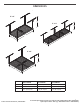
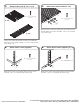
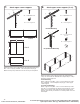
3. Connect the racks (4' x 4', 2' x 8')
P1
P1
F1
F1
F1
M8 - 1.25 x 12 Socket-head
cap screw
4' x 4'
P1
F1
F1
P1
2' x 8'
11-Nov-2019 09:35:29 EST | RELEASED
In some European factories the letter "W" of the part code mentioned herein will be automatically
replaced by the number "4000" (e.g. "W12345678" becomes "400012345678")