ALL REFRIGERATOR AND UPRIGHT FREEZER Use and Care Guide TODOS LOS REFRIGERADOR Y CONGELADORES VERTICALES Manual de uso y cuidado TOUS LES RÉFRIGÉRATEURS ET CONGÉLATEURS VERTICAUX Guide d’utilisation et d’entretien TABLE OF CONTENTS...2 / ÍNDICE...21 / TABLE DES MATIÈRES...38 W11320200A In U.S.A. call: 1-866-342-4089 Aux É.-U. : 1 866 342-4089 En EE.UU. Ilame al: 1-866-342-4089 In Canada call: 1-800-807-6777 Au Canada : 1 800 807-6777 En Canadá Ilame al: 1-800-807-6777 www.gladiatorgarageworks.
TABLE OF CONTENTS REFRIGERATOR AND FREEZER SAFETY.................................3 Proper Disposal of Your Old Refrigerator or Freezer.................4 INSTALLING YOUR REFRIGERATOR OR FREEZER.................5 Unpacking..................................................................................5 Cleaning Before Use..................................................................5 Location Requirements..............................................................5 Tools..............................
REFRIGERATOR AND FREEZER SAFETY Your safety and the safety of others are very important. We have provided many important safety messages in this manual and on your appliance. Always read and obey all safety messages. This is the safety alert symbol. This symbol alerts you to potential hazards that can kill or hurt you and others. All safety messages will follow the safety alert symbol and either the word “DANGER” or “WARNING.
Proper Disposal of Your Old Refrigerator or Freezer WARNING IMPORTANT: Child entrapment and suffocation are not problems of the past. Junked or abandoned refrigerators and freezers are still dangerous – even if they will sit for “just a few days.” If you are getting rid of your old refrigerator or freezer, please follow these instructions to help prevent accidents. Suffocation Hazard Remove doors from your old refrigerator. Failure to do so can result in death or brain damage.
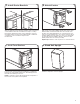
INSTALLING YOUR REFRIGERATOR OR FREEZER Unpacking Location Requirements WARNING WARNING Excessive Weight Hazard Use two or more people to move and install refrigerator/freezer. Failure to do so can result in back or other injury. ■■ Remove and recycle or discard all packaging materials except for the foam corner posts, which will be used for installation. ■■ Remove tape and glue residue from surfaces before turning on the refrigerator or freezer.
Electrical Requirements Before you move your refrigerator or freezer into its final location, it is important to make sure you have the proper electrical connection. WARNING Recommended Grounding Method A 115 V, 60 Hz, AC only, 15 or 20 A fused, grounded electrical supply is required. It is recommended that a separate circuit serving only your refrigerator or freezer be provided. Use an outlet that cannot be turned off by a switch. Do not use an extension cord.
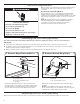
Reversing the Unit Door (optional) Refer to step 1 and 2 from the “Removing the Unit Door” section. 3. Remove Cabinet Hinge Hole Plugs 4. Remove Door Hole Plugs A A. Cabinet Hinge Hole Plugs Using the putty knife, remove cabinet hinge hole plugs from the cabinet top and move them to the opposite side hinge holes. If one breaks, there are replacement parts in your literature kit. 5. Replace Bottom Hinge Using the putty knife, remove the door hole plugs from the door.
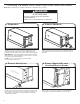
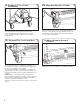
Installing the Heavy Duty Casters and Silver Tread Foot Pedals NOTE: Before installing the foot pedal, adjust the door swing direction, if desired. WARNING Excessive Weight Hazard Use two or more people to move and install refrigerator/freezer. Failure to do so can result in back or other injury. 1. Preparation Replace the foam corner post on the non-hinged side, and then place the unit on its side on top of cardboard or other protective material. Make sure the door hinge is facing upward.
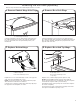
5. Install Caster Brackets Align the right-hand caster brackets and drive in the rear bracket screws with the TORX T40 screwdriver from step 3. Pushing the brackets against the bottom of the refrigerator or freezer, reinstall the upper and lower hex-head bolts with a TORX T25 screwdriver or a 3/8" nut driver. Repeat on the left-hand side. 7. Lock Front Casters Lock the front casters and insert a small piece of cardboard between the caster brake and the floor.
9. Prepare For Foot Pedal Installation 10. Align And Hang Foot Pedal A B Open the product door for easier access to the foot pedal area. On both sides of the product, loosen the lower 3/8" hex-head bracket screw (B), exposing 1/4" of the thread, and fully withdraw the upper 3/8" hex-head foot pedal screw (A). 11. Reinstall The Foot Pedal Bolt On the door hinge side, use a TORX T25 screwdriver or a 3/8" nut driver to feed the screw through the pedal bracket mounting hole and tighten to the cabinet.
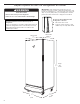
13. Place Unit In Final Location WARNING Electrical Shock Hazard Plug into a grounded 3 prong outlet. Do not remove ground prong. Do not use an adapter. Do not use an extension cord. Failure to follow these instructions can result in death, fire, electrical shock. 5. Make sure the or freezer is steady. If the freezer seems unsteady or rolls forward when the door is pulled open, adjust the brake feet.
Using the Refrigerator Control The temperature control is located at the top front of the refrigerator compartment. Temperature Control Adjusting Control If you need to adjust the temperature in the refrigerator compartment, press TEMP SETTING to display the desired temperature setting. Choose from Party, Assorted, or Beverage. When you first install your refrigerator, check that the control is set to the temperature that is desired for your food items.
Using the Freezer Control The temperature control is located at the top front of the freezer compartment. Temperature Control Adjusting Control If you need to adjust the temperature in the freezer compartment, press TEMP SETTING to display the desired temperature setting. Choose from Soft Serve, Assorted, and Deepfreeze. When you first install your refrigerator, check that the control is set to the temperature that is desired for your food items.
CARING FOR YOUR REFRIGERATOR OR FREEZER Registering Your Unit There are many benefits of registering your product. Find out more and register your product online at www.gladiatorgarageworks.com. Consumers in Canada can call: 1-800-807-6777. Your product’s model and serial numbers can be located on the serial sticker inside your unit.
2. Unplug the refrigerator or freezer or disconnect power. 3. Remove all removable parts from inside, such as shelves, crispers, etc. 4. Hand wash, rinse, and dry removable parts and interior surfaces thoroughly. Use a clean sponge or soft cloth and a mild detergent in warm water.
TROUBLESHOOTING First try the solutions suggested here. If you need further assistance or more recommendations that may help you avoid a service call, refer to the warranty page in this manual, or visit www.whirlpool.com/product_help for recommendations that may help you avoid a service call. In Canada, visit http://www.whirlpool.ca. Contact us by mail with any questions or concerns at the address below: In the U.S.A.
Refrigerator Operation WARNING Electrical Shock Hazard Plug into a grounded 3 prong outlet. Do not remove ground prong. Do not use an adapter. Do not use an extension cord. Failure to follow these instructions can result in death, fire, or electrical shock. PROBLEM RECOMMENDED SOLUTIONS Refrigerator Will Not Operate Check that it is plugged into a grounded 3 prong outlet. Check that the temperature control is turned on. Check that the refrigerator is not running an automatic defrost cycle.
Freezer Operation WARNING Electrical Shock Hazard Plug into a grounded 3 prong outlet. Do not remove ground prong. Do not use an adapter. Do not use an extension cord. Failure to follow these instructions can result in death, fire, or electrical shock. PROBLEM RECOMMENDED SOLUTIONS Freezer Will Not Operate Check that it is plugged into a grounded 3 prong outlet. Check that the temperature control is turned on. Check that the freezer is not running an Automatic Defrost cycle.
GLADIATOR® MAJOR APPLIANCE LIMITED WARRANTY ATTACH YOUR RECEIPT HERE. PROOF OF PURCHASE IS REQUIRED TO OBTAIN WARRANTY SERVICE. Please have the following information available when you call the Customer eXperience Center: Q Name, address, and telephone number Q Model number and serial number Q A clear, detailed description of the problem Q Proof of purchase, including dealer or retailer name and address IF YOU NEED SERVICE: 1.
W11320200A W11320189A - EN/FR ® /™ ©2019 Gladiator. All rights reserved. Gladiator. Todos los derechos reservados. Gladiator. Tous droits réservés.