Sliding Shower Door Installation Guide Vimeo link for installation guide video https://vimeo.
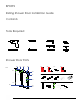
BP05P2 Sliding Shower Door Installation Guide Contents Tools Required SD14 BP05P2 SD19 SD15 SD16 SD5 SD17 SD6 SD1 SD8 SD7 SD20 SD9 SD2 SD21 SD17 Shower Door Parts SD13 SD18 SD10 SD5 SD4 SD16 SD9 SD5 SD17 SD6 SD1 SD8 SD7 SD11 SD20 SD9 SD2 2X SD14 SD13 8X SD16 2X SD19 SD13 4X SD15 SD21 SD17 SD12 1” SD15 1 1/2” SD19 1 1/8” SD14 BP05P2 2X SD20 2X SD17 SD18 2X SD21 2X SD4 1X SD5 SD18 SD10 SD5 2X SD4 SD13 1” 4X 2X SD14 SD12 1 1/2” SD11 1 1/8” SD9 SD1
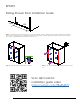
7 ATTENTION INSTALLER: A light haze or smudging may be present on the coated glass on delivery. This is easily removed by washing SD18 with denatured or isopropyl alcohol and a good quality microfiber cloth, followed by a rinse of water. This can SD10 SD17(2X) be done before or after installation.
2X) BP05P2 Sliding Shower Door Installation Guide SD17(2X) SD20(2X) SD17(2X) SD14(2X) SD18 SD20(2X) SD13(1X) SD17(2X) SD19(2X) SD20(2X) Step 6 SD14(2X)below. - Model numbers & opening adjustability GW-SLD-48 = 44” - 48” GW-SLD-52 = 48” - 52” GW-SLD-56 = 52” - 56” GW-SLD-60 = 56” - 60” GW-SLD-64 = 60” - 64” GW-SLD-68 = 64” - 68” GW-SLD-72 = 68” - 72” Measure your opening width and the rod should be 1” less than this measurement.
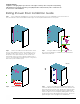
BP05P2 Sliding Shower Door Installation Guide SD21(1X) SD18 SD16(2X) SD13(1X) Step 9 - ATTENTION: Please ignore the video installation instructions for this section as the SD18 has been upgraded to a higher quality floor bracket, for easy installation. Make sure both ends of the fixed panel are the same distance to the front of the threshold tile (or fiberglass pan) and check panel is level again.
SD14(2X) BP05P2 SD18 Sliding Shower Door Installation Guide SD13(1X) X) SD21(1X) SD2 SD18 SD16(2X) SD6 SD15(2X) SD21(1X) SD9(2X) (2X) Step 10 - Install hardware rollers and handle on door panel. SD10(3X) SD18 SD16(2X) 2X) SD6 D2 SD15(2X) SD3 SD19(2X) SD4 SD6 SD2 SD15(2X) SD7 SD8 SD7 SD8 SD19(2X) Step 12 - Adjust Parts SD 19 door stops on top of shower rod to ensure the door panel does not hit the wall or the door handle touches the fixed panel.
SD21(1X) 2X) BP05P2 SD18 SD16(2X) SD13(1X) SD18 SD18 SD16(2X) Sliding Shower Door Installation Guide SD13(1X) SD18 SD5 SD2 SD6 SD2 SD15(2X) SD6 SD19(2X) SD19(2X) SD15(2X) Step 13 - Install aluminum floor strip (SD5) to prevent water leakage. Measure distance from floor bracket (SD18) to wall and cut aluminum floor strip (SD5) to fit. Put a small bead of silicone under strip for waterproofing and set in place.
Care & Care & Maintenance Maintenance EnduroShield makes your cleaning EnduroShield easier and lessmakes frequent; however your cleaning easier it is recommended that you it continue is recommended to clean the surfaces that regularly.
&'1 5 00 ,27 '1 #$$#!2'4# 1 -$ -, ** * 11 0#&-31# .0-"3!2 .30!& 1#1 ! $ # $$ ( # &$ ( ## %* % # $ % $ # $% * &# $$ ( # &$ !# & % * &$ % !# & % * & # $ % % & * % ( ( ## %* % # $ % $ * 11 0#&-31# -$$#01 2&# $-**-5',% 5 00 ,27 $-0 '21 .0-"3!21 ," !-+.
* 11 0#&-31# �# 7 "'1!* '+1 ** 5 00 ,2'#1 $-0 .0-"3!21 1-*" 1 "# *#0 -0 12-0# "'1.* 71 * 11 0#&-31# �# 7 "'1!* '+1 ** 5 00 ,2'#1 $-0 .0-"3!21 31#" -321'"# -$ 2&# ,'2#" 2 2#1 -0 , " 5�� #6.0#11#" -0 '+.*'#" ',!*3"',% 32 ,-2 *'+'2#" 2- 2&# '+.*'#" 5 00 ,2'#1 -$ +#0!& ,2 '*'27 ," $'2,#11 $-0 . 02'!3* 0 .30.-1# ( ## %* % # $ * 11 0#&-31# 5'** 2 '21 #*#!2'-, 0#. '0 -0 0#.* !# 2&# .