
Installation Guide

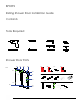


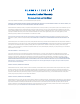

Sliding Shower Door Installation Guide
ATTENTION INSTALLER:
A light haze or smudging may be present on the coated glass on delivery. This is easily removed by washing
with denatured or isopropyl alcohol and a good quality microfiber cloth, followed by a rinse of water. This can
be done before or after installation.
BP05P2
SD14
SD17
SD17
SD20
SD9
SD21
SD18
SD1
SD8
SD5
SD6
SD7
SD2
SD10
SD4
SD5
SD17(2X)
SD12(2X)
SD11(2X)
SD17(2X)
SD20(2X)
SD14(2X)
SD13
SD19 SD15 SD16
SD9(2X)
SD15(2X)
SD2
SD6
SD19(2X)
SD19(2X)
SD20(2X)
SD10(3X)
SD7 SD8
SD3
SD4
SD13(1X)
SD21(1X)
SD16(2X)
SD18
SD9 SD11 SD12 SD13
SD14
2X
2X 2X 2X
2X2X 1X 1X 1X
2X 1X
4X 2X8X
SD15 SD16
SD19 SD20 SD21 SD4 SD5
SD17 SD18
1 1/8”
1 1/2”
1”
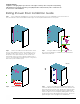
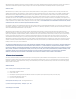
Step 2 - Measure the width of threshold tile where shower
door is to be installed, this needs to be a minimum of 3” to
instal this model shower enclosure. On the wall where the
fixed panel is to be placed measure to the centre of the
threshold tile, from here measure back toward the front of
shower 1 1/8” and mark the wall with a pencil. Using a level
draw a line up the wall at this point.
Step 1 - Before starting the installation process place door panel inside the shower on cardboard to protect the bottom of
door, this will make it easier for installation at later stage once fixed panel and bar has been set in place.
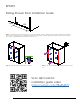
Step 4 - Install SD17 Wall Clips.
Step 3 - Along the drawn level line, mark 8” and 70” from
floor. Using a 1/4” drill bit, you will drill the holes and install the
wall anchors parts SD12
Step 5 - Measure the width of the fixed panel and place the
1/8” thick rubber blocks provided 3” in from each end where the
glass panel will sit on the tile / pan. Gently place down the glass
panel on the rubber blocks & slide glass into the wall brackets.
Check the glass is level, if not adjust by adding thinner 1/16” rub-
ber block to the blocks already placed on the floor. Once level
tighten the grub screws very tight on the wall brackets