
Installation Guide


BP05P2
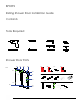
Sliding Shower Door Installation Guide
BP05P2
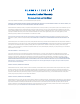
SD14
SD17
SD17
SD20
SD9
SD21
SD18
SD1
SD8
SD5
SD6
SD7
SD2
SD10
SD4
SD5
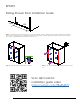
SD17(2X)
SD12(2X)
SD11(2X)
SD17(2X)
SD20(2X)
SD14(2X)
SD13
SD19 SD15 SD16
SD9(2X)
SD15(2X)
SD2
SD6
SD19(2X)
SD19(2X)
SD20(2X)
SD10(3X)
SD7 SD8
SD3
SD4
SD13(1X)
SD21(1X)
SD16(2X)
SD18
SD9 SD11 SD12 SD13
SD14
2X
2X 2X 2X
2X2X 1X 1X 1X
2X 1X
4X 2X8X
SD15 SD16
SD19 SD20 SD21 SD4 SD5
SD17 SD18
1 1/8”
1 1/2”
1”
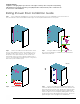
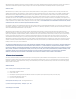
Step 9 - ATTENTION: Please ignore the video installation instructions for this section as the SD18 has been upgraded to a higher quality
floor bracket, for easy installation.
Make sure both ends of the fixed panel are the same distance to the front of the threshold tile (or fiberglass pan) and check panel is
level again. On the floor bracket (SD18) loosen the allen screw on solid section of bracket and rotate the adjustable end which fits into
fixed panel to suit left or right installation, see illustration 9a below. Once the end has been rotated to suit your direction re tighten the
allen key screw and slide bracket over fixed panel, mark the drill hole on the curb and remove the bracket so you can drill the 1/4”
hole into curb. Now install green anchor plug, fill this hole with a little bit of silicone to waterproof, reinstall bracket on fixed panel then
screw the bracket down to secure. Note: If you are fixing floor clamp to fiberglass shower base use a 1/8” drill bit to pre-drill the hole
rather than 1/4” tile drill bit. You will not use the green wall anchor on shower base.
Fixed Panel-Right Hand Sliding Door
(Fixed panel goes in front)
9a. Fixed Panel Clamp can be manipulated for
either a right or left hand shower by loosening the
allen screw on the bottom of the floor bracket
(SD18). The fixed panel will always go in front
while the sliding panel always goes on the inside/
shower side of the floor bracket (SD18).
Fixed Panel - Left Hand Sliding Door
(Fixed panel goes in front)