
Installation


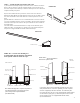


DETAIL #8b
Double Face Tape
Fixed Glass Pan
Glass Door
Center Guide
Bottom Cover Curb Dam
End Cap
Wall Channel
Plastic Insert
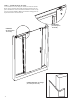
DETAIL #8c— Section view
Inside of the unit
Inside of the unit
Fixed Glass Pan
Glass Door
Center Guide
End Cap
Wall Channel
Thin Plastic Insert
Splash Guard
Bottom Cover Curb Dam
STEP 8 -- Install the End Cap and the Curb Dam:
a) To Install the End Cap first put a bead of Silicon Sealant inside the
base of the end of the U Channel. Add sealant to the inside face of
the vertical part of the End Cap. Slide the End Cap into the U Channel
and press firmly into place.
b) Place the Curb Dam into position in front of the U channel to
butting the wall. Mark the Curb Dam to fit and cut to size with a stain-
less steel hacksaw. Test fit and mark the curb end position on the
wall,
parallel with the centerline. Place a small amount of silicone sealant
on each end. Wipe the base clean of all debris. Clean surface with de-
natured alcohol. (Do Not remove the pencil marks for the outside of
the Curb Dam.)
The Curb Dam comes with Double Face Tape on the bottom, peel
away the paper covering place in position to your marks and press
into place as aligned with the marks and the End Cap.
11
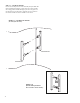
DETAIL #8d— Special Installation
without the Splash Guard
DETAIL #8c— Section view showing the
recommended upgrade with the Installation
of the Splash Guard as shown in Step 1.
DETAIL #8a
If you have chosen not to install the upgrade in Step 1 and
now find that there is excessive splashing or leaks a Splash
Guard is supplied for the door bottom. To install this part:
a) remove the door; b) cut to size and install the Splash Guard
on the bottom of the glass; c) switch the plastic insert in the
Center Guide for the one supplied with thinner walls;
d) reinstall the Door.
Inside of the unit
Outside
of the unit
Recommended upgrade—replace the plastic in-
sert with the thinner insert when using the
optional Poly Bottom Splash Guard
(See Detail 12D)