
Installation


3
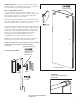
Unpacking: • A box cutter should not be use to open any box.
• Please remove all staples from the box prior to unpacking metal and glass.
• Stand Panels upright on a cushioned base, such as a piece of carpet or towel.
• Do not remove corner protectors during staging of installation.
• Never place glass directly on hard surfaces.
• Any assembly that requires the panel to lay flat must be on a cushion surface.
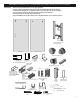
Center Guide Assembly #8
Bottom
“U” Channel
#6
Horizontal Rail
#9
(Assembled with
Panel Screws #14)
Door
Stop/
Bumper
#12
Horizontal Rail
Mounting Bracket
Assembly
#10
Vertical
Wall Jamb #1
Door -- #3
Roller Limiter
#15
Roller Assembly #13
Fixed Panel #2
Curb Dam
End View
#18
End Cap
#17
Clear Vinyl
Door Bumper #16
Clear Setting Blocks #7
Clear
Plycarbonate
Splash Guard
#24
Clear “H” Vinyl #19
Plastic Wall Anchor
#20
Panhead #8 1 1/4”
#21
Flathead #8 1 1/4”
#22
2.5 mm
3 mm
4 mm
5 mm
HEX L KEYS #23
Panel Screws
#14
(Assembled on Header #9)
Locking
Set
Screws
Locking
Set
Screws
(Inner)
(Outer)
Handle Assembly #4
(view from bottom)
Guide 3/8” Glass
Plastic Insert #11
Note: the thinner Plastic
Insert is recommended for
use with the Splash Guard
(#24). See page 11.
Guide #8a
Alternate
Plastic Guide
#11d
Note: the alternate Plastic Guide is
is for use with 3/8” glas and no splash guard
Cover Plate #8b
Double Face
Tape #8c
IMPORTANT: Read all instructions carefully and become familiar with all parts before installation.