
Installation


6
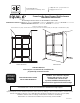
STEP 4. Position for second Header Wall Bracket -- .
Extend the pencil centerline from the marked center
line on the curb and use a plumb or level to determine
the correct vertical position.
Detail 4A
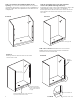
Detail 5A
Detail 5B
Detail 5C
Using a level to mark the location for the
second Header Bracket.
Drill the holes and fasten the second
Header Bracket to the wall.
IMPORTANT NOTE: The header must be exactly
level to insure the correct operation of the
doors. If the header is out of level the doors will
not close properly.
STEP 5.
Use a level to determine the exact position as
follows:
• Place the second Wall Header Bracket on the
Header — loosen the set screws to slide onto
the Header —and place the other end of
Header in the installed Wall Bracket.
NOTE: When placing the header into the bracket squeeze each
end to be sure that the stainless steel cladding is tight against
the aluminum header bar to avoid bending and
damaging the header finish.
• Lower the Header with the installed second
Wall Bracket in position as aligned centered on
the marked vertical centerline.
• Use a level to determine the correct level
position for the second Wall Bracket. (D etail 5B)
• Mark the top and outside of the Wall Bracket
and then remove the header and take the
second wall bracket off the header and place it
the marked in position.
• Mark the installation holes. (Same s Detail 3B)
• Drill and install the second Wall Bracket.
After drilling the
holes for the sec-
ond Header
Bracket add
silicone to each
hole and put the
anchors in place.
Fasten with the
flathead screws
supplied.
Install the Header after Steps #6 & 7 in Step #8 on page 8.
NOTE: DO NOT install the Header at this time.
Use a level to continue
the curb centerline up
the wall, Mark with a
pencil.