
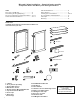
Installation


10
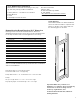
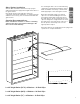
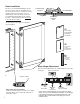
#3
Screws adjust
for Flush Fit
to cabinet face
#2
Screws adjust
for Fit to
Top and Bottom
to cabinet face
#1
Screws adjust
for Fit alignment
left and right
to cabinet face
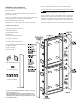
Hinge Cover Name Plate
#1 Screw -
Adjust Left to Right
#3 Screw -
Adjust
Front to Back
#2 Screw -
Adjust
Top to Bottom
Blum Hinge Adjustment
The doors after adjustments are completed place cover caps
on hinges.
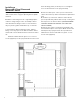
Hinge Toe Plate
Hinge Plate* Factory Installed.
*If the door binds and does not fully close, adjust
the Hinge Plate on the cabinet up and down, to
relieve the tension
Corner Protectors
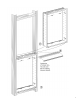
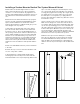
Door Installation
The doors are packed individually for protec-
tion of the mirror surfaces. Carefully remove
the door from the carton.* Hold the door in the
upright position snap open the factory in-
stalled hinges. Place the hinge onto the fac-
tory-installed mounting plate in the cabinet --
Toe rst -- and snap into position. Be careful
not to chip the door mirror.
*Do not remove corner protectors until the
door is installed
To view a video showing helpful tips on how to adjust our cabinet
hinges, please go to GlassCraftersMirroredCabinets.com and navigate
to the cabinet product that you are installing. Simply click on the
installation tab (located below the product images) to view our
installation videos.
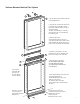
1) Insert into
Hinge Toe
first
Hinge Plate
2) Lift and snap
into place
Door with Hinge