
Installation


8
Side Mirror Kit Installation
For surface mounted and semi-recessed
Mirrored Cabinets.
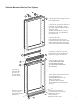
1) Attach the side mirror kit brackets thru the pre-punched
holes in your cabinet.
2) Try to use the rst row from the top and bottom of your cabi-
net. Using the sixteen 10 -32 x 1/2” screws fasten the
brackets and nish with screw caps.
3) Attach the 2” x 2” foam pads to the outside cabinet wall
Side Mirror Kit parts list:
• 2 Mirror side panels to match the
model height ordered
• 8 Side kit brackets with
adhesive tape
(to hold the side mirror in place)
• 16 Screws, 10-32 x 1/2”
• 16 Screw Caps ( part # 434-00)
• 12 2”x 2” Black Foam Pads with peel
off adhesive backing
(to affix to cabinet)
• 2 Alcohol Pads
above, below and in between the position of the brackets.
4) Clean the backside of the side mirror kit panel with the Alco
-
hol pads. Check alignment before you attach the mirror to be
sure it will align even with the top of the cabinet.
5) Peel off paper covering of the adhesive tape on the side kit
brackets pads. (This holds the mirror in place). Carefully align
the mirror to the cabinet evenly on all four sides. Press rmly
into place and attach to the side kit mirror to the cabinet body.
(Note: Once installed, do not try to remove the mirror as it will break.)
To view a video showing helpful tips on how to install side
mirror kits, please go to
GlassCraftersMirroredCabinets.com and navigate to the
cabinet product that you are installing. Simply click on the
installation tab (located below the product images) to view
our installation videos.
Side Mirror Bracket
Side Mirror
10-32 1/2” Screws
2” x2” Foam Pads