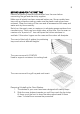
INSTALLATION AND INSTRUCTION MANUAL Gas and Electric 60cm Buit in Ovens Models: Glem - GF64GEI, GF64EEI Emilia - EMF61MVI, EF64EI IMPORTANT This oven is for domestic applications. It is NOT suitable for commercial applications of any kind. Do not install the oven if there is any doubt. Contact Glem Gas Australasia if you require clarification. This oven must be installed by a qualified and licensed installer in accordance with these instructions.
Dear Customer, Thank you for purchasing our product. This manual has been written to assist you and instruct you in the operation of your oven. It will help you get the best performance and make full use of the features of your oven. The safety precaution and warnings are listed for your safety and the safety of others when operating your oven. Please keep this manual in a safe place for future reference. This oven has been designed for use in cooking of domestic (household) food.
SAFETY HINTS AND USAGE TIPS 1) OVEN DOOR Keep children away from the glass oven door while cooking is in progress: if touched, the glass could cause burns. Don’t let children sit on or play with the oven door. Do not use the drop-down door as a stool to reach above cabinets. Do not rest baking dishes or put any weight on the oven door. 2) GRILL - ALL MODELS The grill is electric. Grilling must always be done with the oven door closed.
GENERAL WARNINGS • This oven must not be used by persons (including children) whose physical, sensory or mental capacities are reduced or by persons without experience or instruction, unless under supervision of a responsible person or with appropriate instruction on the use of the oven. • Young children should be supervised to ensure they do not play with the oven. • WARNING: Accessible parts may become hot during use. To avoid burns young children should be kept away.
BEFORE USING FOR THE FIRST TIME Remove all packing material and literature from the oven before connecting the gas and electricity supplies. Make sure all plastic has been removed before use. Some models have trays with a protective coating; make sure the plastic coating has been removed. Clean the interior of the oven and all accessories with soap and water and dry them carefully. Switch on the empty oven on maximum to eliminate grease residues from manufacturing.
GAS OVEN DESCRIPTION OF CONTROLS Use the controls and knobs on the oven instrument panel to select the various functions. ‘TIMER’: Minute counter – rotate the knob to the desired time up to 60 minutes and a bell will ring at the end of the time period. For very short time periods turn the knob past the point you want and then back to it to load the timer mechanism. Some models may have an electronic timer. Refer to electronic timer instructions in this book.
GAS OVEN OVEN OPERATION Lighting the Gas Oven The oven burner must be ignited with the DOOR OPEN. There is a safety device which prevents the oven lighting unless the door is in the open position 1. Open the oven door and remove the grill tray and leave it out. 2. Press the ‘GAS OVEN’ knob and rotate it anti-clockwise to the maximum setting. The electronic ignition is activated automatically when the knob is depressed. 3. Keep knob depressed for about 15 seconds after the flame has lit.
ELECTRIC OVEN DESCRIPTION OF CONTROLS Electric ovens have the advantage of being able to offer different types of heat to suit many cooking applications. Models vary according to the functions available. TIMER: Minute counter – rotate the knob to the desired time up to 60 minutes and a bell will ring at the end of the time period. For very short time periods turn the knob past the point you want and then back to it to load the timer mechanism. Some models may have an electronic timer.
OVEN FUNCTIONS – Electric Oven (functions vary according to model) FAN FORCED: The heat is generated by a circular element and distributed by a fan. Fast and efficient and allows for baking on more than one shelf. Some foods may need to be rotated using this function. ELECTRIC GRILL: On some models this is the inner part of the upper element. Always grill with the door closed. Recommended operation is for 30 minutes only, great for toasting, browning foods etc.
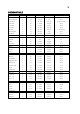
COOKING TABLE Dish Cakes Chocolate cake Shelf Position 1=top Static Fan Oven 2 23 Temp Degrees C Static Fan Oven 180-190 180 Cooking Time Minutes 35-40 Creme Caramel 3 23 130-150 130 30-35 Cup Cakes 1 12 190-200 180-190 18-20 (35 cakes) Fruit Cake 3 23 175-190 165-180 35-35 Jam Tarts 2 23 185-200 185-200 40-50 Nut Cake 3 23 190-200 180-190 40-45 Scones 1 12 190-230 180-190 17 (35 scones) Sponge Cake 2 23 195-210 185 35-45 Swiss Roll 2 23 195-200 185-200
Cooking Notes: • The information provided is purely a guideline. Modify to suit experience, eating habits and personal taste. • The times indicated in the table do not include preheating of the oven, which is always recommended. • The time and temperature indicated refer to average quantities of food: meats1/1.5kg, dough for confectionery, pizza, bread 0.5/0.8kg. • Information in brackets about shelves indicates the shelf to be used when cooking several dishes together.
BAKING TROUBLE SHOOTING All ovens are different and it can take some time to learn the cooking characteristics of your new oven. Listed below are some common problems, causes and suggested solutions that may assist.
GRILLING TIPS: • Before introducing food inside the oven it is advisable to pre-heat the oven for at least 5 minutes. • Place the food to be grilled on the appropriate rack or tray, positioning it at the highest level depending on the volume of food and the amount of direct heat you want to apply. • Place a dripping pan in the bottom compartment of the oven to collect fats.
CLEANING AND MAINTENANCE WARNING: the oven must be kept clean, as a build-up of fat constitutes a fire risk. 1. Cleaning of Stainless Steel: In order that your oven retains its new appearance, care should be taken to protect the stainless steel finish. Never use gritty or abrasive sponges. We recommend stainless steel cleaners and protectors. Stains can be prevented by using a clean cloth soaked in soapy water before a spillage becomes cold or dries up.
REPLACEMENT OF INTERNAL OVEN LIGHT WARNING: Ensure the oven is switched off before replacing the lamp to avoid the possibility of electric shock. Remove the glass protection cover unscrewing it in an anti-clockwise direction, replace the bulb with a similar bulb (15W) and reassemble. Only use oven bulbs (T300°C) 15w. Never touch the bulb directly; use protective gloves. Only use bulbs available from authorised service centres. REMOVING THE DOOR Open the door fully and flip over the locking tabs.
OVEN INSTALLATION INSTRUCTIONS – Qualified and licenced technicians only. IMPORTANT FOR GAS OVEN INSTALLATION WHEN INSTALLING THE GAS OVEN THERE MUST BE A CAVITY SPACE UNDER THE OVEN TO ALLOW AIR FLOW TO THE BURNER. MOUNT THE OVEN IN THE CAVITY ON 2 X 100mm WIDE SUPPORTS. THERE SHOULD BE 50mm AIR CLEARANCE UNDERNEATH. POSITIONING THE OVEN -all models The oven is designed to be built-in to a fixture. The dimensions must be per the measurements indicated in Figures 1, 2 and 3.
When installing the oven ensure that the supply cable does not kink. Where the appliance is built into a cabinet, the cabinet must be capable of withstanding 70°C. Installation into low temperature tolerant cabinetry (e.g. Vinyl coated) may result in deterioration of the low temperature coating by discolouring or bubbling. If the appliance is to be installed adjacent to vinyl wrapped surfaces, use an installation kit available from the vinyl-wrap supplier.
LOCATION OF INSTALLATION The oven must be installed and operated in a suitable place and in conformity with the laws in force. Air flow requirement The installer must refer to the laws in force regarding ventilation and discharge of combustion products. The place where the gas oven is installed must have a natural air flow necessary for gas combustion. The room air flow required for combustion on Emilia and Glem gas ovens is 5 cubic meters/hour.
INSTALLATION - ELECTRICAL CONNECTION This installation must be undertaken by a licensed and authorised technician. • The electrical supply for the oven must be a 240 Volt 50 Hz. • The fuse and electrical wiring of the dwelling must support the load of the oven. • The oven must be earthed. Connect the oven to a properly earthed and rated power socket, as appropriate.
GAS OVEN INSTALLATION - Gas Connection WARNING! THIS OVEN MUST BE INSTALLED BY AN AUTHORISED PERSON – PROOF IS REQUIRED FOR WARRANTY SERVICE CLAIMS. The oven has been manufactured with a Natural Gas injector fitted. For use with LPG the oven must be converted by an authorised technician. The warranty will be voided if the LPG conversion is not undertaken by a qualified gas fitter. The conversion kit is supplied. Information on converting the oven is included with these instructions.
• • When satisfied that the oven is operating correctly, instruct the customer in its safe operation. Ensure the customer understands fully by having them operate the oven in all its functions. GAS CHECKS AND ADJUSTMENTS - LOW FLAME SETTING Check the low flame setting for the oven burner with the control engaged in the minimum position. Light the oven burner and operate at maximum for 15 minutes. Turn the control until it engages in the minimum position and remove the control knob.
Gas checks and adjustments - pressure adjustment First shut off the gas to the oven. Remove the sealing screw from the regulator test point at the rear of the oven and attach the hose from the manometer to the point. Turn the gas back on and light the burner on the maximum temperature setting. Check the pressure and adjust at the regulator if necessary to reach the settings in the table or on the data plate. For LPG adjust at the regulator at the cylinder.
CONVERSION TO ULPG The gas oven has been configured to operate on natural gas only. To operate on ULPG the oven must be converted. The conversion kit is provided with your oven. This is a relatively simple task but must be undertaken by a licensed gas fitter. No responsibility will be accepted by Glem Gas if this requirement is not met and it will void the warranty To Convert to ULPG Operation – Disconnect the electricity and gas. 1. Remove all oven shelves and grill tray. 2.
ADJUSTMENT OF THE THERMOSTAT MINIMUM SETTING The operation is performed with the oven installed in the fixture and after qualified personnel has completed the electrical and gas connections. This measure is necessary whenever the type of gas is changed natural gas to ULPG to guarantee a minimum temperature close to 150°C. Follow the procedures below: • Open the oven door • Remove the floorplate • Turn on the oven at maximum temperature and light the burner.
PRODUCT WARRANTY Thank you for choosing a Glem Gas Appliance, the purchase of this appliance is an important investment in your home and so to protect your investment we urge you to complete the registration card attached, please return it immediately. IT IS A WARRANTY REQUIREMENT THAT PROOF OF PURCHASE BE PROVIDED PRIOR TO REQUESTING A SERVICE CALL. THIS WARRANTY SHALL NOT APPLY IF THE APPLIANCE WAS NOT INSTALLED BY A LICENSED TECHNICIAN AND PROOF IS NOT SUPPLIED.
THIS WARRANTY SHALL NOT APPLY: a) b) c) d) e) f) g) h) If the rating plate has been removed or the serial number or other details on it have been removed or rendered illegible. If the appliance is connected to any gas type or voltage other than shown on rating plate. If the appliance has been subjected to misuse, abuse accident or want of care. If the appliance has been installed, operated or maintained contrary to the instructions supplied by Glem Gas Australasia Pty Ltd.
INSTALLERS CHECK LIST You must test the oven after installation before you hand it over to the customer. On gas ovens, you must have a manometer and a connecting tube to check that the gas pressure is correct. The following checks must be made to commission the oven and to activate the warranty. If this form is not completed fully and correctly it will void the warranty. INSTALLATION CHECK GAS OVENS 1. Has a leak test been completed using soapy water? YES NO 2.
Glem Gas Australasia Pty. Ltd. Division of Glem Gas SpA Italy SERVICE 1300 307 917 Head Office: Post: Email: Web site: 48 Percy Street Auburn NSW, 2144 PO BOX 63 Blaxcell PO South Granville, NSW 2142 info@glemgas.com.au www.emiliaappliances.com.au www.glemgas.com.