manual of buona cucina italiana ... All Cooker models from 2021 IMPORTANT: This cooker is for domestic applications. It is NOT suitable for commercial applications of any kind. Do not install the cooker if there is any doubt. Contact Glem Gas Australasia if you require clarification. This cooker must be installed by a qualified & licensed installer in accordance with these instructions. If you do not retain proof of correct installation your warranty will be voided.
TABLE OF CONTENTS FIRST TIME USE......................................................................................................4 MOVING THE COOKER ........................................................................................5 INSTALLING THE ADJUSTABLE LEGS .................................................................6 INSTALLING THE ANTI TILT BRACKETS..............................................................7 IMPORTANT WARNINGS BEFORE USING THE COOKER..............................
Dear Customer, Thank you for purchasing our product. This manual has been written to assist you, and instruct you in the operation of this appliance. It will help you get the best performance and make full use of the appliance's features. The safety precautions and warnings are listed for your safety and the safety of others when operating this appliance. Please keep this manual in a safe place for future reference. This appliance has been designed for use in cooking of domestic (household) food.
FIRST TIME USE IMPORTANT Remove all packing material and literature from the upright cooker before connecting the gas and electrical supply. A protective plastic film is coated on the stainless steel inside and on the outside of the cooker. It must be removed before use. Some models have trays with a protective coating; make sure the plastic coating has been removed. To make the plastic film easier to remove we suggest using a Stanley knife to trim along joints and edges before peeling back the film.
MOVING THE COOKER When moving the cooker always use two people. When it is installed correctly this cooker complies with all safety requirements. However, it is manufactured from sheet metal stainless steel and care must be taken when moving the cooker as some sharp edges and corners that are not normally intended to be touched could cause injury.
INSTALLING THE ADJUSTABLE LEGS Glem Gas and Emilia cookers are delivered with adjustable height legs that need to be fitted prior to the cooker installation. On some models the legs easily screw into the underside of the cooker. On other models the legs have a new keying system where the screw on the top of the leg is inserted and then slid up the slot so it can be tightened securely. See FIG. 1. You may need to hand tighten the screw into the top of the legs first.
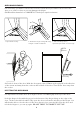
INSTALLING THE ANTI TILT BRACKETS Install the legs to the cooker and adjust the height to the desired level. Make sure that this height is absolutely correct to what you require. 1. On the rear of the cooker there is a covering panel. Accurately measure the distance from the top of this panel to the floor Height H. 2. Mark the same height on the wall against which the cooker is to be installed. 3. Mark the centre of the cooker at the same height on the wall. 4.
IMPORTANT INFORMATION AND WARNINGS BEFORE USING THE COOKER After the cooker is unpacked make sure that it is not damaged. If unsure please contact Glem Gas Australasia on 1300 307 917. All packaging materials should be disposed of appropriately. Cookers are hot. This cooker meets Australia Standards on external surface temperatures but the surfaces are still hot and children should not be allowed to play with the cooker at any time.
OVEN DOOR REMOVAL If at some time you wish to remove the oven door follow these procedures. Do not force the door on or off the cooker as you may damage the hinges. Call Glem Gas Australasia on 1300 307 917 should you require assistance. 1. Open the door fully. 2. Rotate the hinge locking tab using a finger or small screw driver. 3. Tab locked in position, repeat the procedure on each hinge. OPEN 150 mm Lift up Pull away 4. Crouch in front of the door.
IDENTIFYING THE SYMBOLS ON THE CONTROL PANEL Symbols printed on the control panel identify the functions controlled by each knob and switch. The table shows the meaning of each symbol. There may be slight differences in designs.
OPERATION OF THE GAS COOKTOP Gas Burners The combination of large burners, wok burners and smaller burners provides the flexibility for different cooking tasks. All burners are fitted with flame failure safety devices. This means that if the flame goes out for any reason the gas stops flowing. To ignite any burners simply depress the corresponding control knob and rotate anti clockwise to the high flame position. As the knob is rotated the gas begins to flow and the electrode begins sparking.
OPERATING THE GAS OVEN The gas oven is equipped with a gas thermostat. Its purpose is to keep the temperature at a constant heat. The oven is fitted with electronic spark ignition and a safety shut off device. Lighting the Oven First open the oven door and remove the grill tray. Leave the grill tray out when operating the oven as it can affect oven performance unless there is a special requirement to have the tray under the cooking.
PRE HEATING THE GAS OVEN After the oven has been switched on, keep the door open for a minute then close the door gently so there is no risk of extinguishing the flame. Set the oven knob to the required temperature and wait for about 20 minutes before introducing the food. Comply with the cooking indication chart in these instructions to get the best out of the oven and choose the right shelf position. Gas ovens heat up very rapidly and will reach temperature within 20 minutes.
ELECTRIC OVEN FUNCTIONS - functions vary according to cooker model Multifunction Electric Oven 1. Remove the grill tray. 2. Choose a function using the selector knob for oven functions. Turn the knob to the symbol of the cooking function you wish to use. On some models the ovens only operate as fan forced and the function is automatically selected when selecting the temperature. 3. Rotate the thermostat knob to the desired temperature. 4.
USING THE TIMERS Type 1 Electronic timer Setting the clock When the oven is first connected, or after a power failure, ‘0.00’ will flash on the display. To set the clock, push the button, then the (+) or (–) buttons. The time of day will be set after 10 seconds. Changing the volume of the beep The (–) button can also be used to change the volume of the beep. Set the timer for one minute. When the beep sounds use the (–) button to adjust the volume.
SUGGESTED SHELF POSITIONS - TEMPERATURES & COOKING TIMES Dish Shelf Position (1 = Top Temperature Degrees C Cakes Static Fan oven Static Fan oven Cooking Time in minutes Chocolate Cake Cream Caramel Cup Cakes Fruit Cake Jam Tarts Nut Cake Scones Sponge Cake Swiss Roll Pastries Brioches Cookies Pastry Puff Pastry 2 3 1 3 2 3 1 2 2 23 23 12 23 23 23 12 23 23 180 - 190 130 - 150 190 - 200 175 - 190 185 - 200 190 - 200 190 - 230 195 - 210 195 - 200 180 130 180 - 190 165 - 180 185 - 200 180 - 190 1
OVEN OPERATION NOTES The cooking information provided is intended purely as a guideline. Modify them to suit you experience, eating habits and personal taste. The times indicated in the table do not include preheating of the oven, which is always recommended. The times and temperature indicated refer to average quantities of food - meats = 1/1.5kg; dough for confectionary, pizza, bread = 0.5/0.8kg.
CLEANING AND MAINTENANCE Do not use strong detergents to clean your cooker. Many detergents or cleaning products will mark stainless steel. Oven cleaners are intended for cleaning the internal liner of the oven only and will possibly damage the inside of the door. Avoid ignitors becoming wet as they are an electrical part. Avoid water falling into the burners and always dry everything carefully before use. The oven and hob must be kept clean, as a build up of fat constitutes of a fire risk.
INSTALLATION INSTRUCTIONS - Licensed qualified installers only These instructions are for the use of a qualified installer only! Warranty is immediately voided if the cooker is not installed by a licensed gas fitter. It is the owner’s responsibility to ensure that the installer is correctly licensed to complete installation. Faulty installations will not be serviced and you may be subject to a call out fee if the cooker is found to be incorrectly installed.
RANGEHOODS Rangehoods and overhead exhaust fans must be installed according to manufacturers’ instructions. Rangehoods should be installed not lower than 650mm above the cooktop. Minimum 650mm from cooking surface to underside of rangehood Height from cooking surface to floor when installed on supplied legs: 895mm - 955mm VENTILATION REQUIREMENTS FOR GAS COOKERS A cooker should not be installed in any room which has a volume less than 5.6 cubic metres. If the room is between 5.6 cubic metres and 11.
DIMENSION DETAILS 1. Location of gas inlet Bottom rear of upright cooker: 60 mm from right hand side 400 mm from the bottom of the cooker plus the height of the legs. 2. Electrical connection Connection is by means of flexible cord and plug. Check the data plate - models with electrical consumption greater than 2400W will require a 15 amp connection. 3.
INSTALLATION - GAS CONNECTION These technical instructions have been prepared for use by Authorised persons. THIS APPLIANCE MUST ONLY BE INSTALLED BY AN AUTHORISED PERSON – PROOF IS REQUIRED FOR WARRANTY SERVICE CLAIMS. The cooker has been manufactured with Natural Gas injectors fitted. For use with LPG the cooker must be converted. An LPG conversion kit is supplied with every new cooker. Information on converting the cooker is included with these instructions.
CONVERSION TO OPERATE ON ULPG This must be done by a licensed Gas Fitter. COMPULSORY REQUIREMENT Included with the cooker is a conversion kit for converting the cooker to operate on ULPG (LPG in Aust.). The kit consists of replacement injectors for all burners, including oven burner for gas models. The kit also includes a test point for checking gas pressure and a replacement label identifying the type of gas the cooker is connected to.
GAS INJECTOR SELECTION TABLE COOKTOP BURNER TYPE NATURAL GAS ULPG Inj. Diam. MJ/h Gas Press. Inj. Diam. MJ/h Gas Press. Wok Burner 1.80 14.4 1.0 1.00 13.0 2.75 Large/Fish Burner 1.55 11.5 1.0 0.88 10.0 2.75 Meduim Burner 1.18 7.0 1.0 0.68 6.0 2.75 Small Burner 0.90 4.0 1.0 0.52 3.5 2.75 53/60/70cm 1.41 9.0 1.0 0.79 8.5 2.75 80cm 1.75 14.5 1.0 0.96 12.5 2.75 90cm 1.85 15.5 1.0 1.00 13.0 2.
QUICK REFERENCE FAULT FINDING CHART GAS COOKTOP Burner does not stay alight after several attempts 1. Check that the burner is correctly assembled. Sometimes the parts get misaligned and that interrupts correct gas flow. 2. Make sure the gas supply is turned on. 3. Make sure that the burner is dry and clean. 4. Ensure there is nothing blocking the gas inlet on the burner or the slots in the flame spreader. 5. Try to light the burner using a match, this will identify if it is an ignition fault.
PRODUCT WARRANTY Thank you for choosing a Glem Gas or Emilia Appliance. The purchase of this appliance is an important investment in your home and so to protect your investment we urge you to complete the registration card attached, please return it immediately.
Light Globes This warranty does not cover any glass damage or replacement of light bulbs. Consquential Damage or Economic Loss Glem Gas Australasia Pty Ltd accepts no liability pursuant to this Warranty for any cost or consequential damage or economic loss whether direct or indirect, to any person or property, arising from breakdown or failure of this appliance or any part thereof, and no responsibility is to be implied or accepted over and above the replacement value of the product.
INSTALLER’S FINAL CHECK LIST You must test the cooker after installation before you hand it over to the customer. You must have a manometer and a connecting tube.