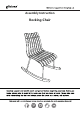
Assembly Instruction Rocking Chair
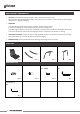
PRE-ASSEMBLY PREPARATION • CAUTION: Assembly will require at least 2 adults. DO NOT use power tools. Please inspect all items BEFORE assembly. If for any reason you need to return this item, please kindly return it in it's original packaging. • WARNING! 1. DO NOT let any sharp objects touch or rub the surface of the product. 2. When assembling, do not let children play around the working area. 3. DO NOT tighten all bolts and screws completely until the entire unit has been assembled and set up. 4.
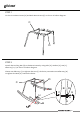
STEP 1 Fix the Front Base Frame (D) and Back Base Frame (C) as shown in below diagram. C Front D STEP 2 Attach the Rocking Bar (B) to the Base Frame by using Blot (G), Washer (E), Nut (F), Allen Key (H, I) as shown in below diagram. Please use Allen Key (I) to tighten the Nut (F) clockwise, meantime use Allen Key (H) to tighten the Bolt (G) counterclockwise.
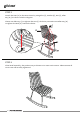
STEP 3 Attach the Seat (A) to the Base Frame by using Blot (G), Washer (E), Nut (F), Allen Key (H,I) as shown in below diagram. Please use Allen Key (I) to tighten the Nut (F) clockwise, meantime use Allen Key (H) to tighten the Bolt (G) counterclockwise. I F A I F E E H G G H STEP 4 After initial assembly, the product may acclimate to its new environment. Please ensure all screws are still securely tightened.