
User's Manual


This document and information herein is the property of Global Display Solutions Ltd. and all
unauthorised use and reproduction is prohibited. Copyright © 2011 by Global Display
Solutions Ltd, Yorkshire, UK. All rights reserved. Confidential, Unpublished Property of GDS
(UK).
MAN10278_02
5 of 13
Cleaning the LCD Colour Monitor
1. To clean the LCD panel:
- Wipe the screen gently with a clean lens brush made of camel hair, or a soft, clean,
lint free cloth. This is to remove dust and other particles without scratching the LCD
panel.
- If it is still not clean, then wipe with a damp lint free cloth and blow on it to dry.
2. Do not clean the panel with keton-type material (e.g. acetone), ethyl, toluene, ethyl acid,
methyl, or chloride. These may damage the panel.
3. Do not apply pressure to the panel.
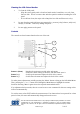
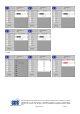
Controls
The controls are three buttons found on the rear of the unit.
Button 1 (Menu) Displays the main menu and the other sub-menus.
Selects the chosen setting or function, and afterwards saves it.
Button 2 (+) Scrolls up the menu and adjusts the level of the control.
Button 3 (-) Scrolls down the menu and adjusts the level of the control.
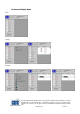
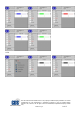
To make picture adjustments, initially pressing the “Menu” button to bring up the OSD Main Menu.
Then, pressing the “+” or “-” button scroll through the Main Menu to highlight the various
functions. Pressing ”Menu” again selects the required command/sub menu.
If an adjustment has been made, there is no need to use a store command for this new setting as this
will occur automatically.
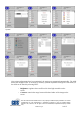
To exit the menu, select EXIT within the menu structure. If no buttons have been pressed for a short
period of time, the menu will automatically disappear from the screen.
3
2
1