
User Manual


10
Chapter 3 Adapter Installation and Configuration
3-1 S
YSTEM
R
EQUIREMENTS
In order to install and use the GL2411V1-A PCMCIA card your PC system must meet the following
requirements:
!"
A PCMCIA Type II or Type III slot
!"
PCMCIA revision 2.10 compliant card and socket services
!"
Windows
®
95,98,ME.2000 or NT (with the Windows
®
CD, for use during installation)
!"
500 Kbytes free disk space for utility and driver installation
3-2 I
NSERTING THE
GL2411V1-A PC CARD
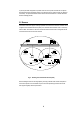
To insert the GL2411V1-A Network Adapter into a notebook computer, do the following:
1. Locate an available Type II or Type III PCMCIA slot.
2. With the PCMCIA Card’s 68-pin connector facing the PCMCIA slot and the GL2411V1-A
PCMCIA label facing up slide the PCMCIA Card completely into the PCMCIA slot.
Fig. 5 Insert the GL2411V1-A into Notebook
After properly inserting the Network Adapter into your notebook, continue with the GL2411V1-A
driver and PRISM Configuration Utility installation.
NOTE:
The PCMCIA slot allows “hot swap” of PCMCIA Card. You may insert or remove the
GL2411V1-A / PCMCIA Card from the slot anytime, even when the power of your computer is on.
NOTE
: Windows
®
requires that the Network card and socket services must be compliant with the
PCMCIA revision 2.10 specification. Please check the documentation of the PCMCIA driver
before installing the GL2411V1-A PCMCIA Card.
NOTE: To comply with FCC RF exposure requirements, this device should be operated in
lap-top computer configurations with a separation distance of 20 cm or more between the
antenna and persons. The antenna should not be operated next to a person’s body.