
User's Manual
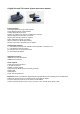


Receiver Unit Operation
Connect the Receiver unit to TV. When you first power up the Receiver unit, this will show the IS DIGITAL
Logo on the screen and then go directly to view mode.
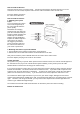
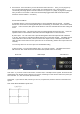
In View mode, press the Cam Select Button to select the camera you wish to view. You will then see the
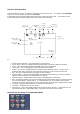
image viewed by that camera together with various function icons as below.
Icon Descriptors:
• Antenna with Signal level – This shows you the RF signal level
• Rec (in Red) – This icon is displayed when the REC button is pressed, to indicate recording
• Zoom – This icon is displayed when the ZOOM feature has been enabled
• Time Lapse – This icon is displayed if Time Lapse has been enabled
• SD/Err – The SD icon is displayed when a good SD card is inserted correctly. The Err icon is
displayed either when a faulty SD card is inserted or when the memory of the SD card is full
• PIR – This icon is displayed if the PIR Trigger has been enabled
• Memory Rolling – This icon is displayed when SD card’s automatic memory over-write is enabled
(when a card is full, old files are automatically over written)
• Camera selected – Shows which camera image is being displayed on the screen
• M/S – M is displayed when you need to manually selecting the particular camera to view by pressing
the Cam Select Button – default setting. S is selected where you have multiple cameras in the
system and you have programming the unit to automatically scan through the multiple camera views
• No Signal – Displayed if the Camera is not connected or out of range
• Time/Date – shows real time clock on screen
• Camera Icon – This icon is displayed when Time Lapse has been selected. In this mode, the unit
will continuously take a single JPEG image, in turn from each camera on the system
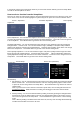
How to Enter the Setup or Programming Mode
Cam1 M/S
SD
Err
Zoom
1-125902.AVI
Rec
2010 09 22
18:50:02
Real time clock
Ant with
Signal level
Zoom
operation
SD inserted/
SD Err
PIR
Enable
Memory
Rolling
Enable
Camera
select
Monitor/Scan
time enable
Recording with
File name
Time Lapse
Enable
No Signal
No Camera connected
- - - -
SD card
Memory full