
User's Manual
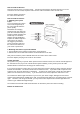


In view mode, please press and hold the mode key for 3 seconds and this will take you into the Setup Mode.
You will see the Setup Menu as above.
How to select a function from the Setup Menu
Press the up, down, left, right and ok buttons to select the appropriate function menu. When the cursor stays
on one of the icons, the icon will be highlighted in yellow and you can press ok to enter that function menu
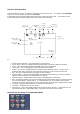
Picture Adjustment Resolution Adjustment Picture Quality
Adjustment
Picture Adjustment - You can select the brightness level from 0 to 5 by pressing the left/right buttons. You
can select the saturation level from 0 to 5 by pressing the down/up buttons. Press OK to save and go back
to the Setup Menu. Press Mode button to go back to the camera viewing mode.
Resolution Adjustment - You can select between NTSC and PAL as the operating system by pressing the
left/right buttons. Default is PAL. You can select between High ( 640x480) or Low (320 x 240) resolution
quality for the picture by pressing the up/down buttons. Default is High resolution. Press OK to save and go
back to the Setup Menu. Press Mode button to go back to the camera viewing mode.
Picture Quality Adjustment - You can select between High or Low picture quality for both images and video
files by pressing the up/down buttons. Default is High picture quality. Note that Resolution and Picture
Quality Adjustment settings will determine the size of the saved files. Press OK to save and go back to the
Setup Menu. Press Mode button to go back to the camera viewing mode
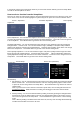
Record Setup Record Time (Sub Menu) Schedule
Record Time
Record Setup
1. PIR Detection - You can select between the PIR motion sensor being On/Off by pressing the left/right
button. Default is Off. Press the Down button to enter the next programming option in this section
or press OK to save and go back to the Setup Menu. Press Mode button to go back to the camera
viewing mode.
Note: If you have two or more cameras connected in Quad mode, then recording will start from the
pir triggered camera.
Whilst the DVR is recording, the PIR trigger on all other cameras will be
disabled.
2. Memory Rolling - You can select whether Memory Rolling is On/Of by pressing the left/right buttons.
Default is On. Press the Down button to enter the next programming option in this section or press
OK to save and go back to the Setup Menu. Press Mode button to go back to the camera viewing
mode.
Note: If Memory Rolling is enabled and the SD card is full, then any new recording will automatically
overwrite the first folder saved on the SD card.