
User Manual

44
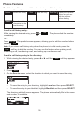
Setting date and time preferences
From the Preferences menu, press q to highlight Date & Time, and then press
SELECT.
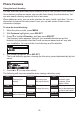
The Date & Time menu appears.
Note: If the Network Time Protocol (NTP) server is enabled, you cannot manually set
the date and time using this this menu.
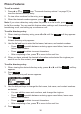
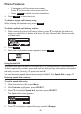
To set the time format:
1. From the Date & Time menu, ensure that Clock Time is highlighted.
2. Press t or u to select a 12-hour clock (12am/pm) or 24-hour clock.
3. Press
Save
.
To set the date format that appears on the idle screen:
1. From the Date & Time menu, press q to highlight Clock date.
2. Press t or u to select the desired date format (DD/MM/YY, MM/DD/YY, YY/MM/
DD)
3. Press
Save
.
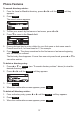
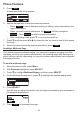
To set the Time Zone:
1. From the Date & Time menu, press q to highlight Time Zone.
2. Press
Edit
.
3. Press p or q to select a setting. The time zone is set as an offset from GMT. For
example, EST is -5, and PST is -8.
4. Press
Save
.
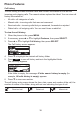
To enable or disable the NTP (Network Time Protocol) server:
1. From the Date & Time menu, press q to highlight NTP server.
2. Press t or u to select Enabled or Disabled.
3. Press
Save
.
Note: If the NTP server is disabled, you must manually set the time and date. This
setting is valid only if the system administrator has already congured the Network
Time settings. For more information, see the VCS752 Administrator and Provisioning
Guide, available from businessphones.vtech.com.
Conguring the Phone