
Instructions / Assembly


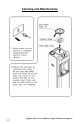
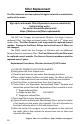

Support videos are available at: https://bluline.com/support/
14
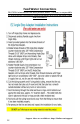
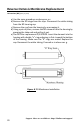
EZ Connections
NOTE: Tubing must be inserted 3/4” into the fitting. We recommend marking the tubing to
ensure it has been fully inserted.
The standard tubing connections on the water coolers are EZ connect fittings. Use
the tubing and follow the instructions below in fig. 7 to make the connections. If you cut
the tubing, make sure it is a square cut, fits squarely in the fitting and seals properly.
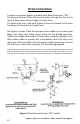
Cut the tube square
Cut the tube square. It is essential that the outside diameter is free of score marks and that burrs
and sharp edges be removed before inserting into fitting. For soft thin walled plastic tubing we
recommend the use of a tube insert.
Insert tube
Fitting grips before it seals. Ensure tube is pushed into the tube stop.
Push up to tube stop
Push the tube into the fitting, to the tube stop. The collet (gripper) has stain-less steel teeth which
hold the tube firmly in position while the “O” ring pro-vides a permanent leak proof seal
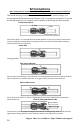
Pull to check secure
Pull on the tube to check it is secure. It is good practice to test the system prior to leaving site
and/or before use. Push in collet and remove tube
To disconnect ensure the system is depressurized before removing fitting. Push in collet squarely
against face of fitting. With the collect held in this position, the tube can be removed.
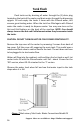
Push Collect in
Pull Tube Out
“O” Ring
Collet
Stainless Steel Teeth