
Installation Guide

INSTRUCTIONS
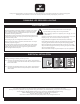
Fig. 2Fig. 1
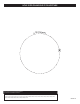
Cutting hole diameter
Fig. 3
Fig. 4
Fig. 5
GLOBE LIGHTING KIT INCLUDES:
(1) junction box (1) foam gasket (1) light panel (1) IS sheet with hole template
SAFETY PRECAUTION:
Before assembling your lighting fixture, TURN OFF POWER
and consult a qualified licensed electrician.
HOUSING INSTALLATION:
Step 1
Turn power OFF from the electrical panel prior to installation.
Step 2
Determine the location for installation and cut ceiling hole in accordance with cut-hole dimensions. Refer to Hole Diameter table for appropriate
sizes or use supplied template. (Fig. 1)
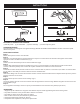
Step 3
Open the junction box cover and remove the appropriate knockout(s) on the side panel. (Fig. 2)
Step 4
Insert the electrical supply cable through the knockout. If you do not have electrical wiring experience, Globe recommends consulting a qualified
licensed electrician who will ensure the fixture is installed in accordance with local installation codes.
Step 5
Using quick-connect push-in terminals, connect the green ground wire to the green wire terminal; black wire to black wire terminal; white wire to
white wire terminal. (Fig. 2) Use cable clamp to secure wire in knockcut hole.
Step 6
Place all wiring and connections back into the box and close the cover. Plug the connector cable from the junction box into the light panel, secure
with screw cover.
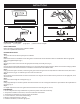
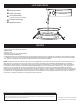
Step 7
Insert junction box through the mounting hole. (Fig. 3)
Step 8
Push spring-loaded clips on the fixture upwards and insert fixture base in to the mounting hole. Release the clips and fixture will be pulled flush to
the ceiling. (Fig. 4)
Step 9
For airtight requirements ensure foam gasket remains between fixture and ceiling (do not remove).
MAINTENANCE
1. Do not modify this fixture. Any modifications may render the product unsafe and void warranty.
2. This product is suitable for wet locations, and can be used indoors and outdoors.
3. This product is IC-Rated and can come into contact with insulation.
4. For new construction, retro-fit and insulated ceilings.
5. Minimum starting temperature is -18˚C (0˚F)
6. Suitable for all locations, it is ideal for tight spaces.
4 inch slim 4 1/4” ± 1/8” (110 ± 3mm)