OWNER & OPERATOR INSTRUCTION MANUAL Model # Serial # Model 3600 FOR GLOBE SLICER MODELS 3600, 3850, 3975 For Service on your Slicer 1. Check the enclosed authorized servicer list for the servicer nearest you 2. Or...Visit our website at www.globeslicers.com (select Service button) 3. Or...Call Globe service department 937-297-7247 and ask for the contact information for your local service company.
INDEX ATTENTION OWNERS AND OPERATORS ................................................................................... 4 KEY COMPONENTS OF THE SLICER .......................................................................................... 5 GLOBE SLICER SAFETY TIPS ...................................................................................................... 6 INSTALLATION AND PROPER GROUNDING ...............................................................................
ATTENTION OWNERS AND OPERATORS Globe’s equipment is designed to provide safe and productive processing of food products as long as the equipment is used in accordance with the instructions in this manual and is properly maintained. Importantly, unless the operator is adequately trained and supervised there is a possibility of serious injury. Owners of this equipment bear the responsibility to make certain that this equipment is used properly and safely.
KEY COMPONENTS OF THE SLICER End Weight Knife Sharpener Food Chute Food Chute Handle Oil Hole Receiving Area Slice Thickness Dial On/Off Tab Power Indicator Light Rubber Feet 3600 FRONT VIEW Knife Ring Guard Knife Motor Knife Power Cord Touch Pad Control Panel -Knife Motor Start/Stop -Chute Speed -Power Indicator Light 3975 SIDE VIEW Slicer Table Knife Cover Chute Arm Data Plate Auto Engage Lever Lift Lever 3975 SIDE VIEW Page 5
GLOBE SLICER SAFETY TIPS SHARP KNIFE BLADE TO AVOID SERIOUS PERSONAL INJURY: • NEVER touch this slicer without training and authorization from your supervisor or if you are under 18 years old. Read owners and operator manual first. • ONLY install on level nonskid surface in clean, well-lighted work area away from children and visitors. • ALWAYS ground slicer utilizing proper power source. • NEVER TOUCH KNIFE. Keep hands and arms away from all moving parts.
INSTALLATION UNPACKING: 1. Unpack the slicer immediately after receipt. If the machine is found to be damaged, save the packaging material and contact the carrier within fifteen (15) days of delivery. Immediately contact your source of the equipment. You have no recourse to damage after fifteen (15) days. 2. You should receive with the slicer, rubber feet, Globe oil, warranty card, wall chart and an owners operator instruction manual.
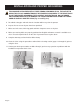
INSTALLATION AND PROPER GROUNDING THIS MACHINE IS PROVIDED WITH A THREE-PRONG GROUNDING PLUG. THE OUTLET TO WHICH THIS PLUG IS CONNECTED MUST BE PROPERLY GROUNDED. IF THE RECEPTACLE IS NOT THE PROPER GROUNDING TYPE, CONTACT AN ELECTRICIAN. DO NOT UNDER ANY CIRCUMSTANCES CUT OR REMOVE THE THIRD GROUND PRONG FROM THE POWER CORD OR USE ANY ADAPTER PLUG (Fig. 8-1 and Fig. 8-2). 5. Post Globe safety tips and wall chart in a location within easy view of operator. 6.
OPERATING INSTRUCTIONS SHARP KNIFE BLADE TO AVOID SERIOUS PERSONAL INJURY: • NEVER touch this slicer without training and authorization from your supervisor or if you are under 18 years old. Read owners and operator manual first. • NEVER TOUCH KNIFE. Keep hands and arms away from all moving parts. • NEVER OPERATE slicer without knife cover and knife ring guard securely installed. • BEFORE TURNING SLICER ON, place auto engage lever in “Manual” position (automatic slicers only).
OPERATING INSTRUCTIONS MANUAL SLICER OPERATION 1. With slicer off, pull the food chute completely towards you and place the food product on the food chute. Slice only boneless, unfrozen product with the slicer. Use the end weight to hold the food product in place. If the end weight is not needed, it may be stored out of the way by swinging it back behind the food chute and locking it on the retaining pin. 2. Make sure all knobs are tightened prior to using the slicer. 3.
AUTOMATIC OPERATING INSTRUCTIONS AUTOMATIC SLICER OPERATION BEFORE beginning to use the slicer for automatic slicing, MAKE SURE the auto engage lever is in the “Manual” position. Automatic slicer operation: NEVER put hand into chute arm opening on right side of slicer. Keep hands and arms away from all moving parts. 1. Make sure the slicer is turned off (power indicator light not illuminated). Make sure auto engage lever is in “Manual” position and that the food chute moves freely. 2.
AUTOMATIC OPERATING INSTRUCTIONS 7. To stop the automatic movement of the food chute, push down or lower the auto engage lever to the “Manual” position. The knife is still rotating even though the chute has stopped. 8. To turn slicer completely off and stop the knife, press the stop button. If the auto engage lever has not already been returned to the “Manual” position, push down or lower the lever to the “Manual” position. 9. Using the food chute handle, pull the food chute all the way towards you.
CLEANING SHARP KNIFE BLADE TO AVOID SERIOUS PERSONAL INJURY: • BEFORE CLEANING, SHARPENING, SERVICING, OR REMOVING ANY PARTS, always turn slicer off, turn slice thickness dial clockwise to closed position, remove food chute, and unplug power cord. • NEVER attempt to clean slicer with the knife running. • NEVER attempt to remove knife or knife ring guard for cleaning. Your slicer should be cleaned and sanitized as often as necessary or at least once per day.
CLEANING • DO NOT put components in dishwasher. • Dilute detergent per supplier’s instruction. • DO NOT hose down, pressure wash, or pour water on the slicer. • NEVER use scrubber pad, steel wool, or abrasive material to clean the slicer. • NEVER remove sharpener from slicer or immerse in water. • Clean the disassembled components with a mild detergent and warm water solution. Allow parts to air dry. • DO NOT use bleach or other caustic/strong detergetns on the slicer base or components.
CLEANING 12. Clean and wipe down the entire slicer. Use a mild non-bleach, non-chlorine sanitizer if required. DO NOT use caustic or strong detergents on the slicer base or components. REASSEMBLY 1. Manual slicers are equipped with a cleaning brace that raises the slicer to allow cleaning underneath. Push the chute arm to the back of the slicer. Simply lift up the front of the slicer and pull the brace completely towards the front of the slicer and lower the unit (Fig. 15-1). 2.
KNIFE SHARPENING SHARP KNIFE BLADE TO AVOID SERIOUS PERSONAL INJURY: • NEVER touch rotating knife. • ALWAYS keep hands clear of all moving parts. • ALWAYS turn off slicer, return auto engage lever to “Manual” position (automatic slicers only), turn slice thickness dial completely clockwise, and remove food chute before sharpening. • NEVER sharpen slicer unless all guards are installed.
KNIFE SHARPENING BE ALERT. The next steps will expose the knife. 4. Lift the sharpener cover to expose sharpening stones (Fig. 17-1). Stones should be clean and dry. ALWAYS keep hands and arms away from exposed knife. Figure 17-1 SHARPENING THE KNIFE 1. Pull on knob #1 (Fig. 17-2) keeping it extended and swinging sharpener up into position. Release knob, and sharpener will lock in sharpening position. #1 2. Pull out knob #2 (Fig. 17-3). 3.
SIMPLE MAINTENANCE AND REPAIR SHARP KNIFE BLADE TO AVOID SERIOUS PERSONAL INJURY: • BEFORE CLEANING, SHARPENING, SERVICING, OR REMOVING ANY PARTS, always turn slicer off, turn slice thickness dial clockwise to closed position, remove food chute, and unplug power cord. • NEVER touch this slicer without training and authorization from your supervisor or if you are under 18 years old. Read owners and operator manual first. • NEVER TOUCH KNIFE. Keep hands and arms away from all moving parts.
SIMPLE MAINTENANCE AND REPAIR End Weight Slide Rod Slide Rod 1. Add a few drops of Globe oil to the end weight rod daily (Fig. 19-1). Move the end weight up and down several times to distribute the oil. Sharpener 1. The sharpener shafts should be lubricated every couple of days with a few drops of Globe oil. Add Globe oil to each of the sharpener shafts as designated by the arrows (Fig. 19-2 and Fig. 19-3).
OPTIONAL ACCESSORIES SHARP KNIFE TO AVOID SERIOUS PERSONAL INJURY: • ALWAYS turn off slicer, return auto engage lever to “Manual” position (automatic slicers only), turn slice thickness dial clockwise to closed position, remove food chute, and unplug power cord BEFORE installing accessories. • NEVER TOUCH KNIFE. Keep hands and arms away from all moving parts. • NEVER OPERATE slicer without knife cover and knife ring guard securely installed.
OPTIONAL ACCESSORIES VEGETABLE HOPPER This tubular chute temporarily converts the slicer into an efficient, heavy-duty meat, fruit and vegetable slicer. To use this chute, follow these procedures: DO NOT put hands inside tubular chute during slicer operation. 1. Turn slicer off. 2. Close slicer table. 3. Remove food chute by loosening food chute release knob that fastens food chute to chute arm. Slide food chute off the chute arm. 4. Remove round end weight from tubular chute.
OPTIMAL SLICING PERFORMANCE TO OBTAIN THE MAXIMUM PERFORMANCE AND YIELD FROM YOUR GLOBE SLICER: 1. Read this entire manual before touching slicer and strictly follow all instructions and precautions. THERE IS NO SUBSTITUTE FOR SAFETY! 2. Lubricate the slicer per the instructions on pages 18 and 19. 3. Maintain a sharp knife and replace as necessary. Sharpen frequently for short durations (10-15 seconds). Globe recommends replacing the knife at approximately 11” diameter.
SERVICE AND TROUBLESHOOTING GUIDE SYMPTOM CAUSE Slicer will not start Power indicator light flashing Chute speed light flashing model 3975 model 3850 1 1 SOLUTION Slicer not plugged in Plug in slicer Breaker at panel tripped Reset breaker at power box Auto engage lever in automatic position Move auto engage lever to manual position Knife cover off Install knife cover Knife cover removed or not properly installed Install knife cover Auto engage lever in automatic position Move auto engage lev
LIMITED WARRANTY Globe Food Equipment Company (“GFE”) warrants to the original purchaser of new equipment that said equipment, when installed in accordance with our instructions within North America and subjected to normal use, is free from defects in material or workmanship for a period of 2 years on parts (excludes wear/expendable parts). The labor warranty is 1 year on labor from original installation, or 18 months from actual shipment date, whichever date occurs first.