Model #: Serial #: Model FS14 Instruction Manual for the Flywheel Slicer Model: FS14 For Service on Your Slicer, call Globe Technical Support at 1-866-260-0522. Visit our website for information on additional products available from Globe. www.globefoodequip.com Slicers, Mixers, Countertop Cooking Equipment, Meat Choppers & Scales - IMPORTANT SAFETY NOTICE This manual contains important safety instructions that must be strictly followed when using this equipment.
Index ATTENTION OWNERS AND OPERATORS....................................................................................................... 4 KEY COMPONENTS OF THE SLICER............................................................................................................. 5 GLOBE SLICER SAFETY TIPS......................................................................................................................... 6 INSTALLATION....................................................................
Attention Owners and Operators Globe’s equipment is designed to provide years of safe and productive processing of food products as long as the equipment is used in accordance with the instructions in this manual and is properly maintained. Importantly, unless the operator is adequately trained and supervised, there is a possibility of serious injury. Owners of this equipment bear the responsibility to make certain that this equipment is used properly and safely.
Key Components of the Slicer Knife Ring Guard Knife Sharpener Pusher Knife Guard Product Holder Knife Fast Forward Knob Knife Deflector Slice Receiving Tray Flywheel Carriage Foot Flywheel Handle Grease Collection Pan Knife Cover Pusher Vertical Slide Lever Product Holder Operating Handwheel Base Slice Thickness Knob Knife Drive Chain Foot Bevel Gear Page 5
Globe Slicer Safety Tips SHARP KNIFE BLADE TO AVOID SERIOUS PERSONAL INJURY: Page 6 • NEVER touch slicer before reading and completely understand everything in this instruction manual. You must be at least 18 years old and have had proper training and authorization from your supervisor. • ONLY install the slicer on a level nonskid surface that is nonflammable and is located in a clean, well-lit work area away from children and visitors. • NEVER TOUCH KNIFE.
Installation UNPACKING 1. Unpack the slicer immediately after receipt. If the machine is found to be damaged, save the packaging material and contact the carrier within fifteen (15) days of delivery and immediately contact your source of the equipment. You have no recourse for damage after fifteen (15) days of receipt. 2. With the slicer you should receive: wall chart, lubricating oil and an instruction manual. Contact Globe or your local supplier if you did not receive all of these items.
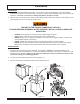
Installation INSTALLATION OF SLICER ON THE STAND BASE USE AT LEAST TWO PEOPLE TO LIFT SLICER UP TO OPERATING LOCATION. NEVER ATTEMPT TO LIFT SLICER ALONE. 1. Make sure stand base is level and that all three feet are correctly level on the ground (Figure 8-1). MAKE SURE THAT ALL SLICER FEET ARE POSITIONED ON TOP OF THE STAND BASE. NO PART OF THE SLICER FEET SHOULD HANG OVER STAND BASE. Figure 8-1 9. Refer to the procedures outlined in Cleaning & Sanitizing section to clean the slicer before use. 10.
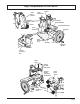
Installation 7 INSTALL FLYWHEEL AND OPERATING HANDLE Note: 32 In order to transport the slicer, the flywheel operating handle and the flywheel is packaged uninstalled. 1. Move the carriage (5) as near to the operator as possible (Figure 9-1). 31 30 4 x 5 Figure 9-1 2. Remove the taper pin (30) from the flywheel shaft (31) (Figure 9-2). 3. Use a hammer to tap the taper pin (30) out of flywheel shaft (31). 4. Install the shim (32) on the flywheel shaft (31). 7 Figure 9-3 6.
Installation 7. Tighten the flywheel (7) to the flywheel shaft with the screw (7a) (Figure 10-1). 7 10. Insert handle (6) on pin (35) (Figure 10-3). 11. Tighten the handle (6) on flywheel (7) with screw (37). 3 7a 37 6 35 4 Figure 10-1 8. Screw pin (35) complete with nut (36) onto flywheel (7) (Figure 10-2). 9. Turn nut (36) clockwise to secure pin (35) to flywheel (7).
Operating Instructions SHARP KNIFE BLADE TO AVOID SERIOUS PERSONAL INJURY: • • NEVER touch slicer before reading and completely understand everything in this instruction manual. You must be at least 18 years old and have had proper training and authorization from your supervisor. ONLY install slicer on a level nonskid surface that is nonflammable and is located in a clean, well-lit work area away from children and visitors. • NEVER TOUCH KNIFE.
Operating Instructions 3. Position the food product to be sliced on the product holder (4). 16 4. Use the pusher vertical slide lever (10) to adjust the pusher (3) to hold product in place (Figure 12-1). 4 12 3 10 11 Figure 12-3 SLICING THE FOOD PRODUCT BE ALERT. The next step will expose the knife. 4 Figure 12-1 Failure to hold the food product firmly in place on the product holder with the pusher could cause the machine to cut uneven slices. 1.
Operating Instructions 4. Hold the handle (6) to turn the flywheel (7) clockwise in order to begin knife (16) rotation and movement of the product holder (4) (Figure 13-1). DO NOT turn the flywheel (7) counter-clockwise. Serious damage to the slicer can occur. 5. Turn the flywheel handle (6) 4 to 5 times in order for the food product to touch the knife (16).
Operating Instructions 8. Turn the product holder operating handwheel (12) or fast forward knob (11) clockwise to move the product holder (4) away from the knife (16) (Figure 14-1). 9b 9a 9 9c 11 12 Fig. 19 9a 13 4 9 16 Figure 14-1 9. Pull the slice thickness knob (13) out towards operator and turn counter-clockwise to zero (0) until it stops. BE ALERT. The next step will expose knife. Figure 14-2 13.
Cleaning & Sanitizing SHARP KNIFE BLADE TO AVOID SERIOUS PERSONAL INJURY TO THE SLICER OPERATOR AND CUSTOMERS: • NEVER touch slicer before reading and completely understand everything in this instruction manual. You must be at least 18 years old and have had proper training and authorization from your supervisor. • BEFORE CLEANING, SERVICING OR REMOVING ANY PARTS, turn slice thickness knob counterclockwise until it stops. • NEVER attempt to remove knife or knife ring guard from slicer.
Cleaning & Sanitizing DISASSEMBLY & CLEANING 1. Remove the grease collection pan (18) (Figure 16-1). 3. Place all removable parts in a three compartment sink with warm water and a mild detergent solution; soak, clean, and thoroughly scrub all surfaces using a solution of mild detergent and warm water. Removable parts include: product holder, pusher, slice receiving tray and knife sharpener.
Cleaning & Sanitizing 7. Carefully insert the cloth between the knife (16) and knife ring guard (14). While holding the cloth between knife(16) and knife ring guard (14), work it along the inside surface of ring guard (14). Repeat this procedure as necessary (Figure 17-1). REINSTALL REMOVABLE PARTS 1. Reposition the product holder (4). 2. Place the product holder (4) complete with pusher (3) on the carriage (5) (Figure 17-3). 4 5 Figure 17-3 14 3.
Cleaning & Sanitizing 4. Install the slice receiving tray (1). Tighten two screws (1a) that fasten the slice receiving tray (1) to the retaining clips (1b). (Figure 18-1). 1 18 Figure 18-2 1a 1b 1 Figure 18-1 5. Install the grease collection pan (18) (Figure 18-2).
Knife Sharpening SHARP KNIFE BLADE TO AVOID SERIOUS PERSONAL INJURY: • NEVER touch slicer before reading and completely understand everything in this instruction manual. You must be at least 18 years old and have had proper training and authorization from your supervisor. • NEVER touch rotating knife. • ALWAYS keep hands clear of all moving parts. • ALWAYS turn slice thickness knob counter-clockwise until it stops and pull product holder completely towards you before sharpening.
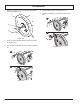
Knife Sharpening 6. Turn the handwheel (12) or the fast forward knob (11) clockwise to move the product holder (4) away from the knife (16) (Figure 20-1). 7. Loosen the knife sharpener knob (38) holding the knife sharpener (17) in place (Figure 20-2). 8. Lift the knife sharpener (17) up and turn 180° (Figure 20-3). 9. Carefully lower the knife sharpener (17). The knife (16) will automatically be centered between the two grinding wheels (Figure 20-4). 10.
Knife Sharpening Do not exceed 1 or 2 knife revolutions in order to prevent the knife edge from springing back, creating a reverse burr. 11. Turn the flywheel handle (6) clockwise and press the “X” button to perform about 20 to 30 knife revolutions (Figure 21-1). 12. Stop turning the flywheel handle (6) to stop the knife rotation. Use a pencil to check that a slight burr has formed on the knife edge. 14. Return the sharpener to its original position. 13.
Inspections, Simple Maintenance, and Repair SHARP KNIFE BLADE TO AVOID SERIOUS PERSONAL INJURY: • NEVER touch slicer before reading and completely understand everything in this instruction manual. You must be at least 18 years old and have had proper training and authorization from your supervisor. • BEFORE CLEANING, SERVICING, OR REMOVING ANY PARTS always turn slice thickness knob counter-clockwise to zero (0) until it stops. • NEVER TOUCH KNIFE. Keep hands and arms away from all moving parts.
Inspections, Simple Maintenance, and Repair LUBRICATION 3. Apply 2 to 3 drops of lubricant to the product holder (4). Various slicer parts need to be lubricated periodically using Globe oil. Globe oil is a light, tasteless, odorless mineral oil that will not contaminate or impart odors or taste to sliced food products. 4. Turn the product holder operating handle (12) or fast forward knob (11) to move the product holder (4) back and forth 3 to 4 times.
Inspections, Simple Maintenance, and Repair Oil Chain. Every 6 months proceed as follows: 1. Lift the slicer and apply 3 to 4 drops of the supplied lubricant to the oil chain (19) (Figure 24-1). Do not use vegetable oil. 2. Wipe excess lubricant with a paper towel. Knife Sharpening. 1. Sharpen the knife (16) periodically or at least once every 6 months as described in Knife Sharpening.
Intentionally Left Blank
Troubleshooting Guide PROBLEM CAUSE SOLUTION Difficulty in slicing; excessive resistance when the product is in contact with the knife. Dull Knife. Sharpen the knife. Product is overly mature or too dry. Tenderize product before slicing. Slicing begins with product in contact with the knife. Turn the flywheel handle 4 to 5 times before the product touches the knife. Slices are of irregular thickness. The pusher fails to secure the product correctly.
Intentionally Left Blank
Limited Slicer Warranty Globe Food Equipment Company (“GFE”) warrants to the original purchaser of new equipment that said equipment, when installed in accordance with our instructions within North America and subjected to normal use, is free from defects in material or workmanship for a period of two years on parts with a lifetime guarantee on stones in the sharpening system. The labor warranty is one year from installation or 18 months from actual shipment date, whichever date occurs first.